Monday, April 6, 2026

Still Around: An Update Of What I Have Been Doing


 Hi everyone. It has been a few years since I have posted here. Although I have been crafting off and on. I no longer use a Silhouette cutting machine. I now have a Cricut Explore 3. It has its pros and cons. 

With the software I have been learning how to take a single layer and turning it into a layered file. The owl was a single layer, and I turned it into this layered image which I used on a card. Unfortunately, it has gotten too expensive now to mail layered image cards. 🙁


I have also been learning how to turn layered files into print and cut. The bunny in this card was a black and white line drawing. I turned her into a layered images and then a print and cut image. She has a wobbler which I had to trim a little. The flower border turned into a print and cut. The Happy Easter done with an offset. The butterfly was a file I added layers to a few years ago when I was learning how to layer. I turned all but the top layer into a print and cut.


I have also been learning sublimation. Sublimation is done with a printer that uses a special ink, or special sublimation or infusion products as Cricut calls them. The products are either transferred to copy paper or a special paper and then the image transferred to items which will take the ink and heat. Doing sublimation can become an expensive hobby. 🤣


Mugs and tumblers require special equipment to heat transfer the ink. Once the image is transferred it is permanent. This is a mug I did for my youngest granddaughter who is a horse girl. The cost of the sublimation mugs are not cheap so I always am a little scared doing them. The horse was printed onto special paper using my sublimation printer. The paper wrapped around the mug and then the mug put in the mug press. I was pleased that the mug came out perfectly.


Images can also be transferred to fabric. Either Muslin or Polyester. I wanted to take the image which was originally a layered one which I turned into a print and cut and do a test transfer onto Muslin. The colors with the sublimation ink look different until they are heated. Also, how long heat is applied can make a difference in how the colors will appear. I was pleased the way the test piece turned out so adhered the fabric to card stock before placing it on the front of a card base.


Besides crafting I added to the family a dog who was supposed to be a senior dog, but the owner brought over a one year who I couldn't resist. She has now been with me for a couple of years. This is Miss Sadie. She is a Siberian Husky/American Pitbull mix with a small amount of Lab and German Shepherd mixed in. Her favorite thing is unmaking the bed and making a nest on the floor. In this picture she thinks I was going to take her new toy away. I said out loud "What was I thinking buying a toy with a squeaker." She went into immediate protective mode. 


Enough of a novel for now. I will try to post more often. Have a Blessed week and thank you for taking the time and reading.


Tuesday, December 27, 2022

Happy New Year Vintage Champagne

 I know I have been missing in action for several months. I lost interest in crafting for a while plus had a lot to do with the house. She now is sporting a new roof after hassling with an insurance adjuster. One of the famous windstorms in this area tore off over half the shingles. Instead of just a gutter over the front door she now has seamless gutters. Just this May she got new siding, and the gables have fiber cement shingles. Luckily the painting crew were able to come and paint the shingles before the cold and snow arrives. I was also busy doing some much-needed landscaping. Plus, sorting and decluttering. There is a ton more to do. Especially in my craft room. O.K. enough of my rambling and onto my New Year's card.


I took a vintage image from The Graphic Fairy and cut it into a shape. Did an offset for my mat. Cut out some extra flowers to add to the bottle and the mat. It doesn't show in the photo, but I used clear Dimensional Magic on the bottle. Where some flowers were on the bottle it didn't look right so covered over with my cut flowers. I used Dimensional Magic with gold glitter for the Champagne geyser. The blue mat is actually plastic-coated glitter cardstock, so it is sparkly. There you have it my first New Year's card. I am now working on more with vintage images.

Wishing you Happy Frugal Crafting and a New Year full of abundance of blessings and inspiration.


Tuesday, April 27, 2021

Arches

 Hi everyone I created this a few months ago and just now getting around to sharing it. This was done for a inspiration piece. 


This is a 4 x 5  inch card. My biggest challenge was to get the arch frame the correct sizes. I have a couple of ones which were the wrong size which I am sure will find their way into other works. I used a Craftwell embossing folder for the background on white card stock. Then took a cotton ball and my kaleidoscope ink pad to color the embossed piece. I didn't have gold card stock but Deco Art Metallic Gold worked perfectly. It is a thick paint not runny and dries quickly so the card stock did not curl. My image is a freebie from Graphic Fairy.

Do come back as on the 4th I have another creation to post for Marvellous Mini Masterpieces.

Happy Frugal Crafting till we meet again! 


Friday, March 5, 2021

Thinking Of The Ocean

 Hi everyone. The current Marvelous Mini Masterpieces had me thinking of the ocean. I miss not being close to the ocean anymore but sometimes sacrifices have to be made if you want to be close to family.

 I would love to have you join in the challenge. Or to at least join the group for inspiration. There are awesome works of art and not just paper. Marvelous Mini Masterpieces


Using the color palette this is what I came up with. I took a seashell stencil and used it to emboss on a piece of cardstock. If you emboss with stencils you may have to play around with your sandwich but it can be done. I rubbed chalk over to pop the shells. 

The seahorse is a Just For Fun stamp. I stamped on a scrap piece of plastic with Stazon ink. As far as I know Stazon ink is the only ink which will not smear. I turned it over and glued tissue paper. When the glue was dry I colored with markers. It is actually more translucent than it appears in the picture.

I embossed with a dot border folder for bubbles a scrap of page protector. Alas I forgot that my tape glider shows the adhesive through the plastic. I ended up having to double frame and lost some of the dots. I took a frame which was the wrong size for a previous project. I sprinkled two colors of Brusho on my mat and spritzed with water. Then dragged the frame through the colors. It is fun to see what you get as it is never the same. 

Off to organize my new craft room more and to start work on April's design project. I have two projects done for later this month. So if I don't post before I will be posting sometime after the 15th so stay tuned. Wishing you Happy Frugal Crafting!

Sunday, February 28, 2021

Another Mini Masterpiece And Experiment

 Hi everyone. I have had so much fun playing with Marvelous Mini Masterpiece mood boards that I did the other team's challenge. Since it was an extra my day to post was today the last day of the challenge. Do check Mini Marvelous Masterpieces out as there will soon be a new challenge up. Mini Marvelous Masterpieces

Enough of my yapping. I know you can't wait to see my masterpiece. A card topper. I am pleased the way it turned out. Especially since I wasn't sure my handmade paper would work with torn pieces of tissue paper and white glue instead of acrylic floor wax.


I love the color palette which was chosen for this challenge. As well as all the leaves and ferns on the mood board. There were hatches on the lower right hand corner of the mood board which reminded me of dragon flies. Being the frugal crafter I am everything was made using scraps. Including my hand made paper where I used tissue paper which had been used in a gift bag. Did I mention I am a hoarder.

Thank you for stopping by. Do come back as sometime before the 15th of March I will have another Masterpiece to share. In the meantime I have April's challenge inspiration piece to work on.

Wishing you Happy Frugal Crafting till we meet again!

Sunday, February 21, 2021

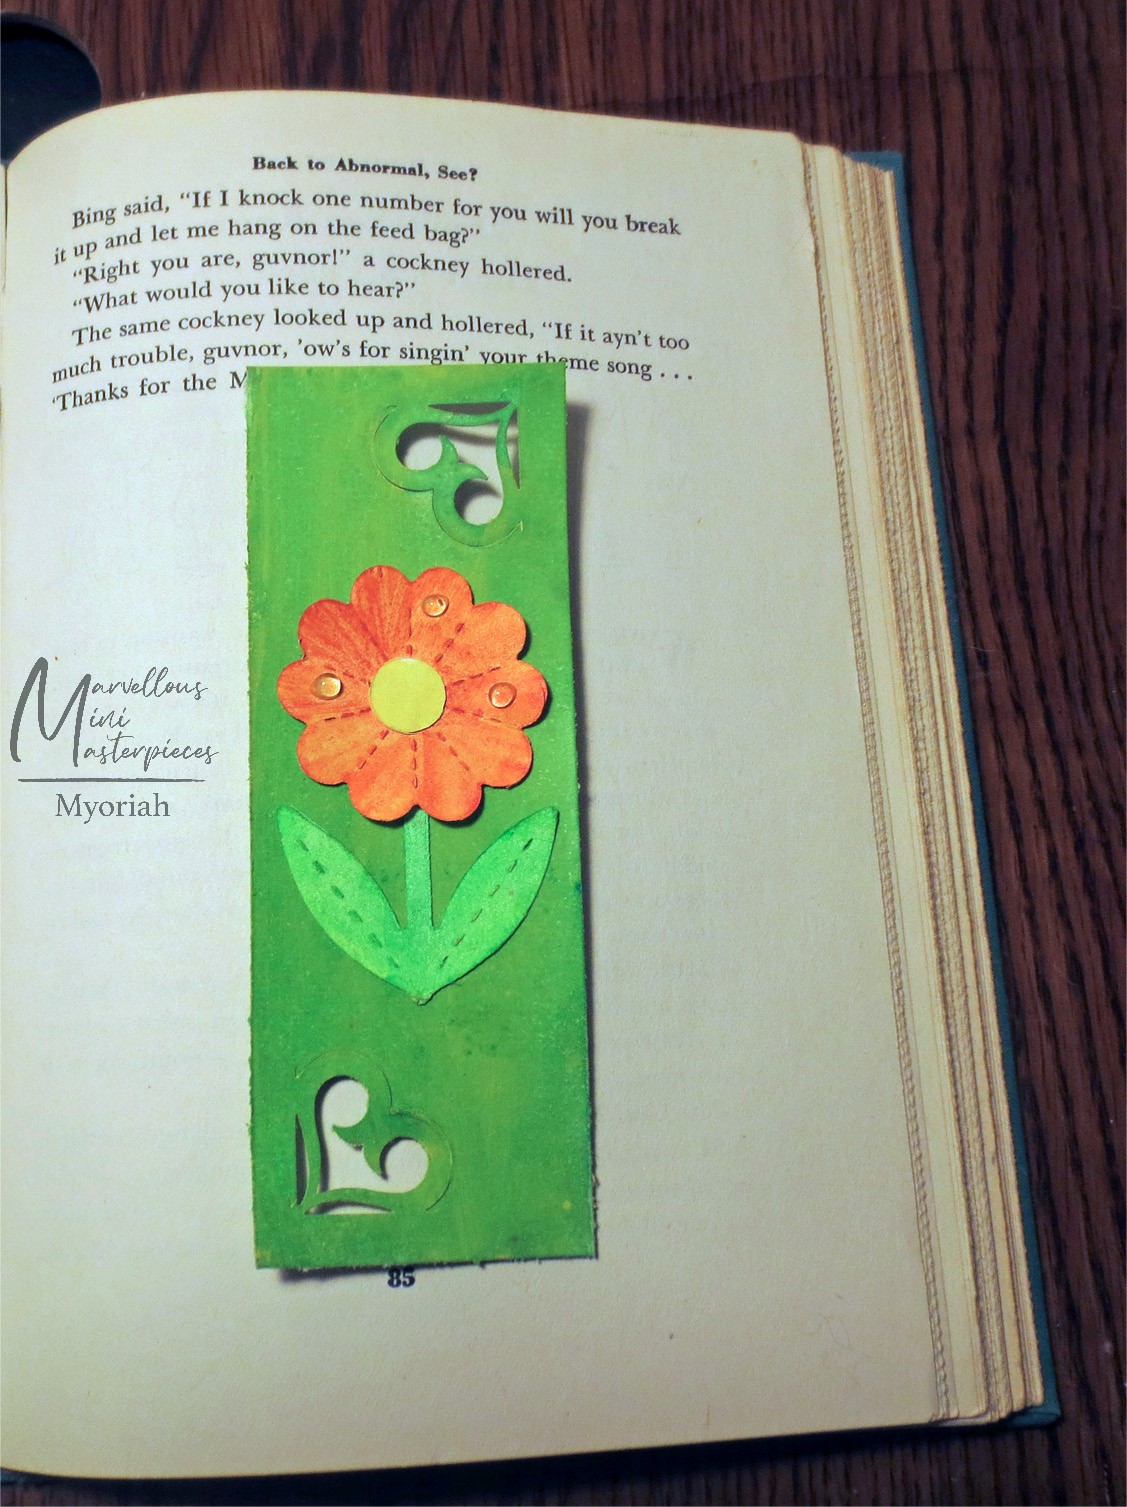
Simple Bookmark

 Hi everyone I  just realized I did not post my simple bookmark for the last challenge. I was having computer problems and it slipped my mind. Although this challenge is over there is another one going on which I will posting on the 28th. Check Marvelous Mini Masterpieces out. There are fabulous inspiration pieces. Marvelous Mini Masterpieces


This bookmark was done with scraps and watercolor paints. The die cut I used was an old foam one with blades embedded and all one piece. I used a scrap of 110 white card stock since I was using my water color paints. The inexpensive Georgie Pacific 110 doesn't seem to curl as bad like other card stock when wet.  The base was a scrap of texture green which I used water color paints on to get closer to the color palette. My corner punch had been gathering dust so I decided to punch two corners. The right hand one allows the bookmark to be clipped on the page. I sent this to my sister for Valentine's day and she loves it.

Hope to be back soon with some more projects. Unfortunately right now I am cleaning the utility room so a new water heater can be installed this week. For now I am camping boiling water.

Happy Frugal Crafting till we meet again!

Wednesday, February 10, 2021

Slim Valentine Card

 Hi everyone I hope you are staying warm if it is cold where you are. Right now I am in bed with covers wrapped around me waiting for the house to warm up. Thank goodness for laptops and cellphones.


I decided to try my hand at making a slim card to go in a regular business size envelope. Since Valentine's will soon be here I made this Valentine for my sister. Hopefully the mail will get to her in time. If not at least she and her husband will know they are loved and thought about.


The image is from Fairy Graphics. It was originally black and white but I colorized it in Silhouette Studio. Sometimes I like something quick and easy. So I let my machine cut out the hearts. 


Thanks for stopping by. Happy Valentine's Day. Wishing you Happy Frugal Crafting till we meet again. s

Sunday, February 7, 2021

First Marvelous MIni Masterpiece


Hi everyone I am excited to share today my first project for the Marvelous Mini Masterpiece design team.

This is a Facebook group with fun challenges. You can go strictly with the color palette or also use a mood board. The only rule is your project can be no larger than 4 x 5. I went for the colors and the stones in the mood board for my card topper.


The lady is cut out of a printed image that I downloaded from Dover years ago. Alas I don't think they are offering their free samples anymore. I collect feathers on my walks so snipped a section of one for on her hat. She is pop dotted on the card stock.

 The dragonfly and foliage were cut from scraps. Both were cut using dies I bought at a thrift store and I don't think they are available anymore. The pathway was another scrap from a project a few years back. Yes, I am a hoarder of bits and pieces. I rubbed chalk over the embossing to mimic the stones in the mood board. The fence a scrap embossed with a wood grain folder. Then gel stain rubbed over it and carefully wiped off  so as not to rip the paper.

The sky was chalked for like a sunset. Unfortunately my camera washed the color out a little bit.

I hope you will join the group and craft a masterpiece. Here is the link :Marvelous Mini Masterpieces

Thank you for stopping by. Wishing you Happy Frugal Crafting till we meet again!

Monday, January 4, 2021

Celebrating The New Year In Style

 Hi everyone,

I spent a fun weekend putting together this card for the New Year. I love this image which showed up in my inbox from Graphic Fairy Friday. It is a black and which image so I didn't have to convert it. 


I decided to make a Dutch Door card but didn't take into account that the image printed on photo paper would be too flimsy. I ended up having to cut out a piece of card stock the same size and round the corners to adhere to the back of my image.

It was fun coloring the image with color pencils and chalk. Then using Dimensional Magic with gold glitter for the champagne bubbles. She is celebrating the New Year in style but perhaps had a little too much of the bubbly.

For a Dutch Door card you will need one panel the size of the card you are making. For my card I cut my card stock to 4 1/4 " by 5 1/2". I thought it looked too plain so went ahead and embossed  a piece and after swiping ink over it glued it on top. I cut a scrap of glitter card stock to 3 1/2" by 8 1/5. Scored it at 4 1/4" and glued it to the embossed panel. You will want your image to be larger than the folded card stock. I printed mine out as a 3 x 5.

Happy Frugal Crafting until we meet again!


Sunday, January 3, 2021

Never More Than A Loving Thought Away

 HI Everyone I am back to crafting again. I am slowly turning the spare bedroom into a craft room now that my friend has moved out. The converted garage was too cold and I want to convert it back to a garage so that my car is out of the weather.

Here is a card I created for my friend for Christmas. I used photos from out favorite hiking place. Of course the dogs had to be included. I actually think he misses the dogs more than me.


Ignore the crappy counter the card is sitting one. I haven't set up a spot yet to take pictures. I also have not found where my good camera went. It is in the house somewhere.


The photo doesn't do this card justice as it is really sparkly. I used plastic coated glittered card stock for the card base and a scrap of a different color for the frame. It has been so long since I have used my cutting machine it took me a minute to remember how.


The photo the dogs are on was taken one winter in black and white mode. I always liked Ansel Adam's black and white photography so was playing around one day. 


With a stiff brush I pounced on heavy matt gel where the snow is in the picture. Then while still wet I sprinkled white coarse glitter over it. I gave the tree trunks definition using a brown marker. I loved how it turned out coloring on photo paper with a marker. The boys were sitting on a wall and the photo was in color. Alas my color printers have all died so I had to convert the photo to black and white. Which is alright as the boys are black and Buddy has a lot of white fur. I cut them out and then adhered to the back side of the frame before adhering the frame to the background. 


My friend loved his Christmas card and I purposely did not do a holiday sentiment on the outside so he could display it all year long if he wished.


I am busy working on New Year's card. Right now waiting for Dimensional Magic to dry so I can finish one.  Stay tuned as I will probably be posting it this week. 


Wishing you a Happy New Year as well as Happy Frugal Crafting! 

Thursday, September 17, 2020

Butterflies Are Everywhere

 Hi everyone. I totally forgot last month to post my butterfly wall. Butterflies are just about everywhere in my house. I even found curtains for my kitchen and dining room which have embroidered butterflies. 

My butterfly wall in my living room though is my favorite. The different butterfly images and butterflies themselves have been collected over decades. My most recent butterfly though is a wooden one I found at Dollar Tree and painted. I used a photo of a butterfly that is found in the rain forest for the colors. Since the butterfly did not have an antennae  I used black wire I had on hand. In the second picture I haven't done a couple of pictures using die cut butterflies yet to go on the plate rack. 


Wednesday, September 16, 2020

Paint Stir Stick light fixture

 Hi everyone sorry for being missing in action. I haven't done much crafting lately. You would think with staying at home I would get a lot of crafting done. However, this house is taking all my time. Finally got the living room, dining room and kitchen walls painted. Boy did they need it. And last week finished painting the trim in the dining room and kitchen. What a difference it has made. Especially since I patched where hardware and doors had once been before painting. Not to mention a bunch of holes. I think a kid got a drill for Christmas and had to try it out.


O.k on to my paint stir stick light fixture. A friend had screwed a motion sensor light on scrap lumber and had it as a bridge between the two cupboards on each side of the sink. Needless to say it looked hideous. Here was my solution:


I cut off a piece from the scrap lumber. Painted the scrap and four paint stir sticks black. Drilled a hole in the scrap for wire to go through for hanging. It doesn't show up for some reason in this photo. I stenciled the sticks with gold paint. When dry I nailed the sticks to the scrap. Threaded the wire through my hole and made a loop. Then used double stick mounting tape to attach the light. There was already a hook above the sink. Now in the middle of the night if I get up to get a glass of water the light comes on. 


My next paint stir stick project is making a faux swag light for my living room. It will be constructed a little differently and use six led remote puck lights which can be dimmed.


Happy Frugal Crafting till we meet again.

Tuesday, December 17, 2019

Vintage Book Page Christmas Card

Hi all! The month is quickly flying by and before we know it Christmas and the other winter holidays will be here. If you have been procrastinating making cards you still have time. In fact you may want to mail your cards for Epiphany so people can enjoy them.

When this angel image showed up in my inbox from Graphic Fairy I knew I had to create a card using it. I also knew it would be perfect for a card for  my sister who was the dark hair sibling.

People often ask where I get my inspiration from. The book page background comes from a Christmas ornament I saw where someone had mod podged torn book pages on. Hopefully I will have time to do that with some of my shabby ball ornaments. For those who are worried about tearing apart a book you can often get books for a few cents or even for free at your public library.  You can ask your librarian what they do with books which are damaged beyond repair.

I tore out a couple of pages and tore them in pieces. If you are stressed from holiday preparations this is a good way to get rid of some of that stress. I adhered the pieces on card stock and then edged my panel with Distress ink. I printed two images so I could cut the angels out of one and pop dot the wings and adhere the rest of the angels flat. Although it doesn't show in the photo this is a good way to give dimension.

Will try to do a post on some decorations you can quickly do. If I don't find my "Round To It" have happy Frugal Crafting and Happy holidays whatever holidays you may observe.

Thursday, December 5, 2019

Entry Makeover & Holiday decorating

Hi all I haven't been crafting lately and if you saw my craft area you would understand plus it is an icebox. In fact I had to turn on the heater just so I could get out some Christmas decorations and do some sorting. I am still looking for a missing box of Christmas decorations. Since it has the ceramic Nativity set I am sure I probably tucked it away somewhere safe. My roommate said I probably placed it in his closet since he only hangs his clothes there.

In the meantime I have been working on my house. The biggest project has been the entryway.
Before tackling the entryway I started with this area which leads to the entry and is off the living room. For months I looked at green paint chips and couldn't make up my mind. I finally decided to give "Farmer Road" by Glidden a chance. The wall is textured and it took two coats and a good half gallon just to paint this small area. Since lighting is sparse and no overhead light I went in search of a swag light.  I will be redoing the electrical cord going down the living room wall to an outlet. I found this Swag light by Better Homes and Gardens. It must be popular because WalMart was always out of it in my local area. There was only two left in stock when I ordered it online. I splurged and got the vintage led bulb.  Right now I am working on a shelf which will go under the picture on the wall. My black metal decorative shelf brackets will finally come out of hiding since I can use anchor screws. One advantage to having your own place. No one cares what color you paint  or how big of holes you put in the walls.I have a piece of outer corner molding stained and ready to install. I am lazy and trying to patch the corner was more work than I wanted to tackle.


I have always wanted a crystal chandelier in my entry. I think they add a touch of class.  I found this mini chandelier and it is perfect. It took longer to shorten the chain and fight with the thick 12 gauge wires in the junction box than to put all the crystals on it. Luckily when it comes time to put thin sheet rock over the popcorn ceiling it will be easy to loosen the canopy. I love the shadows on the ceiling as well as the vertical stripes the fixture creates. 


Last year I had taken off the closet door and taken the long clothes rod out as my entry bench would not fit in the area and no room in the rest of the space for it.  I decided to use the left over green paint in that area.  I put a small rod in for coats. There is enough space on the rod for me to hang guests coats. The metal shelving unit fits perfectly angled and houses hats,gloves, knit scarves and of course a basket of dog treats and the dogs many sweaters. Not as many shelves as the bookcase I had in that area but not as heavy looking. Eventually I will sew a cover for the bench cushion and maybe make some pillows for when it is not holiday time. First though I need to un-bury the sewing machine. LOL!


This is the view as you enter the front door. Note to self do not be deceived by a small area. I spent hours taking two layers of vinyl flooring off and then many more scraping the old glue and sanding the floor before putting carpet tiles down. The carpet tiles are now both in the main area and the nook. Carpet has made a big difference in the temperature of the room and also a lot quieter. I have extra tiles in case I need to replace some in the future. 

Until I can find and afford draw drapes the two back to back panels hanging from a tension rod works. Not only does it help keep cold  or heat from entering the main area but it also provides a little bit of mystery. I felt putting a door back up would make the room claustrophobic looking.


This is the view from the nook area.  JR approves of the flooring as it is warmer while waiting for mom to come back home. I have the base molding to cut and stain but already there is a 100% improvement in the area.

I am trying to decide whether I want to paint the living room before the Holidays or after..I do want to get some organizing done in  the laundry/storage room as well as the sewing room and craft room.  It is long overdue.

Anyway it is beginning to look like Christmas around here. I have some decorations outside and the tree in the living room. But not decorated as the missing box has the tree decorations.

If for some reason I don't post before the coming Holidays wishing you and yours Happy Holidays. And Happy Frugal Crafting.

Thursday, October 3, 2019

Easy Frame Makeover

Hi I am still alive and kicking. I have been busy cleaning, organizing and lots of other things. Unfortunately the blog has been placed on the back burner along with crafting. However, I have had a frame project photo on my camera for a few months which I haven't blogged about. This was a fun project to take a wooden frame and use paint, foil, hot glue and buttons to dress up a frame for a card my sister made for me. I love how this frame turned out and would love to do some more but I have too many other irons in the fire.


I started by drawing lines with a hot glue gun onto the frame. Then hot gluing different size buttons with some of the buttons with raised lips. The color of buttons doesn't matter as they will be covered with foil. I then wrapped the frame with strips of foil. gluing the edges of the foil  down. In this case you don't want to be a perfectionist as the foil crumpled adds to the effect. Paint the foil and let it dry. Then if you wish you can do like I did here and paint another color of top. While the paint is still wet wipe some of the paint off with a damp paper towel. Let dry and you have a one of a kind frame.

This is my newest project. I have had this wire waste basket for years and thought it was time to jazz it up. So now I'm weaving yarn through the holes. Not sure how it will turn out.. I hope it will add a pop of color in my living room.

Happy Frugal Crafting until we meet again!

Wednesday, January 2, 2019

Sew Sew Days

Hi everyone I've been busy playing with my embroidery/sewing machine. There is a lot to learn. Lol! Took me a few minutes to figure out how to wind the bobbin as well as how to import embroidery patterns. Anyway I thought I would share a couple of Christmas gifts I made.


I had fun cutting fabric into strips and making this quilted heart. I learned after I embroidered Love that I should have used fusible interfacing so the fabric underneath didn't show through when I adhered it to my quilted front. It has been a long time since I have done hand stitching with embroidery thread but felt like the heart applique needed something. I was going to hand sew beads around the heart but found this bead trim at WalMart. My dancing diva loves the pillow her grandmother made her. 


This is a sketchbook I covered with fabric. When you open it up there is pockets for putting pens, pencils, ect.  The butterfly was machine embroidered on a scrap of dotted fabric.  Now that I know how to make covers with inside pockets I can't wait to make some covers for composition notebooks for gifts.


This is my psychedelic butterfly. I had variegated thread  on the machine and decided to see how it would turn out. The fabric puckered even though I loosened the thread tension so after doing research I have a few things to try.

Wishing you  a Happy and Crafty 2019!

Tuesday, November 27, 2018

"Take A Mini Vacation Read Fiction" Bookmarks

Hi everyone I belong to a fiction book club and when last week in my Dover Sampler e-mail a vintage ad image showed up I thought it would be fun to turn it into a bookmark.  I decided in the blank space to put the words "Take a mini vacation read fiction".  Since some people are not talented enough to read upside down to have the book in the woman's lap upside down. Here are a few of the bookmarks which after I chalked the background and colored with pencils the image I laminated. I had so much fun with my pan chalks and pencils doing different color combinations.


Time to head out to the book club and deliver these. Wishing you Happy Frugal Crafting till we meet again!

Saturday, November 17, 2018

Thanksgiving Quick Napkin Cards

Hi everyone I'm busy clearing off my sewing table and getting ready to create some Christmas gifts. I thought I would share with you quick cards you can create using napkins.

Originally Carol Duvall on the television show in the 80's " Home" shared this technique using napkins to make note cards. It was fun to watch her craft segment.  At your public library you may be able to pick up her book. Sorry I don't remember the title.

There are all kinds of inexpensive napkins available. After a napkin is ironed on card stock you could even cut out a portion.. Enough jabbering.


After you have picked out your napkin you will want to carefully remove layers until you have single ply. Save the pieces you pull off as you can use those in another project. Then cut a piece of inexpensive plastic wrap to size. (I'm still using plastic wrap given to me years ago when I did Press N Seal demos to show how superior it was to generic plastic wrap. LOL!) First place parchement paper or copy paper on your ironing surface  then your card stock. On top of that the plastic wrap. Then position your napkin. Place parchment paper or copy paper on top. Using no steam iron by placing down the iron and let it sit and move to another area. Do not iron like you would normally do in the beginning or you will have a mess. Once you have checked and the napkin seems to be fairly secure you can iron like normal. At this point I like to turn my card stock over and iron like normal to make sure the plastic has welded the napkin onto the card stock. 

The card on the left is a panel. I edged with ink and the ink bleed some but I like that look. The card on the right the right corner wrinkled so I decided to be frugal and do some creative cutting and use  a scrap of burlap on my base. 

Have  fun and if you decide to do this technique share a link in the comment section so I can admire your creation.

Thanks for stopping by. Wishing you Happy Frugal Crafting till we meet again!


Sunday, October 28, 2018

Here We Come A Caroling

Hi dear readers as much as I love to get inky and stamp there are times I need to use digital images since I either don't have an image of what I want to use or it is the wrong size. In this case it was the fact that the only caroler stamp I have is of snow people which right now I am not sure which box the majority of my wood mount stamps are in.

Sometimes I don't like how a card looks when I photograph it which is why I now use re-positional adhesive so I can change things if I don't like the arrangement. In this case though I basically ended up adding more detail.


Except for the stars and tree the images are from the Melonheadz Christmas Caroler set. I wrapped gift ribbon around the lamppost and crotchet thread around my tree. My sidewalk was card stock airbrushed since I don't have gray card stock and then a stencil used.

I was experimenting with rubbing alcohol and paint again for my background. I had bought Prussian Blue paint at a thrift store and when I opened it the paint was really liquidity which no amount of shaking changed. I painted my canvas paper and then while the paint was wet splattered rubbing alcohol over it. I didn't like how it looked so misted my paper and took a house painting brush and swiped over it. I love my result. I can see a lot of potential using thin paint and rubbing alcohol.

What techniques have you tried lately?

Wishing you Happy Frugal Crafting till we meet again!

Monday, October 22, 2018

Stopping By The Woods

Hi my dear readers. Ever since I learned about poetry at an early age Robert Frost has been one of my favorite . My favorite poem by him is "Stopping By Woods On  Snowy Evening". I decided to make a card based on that poem. Although my Just For Fun stamp has more than one person in the sleigh.


I tried a alcohol technique and it didn't work. Being the queen of frugal I went ahead and painted my forest on the dark blue background.On the bottom of my background I applied heavy gel and fine glitter. I didn't realize that if the heavy gel is put on too thick that it will crack. In this case it was a happy accident. I cut out my frame and used my airbrush to color it.

My stamp was being stubborn and I was ready to throw it out. Then I remembered about putting down a piece of foam underneath so took the stamp off the stamping platform and stamped. I decided to leave the image as it was without coloring. I also decided that the horse peeking over the frame would give more of an idea of motion.

I'm happy the way this card turned out. Sometimes I have an idea but never really sure what the outcome will be.  Sometimes also a card will evolve while I'm working on it.

Wishing you Happy Frugal Crafting till we meet again!