Sunday, May 24, 2015

Mojo Monday Challenge 398

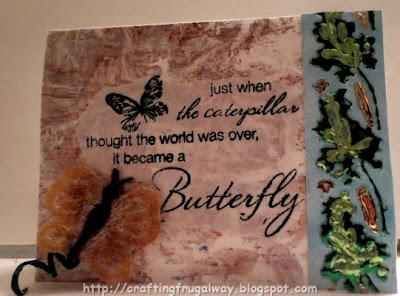
Hi everyone! Here it is the weekend again and for some people it is a three day weekend. For those who do not know http://mojomonday.blogspot.com/ has a card sketch challenge every Monday. As I've mentioned before I don't usually do card sketches but I'm trying to get out of my comfort zone. I have a love hate relationship with my final card. I'm not sure I like my wax paper die cut. I did this morning change out a butterfly for a smaller one and placed it on the ribbon instead of where I originally had a butterfly.
Here is the sketch:
Here is what I came up with:
The ribbon actually covered up the bottom of the die cut border. I like how the background turned out especially the wood grain part. I started by painting the top part of my card stock panel with blue glitter paint. When that was dry I painted the bottom section ivory. When the ivory paint was dry I painted walnut gel stain over it. Let it sit for a few moments and then wiped off the excess. I used the Swiss Dots embossing folder for the blue portion and a wood grain folder for the bottom. In order to not have a line in between the two patterns I ran the folders through individually.


The butterflies were an experiment. The ones on top here I stamped dye ink on wax paper and then added cooking oil. I then smooshed the shapes through the mixture on the wax paper. When they dried I brushed glitter glue on. Doing the butterflies this way each one turned out different. For the bottom one I stamped my ink on wax paper and then dipped my brush in the oil then in the stamped ink. This allowed me to get color where I wanted it.

I airbrushed with a gold sharpie my wax paper die cut as well as the ribbon. I'm thinking I should not have been so stingy with the ribbon pennants on the top after looking at the sketch. My card base was a weird size which is probably why it was on the floor as I originally cut my panel to allow for a border. Since there was a gap at the bottom I used a piece of washi tape.

There you have it my take on the sketch. If you decide to air brush wax paper you need to realize that the air brush side at least using a Sharpie will be tacky so I placed that side down on the card. Also if you decide to do the oil your card stock will become translucent. I originally saw the technique using baby oil and reinkers neither of which I have. Hey I have to do something with the Canola oil I have since I switched to using olive oil ;-)

By the time you read this you probably won't have time to enter this challenge but do check tomorrow and see what the sketch is. Wishing you Happy Frugal Crafting till we meet again!
Sunday, May 17, 2015

Fusion And Lace Card Challenges

Hi everyone! Hope all is well with you. The weekend is almost over and I thought I would share with you a card I made to enter in a couple of challenges. With this card I met two of my crafting goals. Number one to enter more challenges and number two to use my different supplies more often.

When you put card challenges in a search engine it is interesting to see all the challenges which pop up. I decided to go with the Fusion challenge. The challenge can be found Here. What I like about the Fusion challenge is you have the option to use just the inspiration photo or just the sketch. I decided since another goal is to get out of my comfort zone and I don't usually use sketches to do both. Here is the challenge photo.
You notice that I have in my title lace. The other challenge is at Cute Card Thursday. http://cutecardthursday.blogspot.com/ The theme this week is to use lace. I was going to make up a lace rosette but I didn't like how it looked. However, this challenge did allow me to use a piece of lace in my stash.

Here is my card. Let me know how you think I did interpreting the Fusion challenge.
I don't normally create with yellow and gray and as a matter of fact I don't really have a lot of gray and yellow paper crafting supplies. Thank goodness I do have things like an air brush, paints, as well as gelatos.  Of course it was also nice to discover in a recent bundle of dye ink pads I bought there was a gray ink pad.

In my stash I was lucky to find a card base already made which is charcoal gray. My top panel was an experiment which went wrong but I was able to salvage it by placing a piece of tissue wrapping paper which I had mopped up excess paint with over it. I used the gray ink to stamp words from I Brake For Stamps Music Quartet set.  I messed up stamping in the black so painted over it with Iridescence paint to give the stamping more of a distress look.

For the bottom panel I doodled with yellow and champagne gelatos and then misted with water before running it through my embossing machine. I placed the gelato side wrong in the folder so my piece ended up being debossed but I actually like it better. The folder I used is Anna Griffin Brocade.

When I use two different panels I don't like the raw edges showing so I will usually use ribbon or lace. For this card I did both. I don't have gray ribbon and my lace was white but with the magic of my eBrush air brush and markers they were magically transformed.

The lovely lady is from the I Brake For Stamps Music Quartet. When I saw her I just knew that I had to buy the set. After stamping her with gray ink I cut her out. Then I took my rounder punch and just punched on the one side.

There you have it a card using gelatos which have been gathering dust. A embossing folder I've never used as well as some new stamps which have been patiently waiting to get inky. Along with ribbon and lace which I don't seem to use a lot in my creations.

I will be definitely be checking out more of the Fusion challenges so that I can grow as an artist.  One of my goals is to create little works of art which people may actually frame or at least not look at for five minutes and then toss in the trash.

If you do challenges which ones do you enjoy entering?

Wishing you Happy Frugal Crafting till we meet again!

Friday, May 15, 2015

Fairy Mixed Media Card Challenge

Hi everyone I hope your weekend has started out on a good note. I just finished this card today but my daughter in law had a graduation party tonight so just now getting around to posting.

I have to admit that the wings challenge over at Mixed Media card challenge has been loads of fun. This card was so fun to make as I pulled out things from my stash as well as did experimenting. Details about the challenge and entries so far can be found HERE

I am a tease so I'm going to start with some closeups first of the different elements.
Since the theme of the challenge is wings I decided to use a fairy stamp I recently bought from I Brake For Stamps. After stamping her with Memento Luly Lavender ink I colored her with chalk. I then stamped just the wings on tissue wrapping paper. On top of the chalk coloring I painted Liquitex Iridescent Medium I wish that I could get a photo of the shimmer on the wings. The foot is glued down and then adhesive foam adhered higher up to give the impression that she is really dancing.

The stones she is dancing on were created by using gesso and a texture plate for cake decoriting embedding it in the gesso to make the texture. I then when the gesso was dry airbrushed and took the larger pattern cake texture plate and ran my card through my eBosser. I love how it turned out.

The grass was made from a strip of crepe paper that I  cut down and then cut slits in.


 I saw this Iris in my stash. I had printed the image out when I was trying out my laser printer. Although it was only printed on copy paper I decided to see what would happen if I used water color paints. I took out my Faber Castell pan water colors as the colors are more richer.  I love how they turned out and how I could layer colors. I  also love how the laser ink is waterproof. The Iris is glued only at the bottom under the grass. Which allows it to lean and look more three dimensional.

My background was created using gouache on acrylic paper.  The acrylic paper is thick and has texture. While the gouache was still wet I placed crumpled wrapping paper over it  to pick up some  of the paint and to create texture. I don't know why but for some reason the background reminds me of Van Gough's Starry Night painting.

Here is my finished card.

 
My focal panel is pop dotted to a panel which I airbrushed and then adhered sheer material over. Several years ago I bought a sample book at a thrift shop for sheer drapes. I never really used the fabric though in the book. I thought the softness of the fabric would be a nice contrast.

So what do you think of my wings card?  Do you make cards using lots of textures and techniques?

Now that I was able to make an early purchase of the siphon adapter for my eBrush look forward to me making more cards with mixed media. I can't wait until I have it in my hands to play with.

Wishing you Happy Frugal Crafting till we meet again!


Saturday, May 9, 2015

Another Card For A Couple Of Chalenges

Hi everyone when I saw sitting on the top shelf a stamp of wings with a key I thought it would be good for the Mixed Media Card challenge this month. Also Stampotique has a stencil challenge for this week and when I saw a new stencil on my work space I knew it was perfect to also use with the stamp. I had to do a lot of playing with my stencil border to get it how I was happy with it. I also decided to see if I could give deco foil more of an antique look. Of course since there were more of the dryer sheet left over it had to be used for the wings. Without further ado here is the card.
Originally I was going to use  wrinkled water color tissue paper for my background but alas while I was taking the tissue paper off my water color paper it ripped.  So the next best thing was to use my water color paper. I did think it was too harsh so went ahead and brushed Liquidtex Iridescent Medium over it. The medium didn't really change the original look but did soften the colors. I wish my camera would have captured the sparkle.

I'm not sure who makes the stencil. It was one I found on sale at Michaels. I placed my stencil on card stock and used gesso.. When the gesso was dry I placed the stencil back down and air brushed. Then I decided to use green metallic rub over it. However I didn't like the results with the background so then rubbed gold metallic rub over it. It looked too brassy. I decided to airbrush with the same marker I used for the heart. Yuck! It turned an awful orange color. Figuring I had nothing to lose I used alcohol solution. It dissolved some of the gesso pattern along with the color. It was still too brassy looking though. So I decided to use black shoe polish like I had used on my foil key. Eureka! Instant antique look.  I didn't want my words to compete with the other elements so I printed using clear label tape.

I bought a few years ago this stamp in one of Michaels bins and never used it. I first stamped it on a scrap piece of dryer sheet and then on a scrap piece of card stock. I used my embossing pen on the wings. Alas I discovered that even Ranger Archival Ink smears using an embossing pen. Then I used Star Dust embossing powder. On the card stock  image I used gold Deco Foil on the key part. I used black shoe polish over the foil. Then I cut the key out.

I didn't like how the wings with the key looked on the background so I took a scrap piece of tissue wrapping paper and my heart stencil. I airbrushed that and then cut out the heart.

I invite you to join in one of the challenges.The mixed media challenge which goes until the 25th  http://themixedmediacardchallenge.blogspot.com/. Or the Stampotique challenge http://stampotiquedesignerschallenge.blogspot.com/.

Do you ever use things like shoe polish to give an aged look?

I am having so much fun with the wing theme that I may have to create one more card for the challenge. Especially since I have a couple of fairy stamps.

To my women readers I want to wish you a Happy Mother's Day. Also wishing you Happy Frugal Crafting till we meet again!

Friday, May 8, 2015

Mixed Media Card Challenge #11

Hi everyone I hope you are having a wonderful weekend. Sunny and warm where I live so great weather to go out hiking and picnicking but first I would like to share a mixed media card I made for the mixed media card challenge. This month the theme is wings and foil is an option.

If you have been reading my posts lately you will know I've been playing with Deco Foil.. Also from making my last card I had left over dryer sheet. Those butterflies didn't take that much space. This time I used a stencil for my butterfly but more about that later. Also as you may know I like to experiment so this time I experimented with applying Deco Foil to an embossed border.


After eBrushing my card stock I used Anna Griffin Brocade border embossing folder. Then applied adhesive. The foiling didn't turn out too bad but alas for my lime green I thought I had let the adhesive dry long enough and hadn't so the foil got messed up a little bit on the bottom leaf. The directions say to let it dry for something like thirty minutes and after an hour it was still too wet even though the adhesive looked clear to me. The adhesive pulled up with the foil. After putting more adhesive down I let it dry for close to three hours. Since I knew I wanted to use multiple colors of foil I placed adhesive just on the area I wanted to use one color of foil on. After that area was foiled I then applied adhesive in another area. Because of the time it took for the adhesive to dry it was a long process. For this foiled border I used Deco Foil in green, lime green, red gold and gold. To see all the colors available please click on the therm o web image on the left.


The butterfly was so much fun to make. First I took my scrap of dryer sheet and my stencil. I used my eBrush to air brush my butterfly. Then took my black marker to do the body and head. After taking the stencil off I connected the lines with the marker. Then I turned my butterfly over and eBrushed on the back side. I took green jute and saturated it with glue and then wrapped it around a pencil to get the curl. The butterfly is pop dotted on the card.

The background is a gelli print scrap. I was experimenting with rice paper and metallic acrylic paints on my gelli plate.  Everything came together like a dream. including finding the perfect scrap piece of tissue wrapping paper to stamp my sentiment on. You know me I like to use every little piece of scrap if I can. I love how the tissue paper allows some of the background to show through. I did mask a butterfly on the stamp since I wanted to use my dryer sheet  butterfly. Also there wasn't room on the scrap for all of the butterfly.

Drum roll please as here is what the completed card looks like.


I really wish you could see this card in person. It is full of texture. I wasn't sure about the border as I had airbrushed it blue before the rest of the colors came together while going through my stash. But I think it works because of the green ink I used for the sentiment and the gold foils I used.

If you like making mixed media cards like I do I encourage you to join in the fun at http://themixedmediacardchallenge.blogspot.com/2015/05/mmcc-11-wings.html There is a little over two weeks to get your creation made and linked up. Also there is a Design Team call. Fingers and toes crossed that I get picked.

I just realized it is not so warm although it is sunny since a cold wind has started blowing. Since I can enter more than one card I'm off to make card number two. I saw a stamp to use after starting on this card. Oh the shame I've had the stamp for over a year and never used it so don't you think it is about time. ;-)

Wishing you Happy Frugal Crafting till we meet again!


Tuesday, May 5, 2015

Butterflies Mother's Day Card

Hi everyone yesterday I shared with you a Mother's Day card I made for my DIL today I have one I made for a friend's mother. I did the cutting of my pieces and the painting at the same time that I did my other card. The only change I made was to make the frame with three openings instead of two for this card. Also I used used dryer sheets which had been ironed and mod podged together to make my butterflies. I love how the butterflies turned out.

I did my frame panel the same as for my previous card by painting with dye inks. Then this time I stamped the panel adding some shadow stamping.

For my butterflies after the mod podge was dry I used my eBrush to color the dryer sheet.  I stamped and used a embossing pen. The Stazon ink smeared but in this case no damage was done. I used Recollection glitter embossing powder. I love how it picks up whatever color is on the surface.  If you decide to heat emboss dryer sheets be really careful with your heat gun. I did melt a piece of the dryer sheet but luckily not where I had stamped. Then I hand cut out my butterflies. I don't know whether dryer sheets could be used with a die cut machine. I know my Cameo would not cut it as the blade would get caught in the weave of the dryer sheets. Although I used a butterfly stamp any stamp will work. 

Here is the finished card. As I said in my previous post my laser printer did not like my cardstock so my foiling for the border is shabby. I went ahead and used my eBrush with a purple marker to airbrush my card base. The sentiment was foiled after I printed it out on the laser printer.


I encourage you if you use dryer sheets to save them to use in your crafting. They add a nice texture.

Off to walk to the mailbox to get the card in the mail. Wishing you Happy Frugal Crafting till we meet again!


First Mother's Day Card

Hi everyone I just realized that Mother's Day is Sunday. Opps! So I made a quick card today for my granddaughters to give to their mom. For some reason my laser printer didn't like the card stock so I got a really spotty border when it printed. Which means that the foil did not give good covereage. I haven't decided whether to go over the border with adhesive and re-foil or given the time frame just to leave it. After all even an imperfect card is better than no card at all. I also wish I would have had a better picture of Bug but she is in constant motion.

I did learn that laser printing doesn't smear like ink jet printing when it gets wet.  I was happy to learn that. Without further ado here is my first card. My next card is waiting for mod podge on used dryer sheets to dry so I can make butterflies to go on it. It should be dry in the morning and I can finish a card for a friend to mail to his mom. Without further ado here is the Mother's Day card.

I didn't like the color of the card base so I air brushed it. The arrow was a free file from Silhouette. Thank goodness my laser printer likes my white card stock so my sentiment was crisp. For both the arrow and the frame panel I painted with a water brush and Memento dye ink. I used Lulu Lavender, Spun Sugar and Blue Sky. I love the softness of the colors in the Sorbet collection.

I had fun creating a watercolor look with dye inks. In fact so much fun I did another arrow with the sentiment and a frame with three openings instead of two for my next card. I will be doing more water coloring with dye inks in the future.

Have you painted using dye ink? Do you like to paint?

Time for bed so wishing you Happy Frugal Crafting till we meet again!

Sunday, May 3, 2015

Nurse Graduation Card

Hi everyone! First off I want to apologize for being gone so long.  I just have not had the energy for much these days. However my DIL will be getting pinned this month as a nurse so I knew I had to make her a graduation card. A store bought card just wouldn't do. Nor would one that took only fifteen minutes to make. For such a special occasion a special card was needed. Of course the ideas had to percolate in my brain for awhile.

After looking through lots of nursing clipart on the internet I decided to go with the cute nurse I found a couple of years ago when I made her a birthday card. This time instead of making a crepe paper rose I made a miniature ribbon rose for her corsage. What fun memories of my sixth grade teacher teaching me how to make them! My green ribbon shredded when I tried to make leaves for my corsage so it was airbrushing a grosgrain piece of ribbon. For me doing things in miniature is a little nerve wracking but at least I still have the dexterity and eye sight to do it. I also decided to use  brown colored pencils to give her hair more definition.


I decided to go with a panel from a Silhouette Christmas card cutting file. Who says you can't borrow parts from other cutting files for your creations. Then it was off to the internet to try to find a suitable pattern to fill the panel with. Alas I could not find a pattern in burgundy and gold which is the college colors. It is a good thing that blue is a neutral color. I decided to foil the sentiment on vellum to be placed over the panel. I messed up the first time foiling but I didn't like the color I had airbrushed the vellum with my background.  I decided to go with a blue instead since my vellum is a natural vellum which is a gray color. After my foiling and airbrushing was done it was time to take out my eBosser and a Spellbinder die to cut it out. By the way for those who wonder what I use to adhere vellum with a glue stick works nicely as long as you get an even coat. However, forget about buying glue sticks at a Dollar Tree. I ended up throwing them away as they were all dried out.


I was looking at the nurse and decided that the way her one arm and hand is it would be perfect to have her hold a balloon. I thought I had seen a balloon in the Studio library and sure enough I had a cutting file so I just needed to re-size and delete a piece. After filling in the balloon with color I added text.

Of course you know me I'm addicted to Dimensional Magic. The only thing I don't like is that it takes so long to dry.  The nurse,s glasses, the thermometer and the balloon all have Dimensional Magic on them. The balloon actually has two coats to make it more rounded looking. I airbrushed floss with a gold Sharpie for the string. Now I'm sporting gold fingers. ;-)


Of course you know me I almost never can do a card without using adhesive foam on something. So the nurse and balloon are both pop dotted on the card.

Hopefully you have stayed with me long enough to see the reveal of the card and I have not bored you to tears. :-) Drum roll please!
I hope she likes her card. I had fun making it for her and exercising my brain to come up with the idea.

Do you have any graduates you need to make cards for?

Today is a gorgeous day! I already took the boys out on one walk and will be going out again so crafting will be put on the back burner. I do need to make at least one card for Mother's day and get it in the mail.

Wishing you Happy Frugal Crafting till we meet again!