Saturday, March 31, 2012

Paper Pieced Easter Egg Card

I must confess that paper piecing is not my favorite craft. It is often too exacting not one of my strong points. On the other hand it is a great way to use up scraps of paper.

When I was going through my files and saw that I had downloaded from My Scrapchick this cute card  cutting file I knew I was going to have to make one for my granddaughters. The white card stock is the only non scrap that I used for the scallop pieces and the card base. Luckily I had just enough of the light pink to cut out the two pieces I needed.
I used a border embossing folder on the white scallop pieces. I used a brayer and applied ink to the raised design part of the folder. You get different looks depending on whether the ink is applied to the raised or recessed side of the folder.

I discovered that heat embossing doesn't work too well on textured card stock. Also discovered that my new Glitz embossing powder is transparent so a colored ink has to be used.  Not one to be wasteful I flipped the piece over and stamped with yellow ink. Then added the embossing powder and melted it.

I am pleased with the way that the front of the card turned out.Even more pleased with how the inside turned out.
You can't really tell in the picture but the grass is a scrap of craft foam which I cut slits in. The bunny is from Scraps by Mara. I just turned him into a Print and Cut. I added Karen Foster Scrap Floss for the whiskers. I didn't have any black but I still think he looks good. He is pop dotted. The butterfly was in my Studio library. I think it was a free print and cut file. I cut it out instead with a scrap of pattern paper the same as is on the front. I wrapped Karen Foster Scrap Floss around the body and tied for antenna. Then pop dotted it on the sentiment. The sentiment was manipulated and filled with a pattern in Studio. I also set it to print the line and changed the line color. I like the way that fonts can be outlined that way. I used a Krylon copper leafing pen to edge the rectangle that the sentiment is on. After I got everything glued down I thought I should have added a blue background for the sky. Too late now. LOL! Oh well I'm sure the girls will love it just the way it is.

Thank you for stopping by. I hope I have inspired you to get out those scraps and craft. Happy crafting till we meet again.

Tuesday, March 27, 2012

Printing On Ribbon & Easter Card

I've been reading a book about transferring digital images to different media. Although in this post I won't be showing you how to do any of what was in the book as I don't have the supplies it did get me to thinking.

I don't have a lot of sentiment stamps and my Easter one is too large for my ribbon. So first off was seeing if I could print on ribbon. The book did show different ways of printing on fabric but I didn't have the supplies on hand and right now am without transportation. So I decided to see if I could print on ribbon the same way I have printed on fabric in the past.

This is the easiest way I've found to print on ribbon. I like to use stiff wire ribbon that I can often get at a dollar store. You could do faux ribbon printing on sheer ribbon by printing on paper and then  gluing print side up on the back side of the ribbon.

First step is printing on paper. As long as you save the file used for the initial ribbon you can use the paper over and over again. I already took a picture of the printed ribbon so lifted the ribbon from the copy paper to show you the printed words underneath.

 Next step is to lightly spray the back side of the ribbon with re-positional adhesive. The key word is lightly as you do not want the spray to seep through your ribbon. This is also why sheer ribbon won't work this way. 

Place your ribbon on the printed page adhesive side down. I use a brayer to make sure it is down tight. Send it through your printer. (I am not responsible if you mess up your printer using this technique. I have used this technique printing words on fabric with no problem. My printer is still running strong.)
There you have it an easy way to print on ribbon. If you can't see through the ribbon to center it on the printed page you can always hold it up to a light or use a light box if you have one. 

My card is not what I envisioned due to a change of plans because I didn't have some of the supplies I wanted to use. This card kept changing direction right up to the point when I adhered everything down.Too many different ideas. Oh you wanted to see the card. LOL! I like how it turned out and hope you do also.

Sorry the picture isn't better but my camera was doing wonky things with the fabric behind the girl.The girl is a print and cut.  The image is from Let Me Scrap. It is part of a recent blog train "Spring Sun Easter Fun". She is pop dotted on the fabric.(It will cost me extra to mail the card but the person getting it is worth it.)

 I bought the fabric a year ago on sale because I liked it. I thought it would really add to this card with the flowers and butterflies. I cut out the oval on my Cameo without using interfacing since I didn't have any.(In tips on the Silhouette Plus Forum you can read how I did it.

The frame is a Silhouette free file Scalloped Circles. I turned it into a Scalloped Oval. This is what I love about my Cameo and the Silhouette software. If I want to change something I can. I debated on how to finish the frame. The white seemed too stark to me. I decided to pick up the pink in the fabric so used chalk ink and a cotton ball to color it.

The card  base is stamped with a flower stamp and Versamark watermark ink. Then heat embossed with a white opaque embossing powder.  I changed my mind about rubbing ink over the stamped  embossed image after playing with rubbing ink over an embossed image on my sample.

Thank you for stopping by and do come back again. Happy crafting!

Friday, March 23, 2012

Challenge Yourself!

Lately there seems to be all kinds of challenges. More challenges than I have time to do unless I don't eat and sleep. Anyway over at Monica's is the fourth Cameo challenge. (link to her site on the right hand side) This challenge is to use a digital stamp,buttons, a square card,and any Silhouette machine. I don't usually do square cards so this is different for me. I do use digital stamps sometimes because they are easy to resize where with the conventional ones you are stuck with whatever size the stamp is.

This was a fun card to do and I did a lot of experimenting. The sky in the background is Gesso mixed with Stream color alcohol ink. I did not totally mix it in the Gesso and applied it with a gift card that was no longer good. The grass is  Gesso with the Stream and Butterscotch alcohol ink added. It was applied with a cheap 1" bristle brush that is tapered. I don't know where I got the lattice file from. I made it smaller and cut it with my Cameo. I sprayed adhesive on  the lattice and then shook embossing enamel on it and heat embossed it.The sentiment is stamped on burlap which Gesso has been applied to using again the gift card. I mixed Butterscotch ink in the Gesso. The sentiment is stamped with Tim Holtz Peeled Paint distress ink. I discovered that distress  and dye inks worked the best. The buttons are g studio adhesive buttons. I used Karen Foster scrapping floss to attach them to the burlap. The butterfly is a Silhouette free file. I really shrunk it down. I heat embossed coarse gold embossing powder on the solid piece and chalked the intricate piece. The antennae tore when I took the butterfly off the mat but since I already knew I was going to wrap the Karen Foster floss around it was no big deal. The digital stamp was originally a rubber stamp in my sister's collection. When I first got my Silhouette almost a year ago she stamped and scanned in her stamped images. This was the most challenging one for me to turn into a print and cut file. I decided rather than to fill in with color in Studio to use my chalks. I also chalked the flower and used my glitter pens. The glitter doesn't really show up in the picture.

I love the way this card turned out. If I was going to mail it I would leave the buttons off and instead add a couple of butterflies. Otherwise even with the embossed lattice this is flat enough that no extra postage or hand stamping would be needed.

Thank you for stopping by. If you would like to join this challenge there is still time. I encourage you to try a challenge or two. Not only can they be fun but I learn a lot and find myself trying new things.

Happy Spring whether your weather is still Winter or it is already Summer. Happy crafting also. Do stop by again

Sunday, March 18, 2012

Adding Dimension Without Flab

I don't know about you but if you live in the U.S. you will be charged an extra $.20 to have your card hand stamped when you go to mail it. The other thing I found out is if you use pop dots don't put a stamp on the envelope. Instead if it doesn't need to be hand stamped have the clerk put a postage meter stamp on it. Otherwise the person on the other end may end up being charged $.20 even though it was a thickness that did not require extra postage. So having said that you may be wondering how you can do a card that is different and has some dimension without paying extra. One way is to add Gesso. The way we are going to do this it is going to be flat. So let's get started.

Here I put a dab of Gesso on a piece of scrap paper. A little bit goes a long way in fact I almost got too much here.
Next load your tool. I'm using here a pan scraper left over from the days when I would give people who were cooking samples a break and clean their pans of stuck on gunk. A credit card you don't use or empty gift card will work just as well.
Drag your tool over your media at a slight angle. You can go just one direction or both. 
Keep dragging with Gesso adding more to your tool if need be until you are satisfied with the look. It should be smooth  to the touch. Then let dry. Your card stock may curl but you can use an embossing tool or iron it between two sheets of paper on low heat with no steam.

At this point you can leave it as it is. You could paint over it or rub inks or chalk over it. You can stamp over the Gesso surface.

 I used Stazon royal purple ink and my tile rubber stamp. I stamped first on scrap paper which the darker impression is and then stamped on my Gesso panel. I overlapped the stamp and love the way it turned out with some areas darker than others.

Here is my finished card using the Gesso panel.

The flower is a cutting file from My Scrap Chick. I dragged the two larger petals over an ink pad. I somehow overlooked the smallest petal. Then I spritzed all the petals with my faux glimmer mist.  I did the same with the leaves. I did learn that it is best to try out the ink pad first though on a scrap piece of paper. My card stock totally absorbed all the distress ink on the leaves leaving me with dark blotchy areas. That is all right because to me they looked more natural after I sprayed them. The circle I heat embossed  with enamel but decided that I didn't want it to be totally smooth. 

The Gesso panel is put on card stock which I sprayed with re-positional adhesive and put squares of wrapping paper that I cut using my Cameo. Then I sprinkled on my embossing enamel and embossed. I will have to do some tweaking with this process as some of the squares blew off while I was heat embossing. Luckily the embossing media was tight so I was able to glue them back and still had the bronze grout. The grout isn't really going to give it thickness but like the Gesso will give the card more dimension. You could really get creative using triangles,squares of different sizes,different shapes etc. LOL! I don't think I have the patience anymore to glue on a bunch of small circles but this is a way you could also use punched out shapes. This would also be another way to use scrap paper or even some bad photos if you have some laying around.

I hope I've inspired you to try a couple of different things.  Now I'm off to see about cutting some other shapes with some wrapping paper. Woo Hoo! Another inexpensive alternative for pretty paper.

Have a wonderful crafting time and thank you for stopping by.


Friday, March 16, 2012

Yes,Virginia You Can Heat Emboss On Craft Foam

My roommate came upstairs today and told me that his Mother had called to thank him for the St. Patrick day card I had made for her. Then he said "I hope you didn't have anything planned for tomorrow as I promised her we would go play Bingo with her".  It has been so long since I've played Bingo and I have no idea where my "lucky" socks are. The next best thing was to make up some four leaf clovers for pins and hair clip.

I just happen to have all of this green craft foam including a large size scrap. First I designed my four leaf clover in Studio using a heart shape. I welded the four hearts together and added a stem which I also welded. I placed my foam on my cutting mat adhering it with painter's tape to make sure it was secure. I changed my blade to ten and used the slowest speed and maximum setting and set it to double cut. I should have put a newer blade in though as my shapes didn't completely cut out. (I think my blade is finally starting to get dull.)Very carefully I punched out by hand and tore the foam along the score lines. I think finishing cutting through with a craft knife would have been better.

I was looking at the foam clover thinking what now. Then I decided to see if I could heat emboss. I had cut an extra one out just in case it didn't work. I decided to run it through my adhesive machine as I wanted to make sure that I had a good coating of adhesive to hold the embossing powder. Normally I would have just stamped my watermark pad over it.

Yes, Virginia you can heat emboss craft foam.  I panicked at first when the stems started curling but discovered I could straighten them while still warm. The last one I heat embossed actually folded in on itself but was easy to unfold. I discovered I could easily manipulate the foam while warm. Can't wait to cut flowers out of craft foam now.

Sorry you can't see the true sparkle of the embossing. These are beautiful but alas no matter what settings I tried and  light I could not get a good picture of the sparkle.


All I have left now is to adhere pin findings to two of them and a hair clip to one for myself.

Thank you for stopping by and looking. Do come back as I really plan to do a post on adding dimension without adding flab.

Happy crafting and Happy St. Patrick's day if you celebrate it.

Tuesday, March 13, 2012

How To Weave A Mat And St. Paddy Card

Today it is snowing so a great day for staying indoors and crafting. I am working on finishing up the card I started in the previous post when I showed you how to use a stencil with chalk.

Previously I have cut slits in paper or card stock to make woven mats or adhered my beginning strips to a cut piece of card stock.  Today though I am going to show you how to weave a mat using double sided tape. I already have my strips cut. I cut them on the same page as I was cutting out the stencil and panel I chalked on. You could cut the strips with a paper cutter.

Let's get started. You will notice my strips are white and that is because the color doesn't matter because I will be doing a heat embossing on them. Depending on how you are going to be doing your mat you may want to use pattern paper or different colors. You can even cut those photo that didn't turn out just right into strips. Especially if you have any from the before digital days. You can cut different width of strips or all the same size. Don't worry if you cut your strips too long as you can trim them. Better too long than too short. LOL! Don't ask me how I know. By the way this is an excellent way to use up scraps.


First  cut your double sided tape the size you want your mat to be. Then start adding your strips on the sticky side. The other side of the tape should still have a backing. Once your strips are attached you are ready to weave. Normally I would leave a fringe on the ends but since this is going in the middle of the card  panel  and I didn't allow for a fringe I won't.


I went ahead and added double sided tape on the bottom on the back side. Then I went ahead and trimmed the ends.  

Once your woven mat is done you can stamp on it and then use clear embossing powder. You can do like I am going to do and use ultra thick embossing powder.You can even stamp on it while the embossing enamel is still warm. Although you can use regular embossing powder you won't get the same look as using the embossing enamel. My suggestion is to play around and see which look you like better. By the way although embossing powder and enamel may seem expensive a little goes a long way.


Although I used the pigment embossing here. I actually prefer the VersaMark watermark pad. I ended up having to go back with the VersaMark after I  heat embossed the first coat. I remembered then why I don't like to use the pigment embossing ink when I emboss. 

Pour the embossing enamel on your mat ink side up. I use a tray which makes it easy to pour the excess back into the jar.

I would show you how to use the embossing gun but it takes both of my hands and I don't want to burn myself. I also can't walk and chew gum at the same time. 

I hold my embossing gun several inches away. I keep the embossing gun moving. As soon as an area turns shiny it is time to quit in that area. You don't want to burn your project. Not that I have ever done that. LOL! 

I should have just touched up a few places where the card stock still showed instead of coating the whole area with another coat as I lost some of the woven pattern. It doesn't look bad though in the finished card.
The woven mat is attached with more double sided tape on the sides and in the middle. Heat embossed card stock has a tendency to curl. Yes, that is the chalk panel I did in the last post. The sentiment was printed on green card stock. It seemed to me to be too minty so after printing and cutting it out I used the green blending chalks on it. I edged it with green ink. The daisies on the tag are from a Delicious Scrap tag which had too sharp of edges I thought for this project. The shamrocks are the cut outs from the stencil. I misted them with my faux glimmer mist and curled them up a little bit.

So what do you think? I would love to hear your comments.

Thank you for stopping by. Do come back as I think my next project will be adding dimension without adding flab. It may even be a Spring card as I'm more than ready for Spring.

Happy crafting!

Saturday, March 10, 2012

Blending Chalk Tutorial And A St. Patrick Card

I am going to be using my blending chalks today. You can use pastel chalks by chalking a strip and using what you want to use to transfer the chalk. I prefer to use cotton balls or Qtips as they are inexpensive.  The blending chalks will come with a couple of applicators but they didn't seem to last long.  Eye shadow applicators can be used  or you can buy replacement applicators.

Using either the pastel chalks or the blending chalks you don't need to use a fixative. The chalk won't rub off of your project. However, if you want to use a fixative cheap hairspray will work.

First I made a stencil from card stock to use for this particular project. I filled my corner rectangle full of shamrocks. I made the stems too narrow so they won't chalk right. However, instead of redoing my stencil I'm just going to draw the stems on with a Qtip The stems don't all need to be uniform.

Remember you can use the stencil at a later date on a project. We are talking frugal here after all. You can either turn it over or use the side that will have chalk on it like I will be doing. Oh and all the little shamrocks well they will be misted with my glimmer spray. My plan is to use some of them on  one of the cards I'm going to be making.

Usually I use painter's tape to tape down my stencil on my project. However this time because my stencil and panel are the same size I used re-positional spray.


Using a Q-tip or a stencil dauber coat it with chalk
If you want you can rub the squares over a piece of paper and make your own custom color by mixing them.


Then fill in your stencil going whatever direction you wish. I used both green chalks for my shamrocks. Going over my shamrock with the different colors until I got what I was after.


 I wasn't thinking of my drawn in stems smearing when I lightly brushed. Normally I lightly brush over before removing the stencil. It is going to soften your images and the chalk won't smear. I learned today if I am going to draw in something  with a Q-tip to use a Q-tip to remove the excess chalk. 

With a cotton ball that I have rubbed over a chalk square I am rubbing in a circular motion. I always start at an edge as the color will be darker. Keep adding chalk to the cotton ball as needed. Don't worry if your color is not uniform. You don't need to limit yourself to one color either. I went ahead and also used the green chalks.

Here is the stencil and my panel after I rubbed chalk over them with a cotton ball.  On the panel I did not stencil in the shamrocks in the center for a reason. The card stock or paper you use under your project while you are rubbing your chalk can also be used in a project.


Here is my finished card using the stencil. The tag is a print and cut using a tag from Delicious Scrap's Lucky Me.  I added the sentiment and love how it turned out with the yellow outlining the letters. I folded up the ribbon part of the tag to give it a little more dimension. I'm always amazed at how pliable card stock can be. Now that the card is done I'm thinking I should ink the three edges with a dark yellow or gold ink pad.

Thank you for stopping by and do come back. I will be posting the other card when I get it made. First I need to weave a mat and use Ultra Thick embossing powder on it. Also I haven't misted the shamrocks yet. Nor am I totally sure exactly how I want the card. Sometimes my cards will evolve while I am working on them.

Wishing you happy crafting times!

Thursday, March 8, 2012

St. Paddy Birthday Card And Glimmer Mist Play

What could be better than having a birthday and it being St. Patrick's day also. A lot of people are celebrating your birthday. So I decided to make a St. Patrick day birthday card for someone special who just happens to have been born on St. Patrick's day.

The cut out ribbon and tag were free files from Delicious Scrap. So easy to turn jpg and png files into print and cut with the Studio software. I added in Studio the sentiment  on the tag before cutting. I set the line color what I wanted and set to print selected lines. Although I had filled in the text I don't know why it didn't print but I actually prefer the outline of the letters.

I could not find a pop out shamrock at the Silhouette store so created my own. It is really easy to make a shamrock using a heart shape and replicating and welding. I love the eraser in the Designer Edition of Studio I no longer have to edit points if I don't want a section to cut. This shamrock panel was cut out of a scrap piece of card stock.

Originally I was going to cut the final one out of a piece of green card stock but I had to play. It has been awhile since I've played with making my own glimmer mist. It is so easy. I used soap dye for the color here as I could not find my alcohol inks. I goofed and thought I was putting green in my water and it was blue instead. No problem as I then added green to my mixture and it turned out darker then when I had used green by itself before. I added mint green and blue Perfect Pearls to the water solution and spritzed my card stock. While still wet I folded the leaves up.  Normally I would have used my heat tool to flatten out the card stock but decided to leave the edges curled as it was. I pop dotted the leaves and the panel onto the card  front.

Not only was this card frugal to make but it was also fun.

Do download free digital content when you find  it as you never know when it might come in handy. Don't be afraid to design something if you can't find a file for what you want. Especially if it is something simple like this shamrock. If you don't have paper the color you want spray to make your own. Food color,alcohol inks,fabric dye,water color paints,or even tempera paints can be used to make a spray to color your card stock.

There are several tutorials for making glimmer mist. I prefer using the Perfect Pearls because I don't need to add a binder.  Don't let the price scare you away as you can make several bottles for what you would pay for two bottles of  commercial glimmer mist.

Thank you for stopping by and do come back as my next project is going to be chalking shamrocks for a background. Of course using this technique you could use other shapes but I need to get some St. Patrick cards made.

Monday, March 5, 2012

From Trash To Treasure Using What You Find Card


What do these things have in common? Well these are all things I have found while out walking the dogs. Yes, even the broken cell phone. Which even has a micro sd card left in. Not sure it is even good but very tempting to try to see what is on it. 


Adding tape for a machine  I don't have,backing from Zots,backside of Mylar Christmas wrapping paper,and corrugated packing foam. These are some other things I want to play with and see what I can come up with.

So why am I showing you these? Well over at Silhouette Plus forum is a challenge for making a card using recycled items. Some of these objects are going to be used in a card now and others probably in the future. 

Well I managed to get the keyboard part of the cell phone taken apart. I am using a thin metal piece which helps hold the keys in.As well as a couple of the keys. The adding machine tape ripped while trying to cut it with the Cameo so I spritzed my faux glimmer mist on it and using it as faux Washi tape. I painted the blue thing that I think was part of a toy and adhered rhinestones to it. I glued the mylar paper onto a piece of card stock. I had cut out the daisy chain from a scrap of card stock to mask the adding machine tape when I spritzed the glimmer mist on. Didn't like the way the tape turned out but I can salvage part of it like I did in my card here.

O.K. if you have gotten this far here is the card I came up with. I love it. Let me know what you think.

I'm really glad that I kept that scrap piece of Christmas wrapping because using the back side of it really added to this card.

Look around and see what you can use that perhaps you wouldn't normally use. I hope that you will play around and submit an entry to the challenge. I know a shameful plug on my part. LOL!

Thank you for stopping by and do come back.


Sunday, March 4, 2012

Chalk It Up To Play

I love to play and I love using chalks. In the past I only used pastel chalks but one day I discovered in a clearance aisle a box of blending chalks. I decided to splurge and have never regretted it. 

I will use just the chalk pastels in this project. However, I wanted to show you the blending chalks and some of the tools I use with them. If you use Q-tips make sure they are ones with tight buds. I also use eye shadow applicators and using cosmetic pads you can get some interesting designs. In a future post I'll show you some of the things you can do with blending chalks.

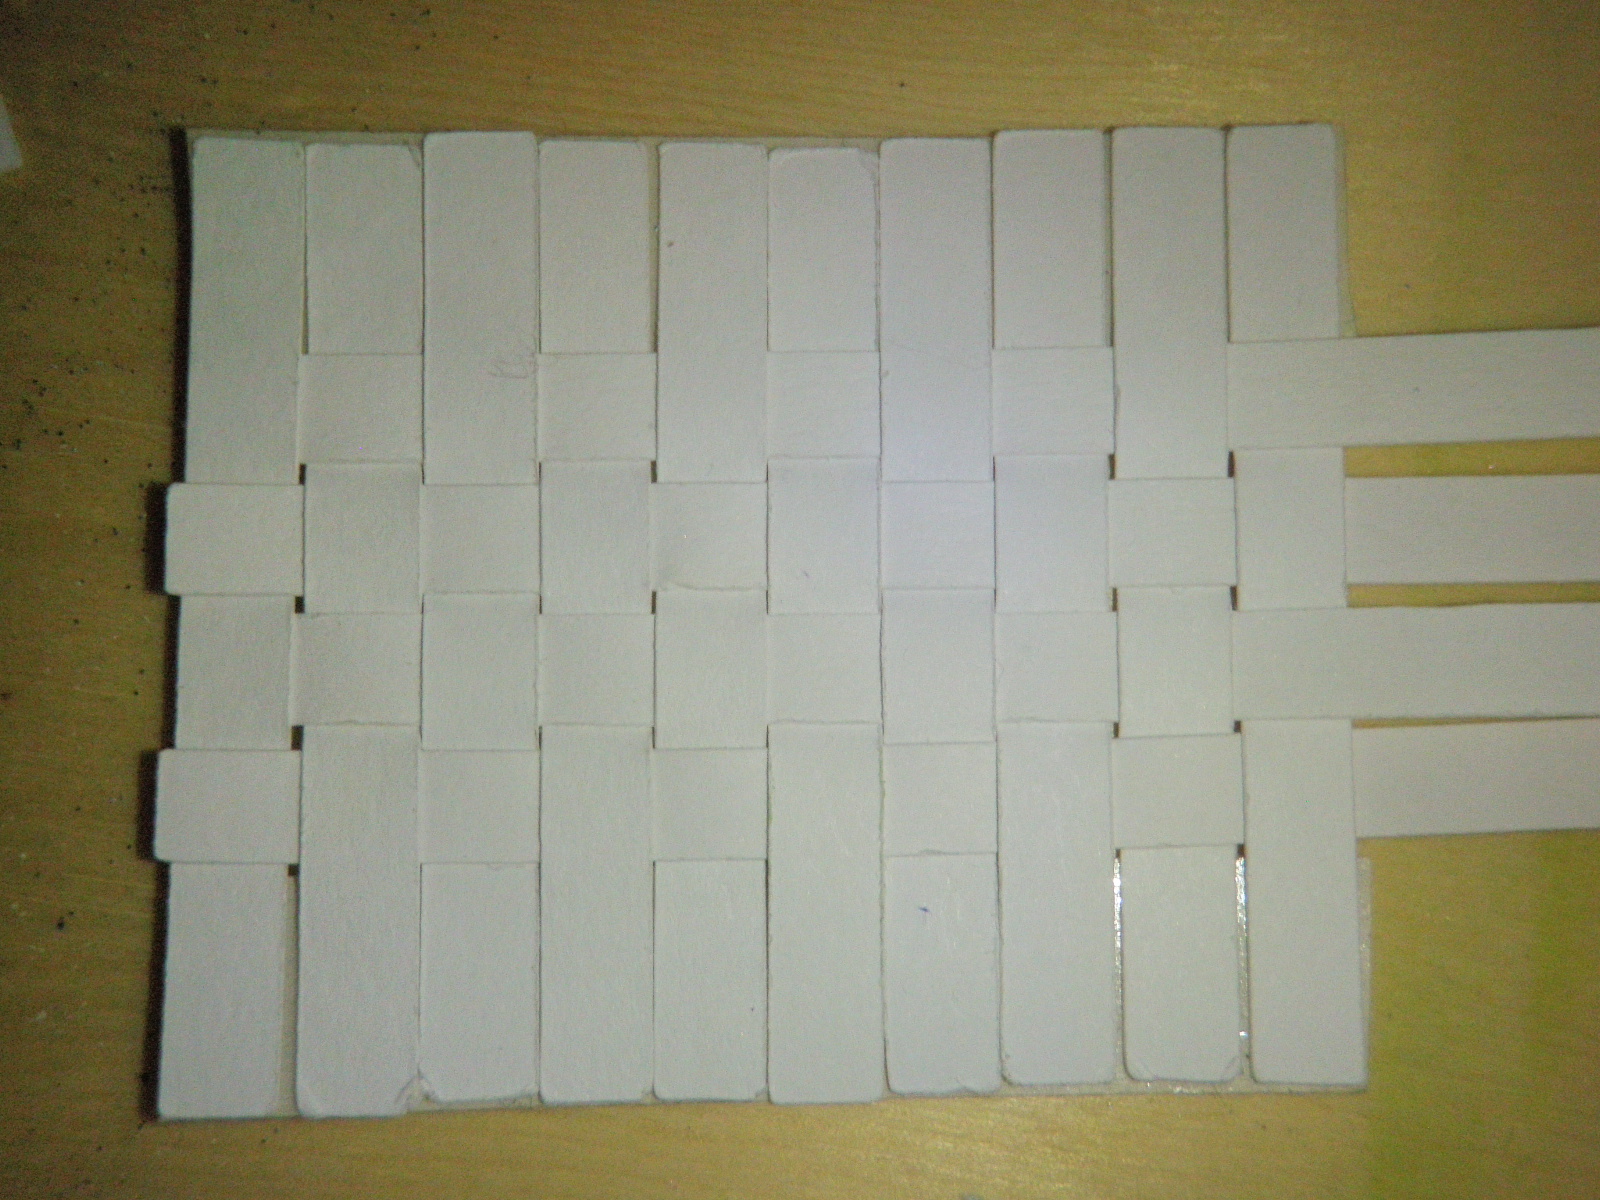
I have cut some 4" strips. The width doesn't matter.  The only reason I made mine the size they were was so I could fit them on the page with a printed image and shape.Remember you can use these strips on other projects so don't throw them away when you are through. I have also cut out a rectangle which I will be transferring the chalk from the strips onto.

Now the fun begins. The hardest things for me is deciding what colors of pastel chalk I am going to use. The card base is a bright yellow and a printed background is a soft green. I have been having winter weather lately so I am ready for something Spring looking. If you decide to do this remember that the colors are going to be lighter than they are on the strip.

O.K. now for some pictures of what I did. LOL! I was taking the pictures myself while I worked. Not the easiest thing. If you don't want to get your fingers dirty you can use a cotton ball. I wiped my hands off as I changed colors. I also rechalked the strips if they were too light.


First color your strips with chalk. The heavier you chalk it the better.


I tore an edge off of one of the long sides of the strip. You can keep it straight,or use decorative scissors. It depends on what effect you are after.


To keep the strip from moving I actually held it down with my thumb and finger from my left hand. onto the piece of paper I was transferring the chalk to. However in this picture I had the camera in my left hand. I took my finger and starting at the top of the strip pulled my finger towards me. How far down you go on the paper you are transferring to is up to you.

This is what the finished paper looked like. I did it on the diagonal as this is going to go  on the card so it is a diamond. Surrounding the paper is the strips I used which will go on a card in the future.

When I was playing in Studio I forgot to change the color of the cut line for the image  and turn off print lines so it printed red and because it was a thicker line alas the red shows. I decided to see if my faux sculpted paper would cut with a flower die I won last year. Not only did it cut but also my punch worked cutting it. The tutorial for making the paper is here:
Here is the card I made.


I edged the chalk paper with copper ink pad. I was disappointed with the green paper the flower is on. Although I had the pattern set at scale 500% it does not really show up. I edged that with Peeled Paint ink pad. (the angle of your paper to the pad as you drag it through the pad will determine how thick or thin your edging is.)

I edged the flower petals with a gold paint marker. I would pounce the pen up and down to get a glob of ink  on paper and then use a artist brush. since I don't have any gold ink. I wanted to cover up the white gesso that showed on the cut edge as the foil separated a little bit. Because of the foil backing it was easy to mold the flower petals until I had something I was satisfied with.  The bead in the middle I have had for a little over a couple of decades. LOL! Let's just say my son was eating baby food and leave it at that. I glued a rhinestone over the hole.

I hope my hairdresser will love her unique card. I had lots of fun making  it and now that I know that the sculpted paper will cut with a die will be having fun making more paper.

I hope you will play around with chalk. There are so many wonderful things you can do using this technique. Including using it to color an image.

Thank you for stopping by and do come back as I am working  on a  couple of "Trash To Treasure" cards. Yes, there is another challenge going on at the Silhouette Plus forum. This time to use something recycled or something you normally would not use.

Have a GREAT crafting week!