Tuesday, November 22, 2016

Thank You Hiding In My Craft Room Challenge

Hi faithful readers today I have exciting news. If you look over at the right sidebar you will notice a new image. I'm now a design team member for Hiding In My Craft Room starting next month which will soon be here. In the meantime I'm entering this week's challenge and am going to try to enter next week as well.๐Ÿ˜ƒThen after that I'll be sharing with you weekly inspiration pieces for the challenges.

This week's challenge is brought to you by A Day For Daisies They are giving away a $12 gift certificate to the winner. Do check them out as I found out they have some adorable free digital stamps.  The one I'm using today is Holding Fireflies With Wings.

The theme for this week is Show Thanks And without further ado here is my challenge card.


I remember now why I quit using this yellow card stock for a base. It is much too lightweight. Oh well learn and live.

My sentiment is alphabet stickers which I colored with a dark purple marker and then heat embossed using Recollection Vintage Lilac powder. I stick my letters on a piece of wax paper to color and heat emboss. Since they are sticky but not super sticky I can place them on my project and move them if need be. After I'm pleased with the placement I go ahead and one letter at a time peel up and carefully run a tape runner over the back to give the letters a little extra holding power.

The background was a frame image by Dover Sampler. I took it into PhotoShop and modified the frame so I just had the border on the sides. I also changed the color of the frame as it was blue and white. As well as filled in the center with color. It has been so long since playing in PhotoShop I've forgotten how to do so many things. ๐Ÿ˜• However I also had to upgrade my version and some things are different. That's my story and I'm sticking it to it.

After printing my digital stamp out using my printer to change the lines from black to purple. I colored the fireflies or lightening bugs as I called them growing up with a glitter pen. The girl is colored with chalk and the same glitter pen used on the wings. For my jar I used Mod Podge glitter Dimensional Magic. At first I didn't shake it up good enough so the top part doesn't have the amount of glitter as the bottom of the jar. The hardest part for me is waiting for the Dimensional Magic to dry. I edged my panel with Brilliance Orchid Pearlescent.

I hope you will join in either this challenge or a future one.

Thank you for stopping by and do come back and sit a spell. Wishing you Happy Frugal Crafting till we meet again!

Sunday, November 20, 2016

I'll Be Home For Christmas

Hi everyone this time of year if you are no longer living at home you may be wishing you were going home for Christmas. You may be wishing for snow at least for Christmas Eve and Christmas day.  Whether you are going home for Christmas or not for now enter my home and help yourself to a mug of hot chocolate complete with marshmallows and candy cane.

A friend introduced me to Curtain Call. This week the challenge is At Home. Here is the inspiration picture. You can if you wish create an anything go project using this as your inspiration.


I decided to use the High Hopes window stamp which my image ended up being smudged and the shutters didn't totally stamp. Being the frugal crafter I am I decided to cut the center piece out. Add corrugated cardboard over the shutters. As well as cut out a triangle for my roof. 


I decided I wanted to add Christmas decorations to my house. I took the star spangles which I have a ton of and glued them on Scrapper Floss. If you don't have Scrapper Floss you could use dental floss or string which has been dipped in glue.


I used my air brush with a brown Spectrum Noir to color my cardboard. My triangle I used a stencil and a Sharpie in the air brush.

The background was a scrap of a napkin I had glued on plastic for a previous project.  For my tree I used a stencil I cut out a few years ago. Then hand cut my tree. I then wrapped part of a chenille stick which I had sprinkled some glitter on after applying some glue. I placed my tree in between wax paper and placed books on top to flatten the chenille garland. I added glitter to the star when I took it out.

I used a teal marker around the window opening. Then I added some lace at the top.

I stamped my sentiment using an old Hero Arts stamp. Then colored with color pencils and a fabric marker. Used decorative scissors to cut it down to size.

I thought of adding plastic on the back of the opening but because of the lace and the fact the tree is not flat I changed my mind. I also changed my mind about adding presents under the tree because I figured there was enough going on.


Have you started your holiday cards?

Wishing you a Happy Thanksgiving if you celebrate that holiday. Happy Frugal Crafting till we meet again!


Wednesday, November 16, 2016

Corn Fairy Card

Hi everyone today my card is a combination of several different challenges. I will add links at the end of this post. I will confess that the Corn Fairy Image is not a scrap although I did use a scrap of transfer foil on my desk.

When I saw that Sami Stamps was the sponsor for the Hiding In My Craft Room challenge I knew I wanted to use it for another entry in the Super Scraps Saturday challenge. Shopping From Our Stash also has a challenge using what is in on our desks. Besides my image the stencil I used was not on my desk. Otherwise the other things were. I guess it pays sometimes to not put things away. ;-)

The card is far from perfect but it was fun to play and see what I could come up with it. It was also a learning experience. Now I know I need a little lighter hand when it comes to applying the gold Dreamweaver paste.


Since I cut two card bases out of one letter size sheet of card stock I had the leftover piece on my desk. I also had the sheet of green transfer foil which I had attempted to foil an embossed panel. In fact if you look carefully you may see the hexagon pattern in the foil. Because the piece was too narrow I used a piece of washi tape where the leaves had torn off. Since the leaves are on the back you can't tell. :-)

The black paper which had been inside of a page protector was also on my desk. I often will either stamp or emboss on page protectors. Had to find some use for them as I bought a box of 300 at a thrift store.

I bought the gold Dreamweaver paste at a thrift store also and had not used it yet. Nor had I put it away. I'm bad at just placing things I buy on my desk instead of immediately putting them away. Yes, my favorite crafting store is thrift stores. Amazing the things I can find although I did learn to have a scrap of paper with me first to try out used punches.

I usually don't use digital stamps only because I have so many traditional stamps. However, I love digital stamps not only because they can be resized but also because I can print out on my laser printer and foil the images. I still haven't had any luck foiling traditional stamp images except to stamp and scan the image in order to print it.. If you don't have a laser printer you can take the digital stamp some place that prints copies using toner based copy machines.

After foiling the Corn Fairy with a scrap I colored her using colored pencils and Ranger Stickles. By the way you can head over to Sami Stamps and I believe still get her for free. Thanks Sami Stamps for quickly e-mailing me this whimsical stamp. I had fun coloring her.

Challenges I'm entering this in:

  1. http://www.hidinginmycraftroom.com/2016/11/himcr-275-super-scraps-saturday.html
  2. http://moremixedmediachallenge.blogspot.co.uk/2016/11/more-mixed-media-challenge-anything.html
  3. http://shoppingourstash.blogspot.ca/2016/11/sos-278-front-and-center_15.html
  4. http://samistamp.blogspot.com/2016/11/new-release-fall-harvest-and-sami.html
Now it is your turn to have some fun creating just for the fun of it like this card was for me.

Wishing you Happy Frugal Crafting till we meet again!


Monday, November 14, 2016

Give Thanks Grass Card

 Hi come on in and sit a spell while I share with you my last Thanksgiving card. Wow! I feel like someone has given time an energy drink as it is already only ten days to Thanksgiving here in the U.S.. As they say time flies when you are having fun. I sure have had fun lately hiding out in my "playroom"

My apologies first that I didn't think to take any pictures of my dried grass panel while I was creating it. I saw dried grasses growing along the railroad tracks and decided to cut some. I used a technique which I haven't used for years to sandwich them. Only thing I changed was using a re-inker instead of soap dyes.

It takes awhile for the grass panel to dry like at least a couple of days. So I started by stamping the stamptangle pumpkin I wanted to use and painting it.
Lol! I thought you would like to see my work area.  Oh and my metallic pan water colors. As you can see they have been well used. Don't worry I have an unopened set in reserve. When it comes to watercolor paints these are my go to if I want a light wash of color with a sheen. I often stamp on scrap paper so I can try out my colors.

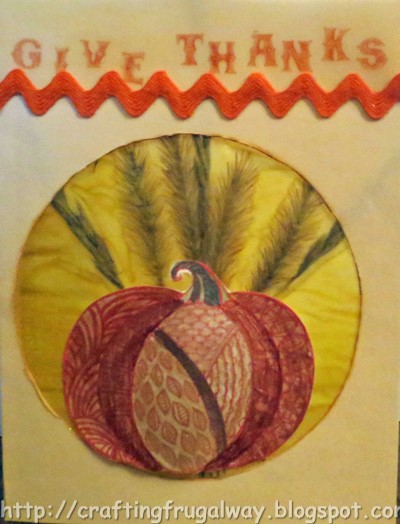
Here the pumpkin is on the card. When I took the photo of the completed card some of the colors became washed out.
 I used Memento Lady Bug red ink to stamp with. I used dimensional dots in the center of the pumpkin and glued the side edges down which gave my pumpkin a semi round shape.

I know you want to see the completed card. So drum roll please.
For my card base I cut a circle out of the front. I used a emery board to distress the edges of the circle. Then used my blending tool to edge the circle with Scattered Straw Distress Ink.

For the background the pumpkin is on. I took two sheets of food divider paper. This is the paper you would put in between hamburger patties before freezing them. I arranged my grasses on one sheet of the paper. In my flat plastic container I mixed white glue and Fossilized Amber re-inker. Not mixing the reinker totally as I didn't want my glue to be all one color. I like the streaks of color I get when I paint the glue onto the other sheet. I use a cheap Dollar Tree foam brush so if I forget to wash it out right away I can toss it without feeling guilty. Once the glue is painted on the paper I place it down glue side and from the center out rub with my hand so that the two pieces are adhered tight. Normally I don't do this step but since the grasses had not been flatten I placed wax paper over and then placed books on top.  I let the books stay over night and then took them off. Of course anything heavy would work to flatten. Then because the glue was still wet I let it sit for another day. Once it is dry you can cut to size with a paper trimmer. I've used this technique with all kinds of things. Sandwiching lavender flowers, confetti, sequins, and even buttons. If you are using anything found in nature you will want to make sure it is completely dry first.

Since my Ki alphabet stamps are not mounted straight I decided on purpose to have the letters go up and down. Although you can't tell I stamped on pale yellow vellum. I then turned my vellum over and wiped the Scattered Straw Distress pad over the back to color it some more. I folded my strip over to the back and glued it and then inside the card. The panel hides the glued part on the inside and who really looks on the back of cards anyway.  I then saw the orange rick rack still on my table which I was going to use on another card and decided not to use it. I thought it would nicely echo the up and down of my words.

Lol! The Vanilla card stock is a lighter weight than I usually use and I didn't realize until I went to take the picture that the grass shows through the card stock to the front.

I'm entering this in the Mixed Media Card Challenge:
http://themixedmediacardchallenge.blogspot.com/2016/11/mmcc-29-thanksgiving.html
As well as the Just For Fun Rubber Stamp Challenge:
http://justforfunrubberstamps.blogspot.com/2016/11/just-for-fun-november-challenge-give.html

You still have time to enter both of these challenges. The Just For Fun challenge is about being thankful so if you are not in the U.S. you could create a project with that theme. :-)

Now I'm off to write personal notes in the cards and address envelopes so I can get my cards in the mail this week. :-)

Wishing you Happy Frugal Crafting till we meet again!

Sunday, November 13, 2016

Scrappy Nativity Christmas Card

Can you believe that I have another card to share with you today. Yes, for those who want to know I've been hiding in my craft room a lot lately. I've been trying to get ahead with crafting holiday/winter cards since I plan to donate some of the cards. I've also been entering challenges with the hope of getting my name out in the crafting world. Plus it is fun at least for me to stretch my creative muscles and see what I can come up.

Talking about hiding in the craft room Hiding In My Craft Room has a scrap challenge for this week. If you are like me you are drowning in scraps so this is a good way to use them up. On the other hand maybe you are not like me and save leftover pieces and even dies that don't necessarily cut correctly. Of course if I have scraps left over of experimental papers I have to save those. ;-) Okay enough of my yakking because I know you want to see what I came up with.

I knew I wanted to use the scrap of my spray starch with Perfect Pearl sprinkled on. I so love the backgrounds I created that way using a dark paper as the base.

I also wanted to make a Christmas card.  Then I saw the Nativity die cut which didn't cut out all the way. I had to finish cutting it out by hand and the upper part where there were stars was no good. However, later on I can use that part as a stencil ;-)  This was initially designed for a popup card so if you look really closely you may see the score marks but because it is black card the score line is hard to see.Then it was what to back the piece with as it blended in too much with the background. Looking further in my different containers of scraps I found the piece of embossed metallic card.  Sometimes I don't use a full piece which I have embossed. Needless to say I'm starting to also drown in those pieces.

I bought at a warehouse store a bag of star sequins. There are so many stars in the bag that I don't think I'll use all of them in my lifetime. Lol!

I wanted to add a sentiment but all of my stamps were either too large or didn't look right stamped and cut apart to fit. I spied my box of alphabet stamps which dare I admit I've only used once. When I stamped the Merry Christmas I realize why as they are not square on the mounts. Which is probably why the box of them was on sale. Good thing I'm not a perfectionist. Lol!

I use wax dividers like what one would use to separate hamburger patties for freezing. With a thousand in a box they are a bargain.  Since they are 6" by 6" I always have scraps of them which often work well for stamping sentiments on. Also they become almost transparent when glued on with a thin layer of Tombow multi-purpose glue. Normally I use Stazon ink for stamping but decided to see what would happen using Brilliance Copper.  Yeah! It didn't smear like some inks do and gave me a crisp image.

There you have it my scrappy Christmas card. It was fun looking through all my scraps and seeing what I could come up. Since one of my crafting resolutions  for this year is to use more of my scraps this challenge fits right in. Details can be found here:
 http://www.hidinginmycraftroom.com/2016/11/himcr-275-super-scraps-saturday.html

I would love to have you join in the challenge. The more the merrier. Also if you do decide to use scraps in your crafting I would love to see your project. You can post your project on my facebook page. https://www.facebook.com/craftingfrugalway

Thank you for stopping by. I hope you have enjoyed your visit and that I have inspired you. Wishing you Happy Frugal Crafting till we meet again.

Saturday, November 12, 2016

Who Says You Can't Use Pink For A Christmas Card

Hi everyone if you have been following me you know that I usually don't use pink in my creations.  However when a friend posted about a pink challenge I knew I had to get outside of my comfort zone. Since I won a stamp from High Hopes I wanted to use it to make a card for my sister. She is a fan of pink. She also collects snow people. I think she will love this card.

The Card Concept has their pink challenge. Details can be found here:http://thecardconcept.blogspot.ca/2016/11/card-concept-61-pretty-in-pink.html

Participants were asked to pick a style. Without a doubt this card is Mixed Media. It also I think falls in the category of Classy and Elegant. Drum roll please!


This hot pink card stock has been gathering dust in my playroom. I used all the purples that had come in the package which is the only reason I had bought the package.

Years ago I received a package from The North Pole. In that package was QuicKutz Holiday theme kit which includes the GooseBumpz embossing die which I used for my sentiment. I wiped Stazon Cherry Pink ink over the letters before embossing. Since my embossing faded into the background I decided to adhere it to a piece of gold paper. Opps! I forgot that my dot tape shows so ended up cutting adhesive gem strings in half to use to cover where the dots showed through.

I tried foiling the High Hopes Snow Kisses stamp from their new release. Alas even following instruction from a video I still could not get the foiling to come out right. Since I had success stamping using Precious Metal Classic Gold leafing medium I stamped with that. 

I used orange and yellow glaze pens to color the birds and then finished coloring them with pencils.

For the snow I use my finger and Spackle. (A lot cheaper than many of the products in the crafting aisles.) Then sprinkled glitter while still wet.

I used chalk and my finger to color around the image. Then I free cut out the image and used a emery board to smooth rough edges. Then inked the edge with Teal Blue Stazon Ink.


The nose and mouth was colored with glaze pens. The winter outerwear was all done with Martha Stewart flocking. The two pinks had never even been opened. I used a glue pen to fill in the different areas and sprinkled the flocking on. I found if I had gone over the stamped lines that a toothpick quickly removed the flocking. I love the texture the flocking added. Oh and the glitter was already in the flocking.

I'm also entering this in the One Crazy Stamper challenge for this month. Who knows maybe Random Org will pick me again. A girl can always hope. ;-) Details can be found here and this is a month long challenge.
 http://onecrazystampercom.blogspot.ca/2016/11/november-challenge-fallwinter-fun.html

Have you used flocking in any creations? What supplies you can get from a hardware store have you used in your crafting?

Thank you for stopping by. Wishing you Happy Frugal Crafting till we meet again!


Wednesday, November 9, 2016

Thanksgiving Joys

Hi everyone there are a few people that I send Thanksgiving cards to. When I saw that Shopping Our Stash has a Thanksgiving challenge this week I knew I needed to make a card with that theme. Also Just For Fun has their monthly challenge which is Give Thanks and the monthly challenge for the Mixed Media Card Challenge is Thanksgiving. And another challenge I almost forgot about is this week's Hiding In My Craft Room color challenge.. I will post the links to all these challenges at the end of the post so you can join in the fun also. :-) Thanks goodness for all these challenges as they motivated me to get another Thanksgiving card done.

I'm a loving how this card turned out as I did some experimenting along the way. Of course I didn't mind that my first stamped image didn't turned out as I would have liked as it gave me a chance to play with my markers to decide which ones to use as well as to see what would happen when I rubbed chalk over the image after coloring. Okay enough of my yakking. Drum roll please!


I started out by running photo paper through my embossing machine. This time I wanted the leaves to be de-bossed instead of embossed. Then the fun began with rubbing Distress Inks over the photo paper with a blending tool until I liked it. I did realize that I need to buy re-inkers to ink a couple of ink pads. I just don't understand why they would need it other than they have been heavily used for over five years as they were the first Distress Ink pads I bought.

My sentiment is from a vintage clipart. I didn't like the color so changed that in PhotoShop. After cutting just the sentiment out I inked the edges with gold ink.

The woven trim was a thrift store find. At the time I was going to use it for a piece of  artwork  with a beach scene but changed my mind. Since photo paper is narrower than my card base I wanted something to cover the seam. After playing around I decided that I wanted a little bit of the card base to show. 


The image I used is by Just For Fun Rubber Stamps. Sorry I'm too lazy to look up the name of it. Originally I tried to use Sticky embossing powder to foil the image but I didn't like the way it turned out. Then I saw the jar of Precious Metal Leafing Medium and thought I would see what happened stamping using it. I applied the medium with a sponge brush. Then stamped like normal. I had just a little bit too much of the medium on my stamp. Second time was the charm. 

I colored the ribbon with a Spectrum Noir marker and then heat embossed clear over it. However when I colored with chalk over the entire colored image it was dulled. The corn and husks were also colored with Spectrum Noir Markers.  I have a ton of Spectrum Noir markers but not a good orange and I didn't like any of the browns I tried on the my first stamped image. A friend gave me a set of Tulip markers so I used those.. For the leaves when I went to brush yellow over using the brush tip another color was transferred giving me the happy accident of having mottled leaves.

After hand cutting out the image there were white edges as well as I thought the gold leafing was too bright. The husks were too bright of green also. On my first stamped image I decided to see what would happen if I chalked over the image with Khaki color chalk and my finger. I then took a cotton ball to wipe some of the chalk off. I love how it muted the gold and the green. As well as helped the edges to blend in more.

Challenges I'm entering:

  1. http://justforfunrubberstamps.blogspot.com/2016/11/just-for-fun-november-challenge-give.html
  2. http://shoppingourstash.blogspot.ca/2016/11/sos277-gobble-til-you-wobble.html
  3. http://www.hidinginmycraftroom.com/2016/11/himcr-274-fall-colors.html
  4. http://themixedmediacardchallenge.blogspot.com/2016/11/mmcc-29-thanksgiving.html
What challenges if any do you enter? Does entering challenges motivate you to craft more?

What have you used to stamp with besides ink pads?

Off to hide in my craft room some more and after I glue some dried grasses in between two sheets of deli paper to create another holiday card.

Wishing you Happy Frugal Crafting till we meet again!


Monday, November 7, 2016

Elegant Santa

Hi everyone One Crazy Stamper's challenge this month is Fall/Winter Fun. When I think of Winter fun I think of Christmas and Santa. With that thought in mind I decided to play with High Hope's Elegant Santa stamp. Which by the way High Hopes so generously sent me along with another stamp for winning their September contest.

I had so much fun creating this card that I only wish I could have gotten better photos. Hopefully the closeups I took will give you a good idea of how gorgeous this card really is.


I started out by wiping VersaMark ink on my embossing folder. The folder had teal blue residue and the ink picked up that color.  I then heat embossed my deli embossed paper with Recollections glitter embossing powder.

My circle was cut from a scrap of card stock I marbled using shaving cream and reinkers last year. I love the way this paper turned out and think it is time I marble more paper using this technique.


I added reinker to my VersaMark WaterMark inkpad as I wanted to make sure it was nice and juicy. Than after stamping my Santa I sprinkled on Ranger Sticky embossing powder. I then heated the powder and as soon as it melted quickly placed down my piece of foil. I burnished the foil good and did end up heating up from the backside and burnishing some more to get better coverage with the foil.

I hate to admit it but I bought Neon Ampifly several months ago and haven't really used as I didn't like my results. However I got to thinking and decided to see what happened if I painted it on before using my heat gun. I love the way the beard and mustache turned out using it.

Another thing I haven't used much is Martha Stewart flocking powder. I used a paint brush to apply glue and then sprinkled the flocking on the band of Santa's hat.

I tried to paint the hat with a red gelato but it was too pastel and the color was trying to bleed into the flocking.  I ended up taking a Poppy Red color pencil and coloring. The holly and the bell on the hat were colored with gel pens.

Using a smaller circle die I cut out card stock which I airbrushed to make it a darker green. Then using my label marker with Satin tape I printed out the Merry Christmas and cut the ends.

Details about the challenge can be found here:
https://onecrazystampercom.blogspot.com/2016/11/november-challenge-fallwinter-fun.html

Thank you for stopping by. Wishing you Happy Frugal Crafting till we meet again!

Friday, November 4, 2016

Postcard Winter

Hi everyone I was shopping from my stash and am pleased the way this card turned out. I did discover that I need to buy reinkers for my archival black inkpad and my Stazon Jet Black.

Talking about shopping from the stash this card will be entered in the Shopping Our Stash challenge. Details for this week challenge can be found here:
http://shoppingourstash.blogspot.ca/2016/11/sos276-home-sweet-home.html

Go grab yourself a cup of coffee, tea, or hot chocolate and sit a spell.


When I saw the challenge theme this week is Home Sweet Home I was disappointed because I thought I wouldn't be able to enter. Then while checking to see what was in a box in my playroom this postcard stamp literally jumped out when I opened the lid. I knew I had to use it and then it was a question of how am I going to use it. Literally dozen of ideas popped into my head. Then when I was looking through past posts to feature a post on the blog I saw a post where I had used a printed image on photo paper and gelatos to color.

I know I have old fashioned photo corners somewhere but where is anyone's guess and since the challenge is shopping from my stash I couldn't justify going out and buying some. Then I remembered I have a couple of punches which allows photos to slip in a frame. Oh the shame the punches have been gathering dust for three or more years. Using my go to card stock 110 lb. Georgian Pacific white I punched the corners. After coloring my stamped image I decided I didn't want to leave the card stock white so used a bronze Sharpie in my eBrush. Did I mention the eBrush was one of my best investments. It has paid for itself just by not having to buy card in different colors. :-)

The stamp is Snowy Postcard (Christmas) by Stampendous. A friend surprised me with the stamp three years ago. My image is stamped on photo paper bought at a dollar store years ago. It is water and smudge resistant. Needless to say when I saw the photo paper I bought up all in stock.

I had stamped with Jet Black Stazon ink only to get a faint image. I had forgotten that the pad needs to be reinked along with the Ranger Archival black pad. The Timber Brown Stazon ink picked up the black ink that was still on the stamp while giving me a better image. I wasn't sure how the Stazon ink was going to work on the photo paper since it is glossy.

I had so much fun coloring the image using a red gelato with a water brush for the buildings and yellow for lights and the one window. A green gelato was used to color the holly leaves. Gel pens were used to color the berries, frame and to accent the smoke coming from the chimney. Metallic pan watercolor paints were used for the stamp and the smoke.

Tip: When painting with gelatos or watercolor paints make sure your brush is almost dry. I would swipe it on scrap paper before painting on the photo paper. Also you can add more color after the layer has a chance to dry some. Better to start lighter color than to get the color darker than you want.

It was so much fun to use DecoArt Snow Writer. I did decide to cover the foreground completely with snow. As far as I know there is no rule about modifying stamped images. Or if there is I break it often. ;-)

If you have craft supplies which have been gathering dust I suggest you check out  http://shoppingourstash.blogspot.ca/. While at it why don't you join in a challenge. The challenges run Tuesday through Monday until 11:55 p.m EDT which will probably change to EST.

Do you use photo paper in your creations? How have you used gelatos?

Thank you for stopping by and do come back. Wishing you Happy Frugal Crafting till we meet again!


Thursday, November 3, 2016

Embossed Glaze Panel Autumn

Hi everyone I decided to try a technique I read about and it didn't turn out as planned. Sometimes my play can be a learning experience. I was however able to save my glazed panel and make things work. Let me know if you think I saved the day.

Can you tell I've been hiding in my craft room and playing lately. Yes, and that is one of the challenges I'm entering this week. Especially since it is a free style challenge. Not sure exactly what that means but I think this card will qualify.


 I just didn't like the look of the glazed panel on the white embossing. I first airbrushed the panel in different shades of yellow. Still didn't like it so added brown.  Must be the mood I'm in today as I still wasn't happy so ended up putting the alcohol blender marker in my airbrush.

The sentiment was stamped on a scrap of calligraphy paper. I love this stamp from Just For Fun. Not only is it fun to stamp with but also to cut out free form. Plus it reminds me of falling leaves.

I took my embossed panel and chalked the leaves. Using bright pan chalks and my finger. However when I took my finger and spread Plaid Glitter Dimensional Magic over the panel the chalk smeared and the leaves were pastel instead of brilliant fall colors. Perhaps I needed to use darker colors and a heavier application of chalk when planning to apply a glaze over the chalk.

 I decided to go ahead and let the glaze dry overnight. I did like how the chalk mixed in with the glaze coloring some of the gold glitter.

Then this morning a possible solution came to me. O.K. my alcohol markers bleed through on this card stock so I'll see what happens when I color on the back of the panel. The markers didn't bleed through where some glaze seeped to the back but still it was better. Alas the dark yellow doesn't show up well in the photo of the panel but I wanted to show the shine and glitter.

The instructions had the panel matted but I forgot that detail. I guess because for the most part I'm not a mat girl.  Because I used strong double sided tape to adhere the panel I was afraid I would ruin my card by pulling it up and adding a mat.

Challenge I'm entering:

http://www.hidinginmycraftroom.com/2016/10/himcr-273-freestyle.html

I know I probably sound like a broken record but I encourage you to join in challenges. Not only is it fun but the more you stretch your creative muscles the more creative you will become.

O.K. I'm off to hide once again in my craft room to work on another weekly challenge. Wishing you Happy Frugal Crafting till we meet again!


Tuesday, November 1, 2016

Be Thankful

Hi everyone can you believe that it is the first of November. That means that here in the U.S. we will soon be celebrating Thanksgiving. I will be entering this card in two challenges where the theme is Thanks or Thanksgiving details will be at the end of this post in case you would like to enter into the fun.


I started by running the front of my card base through my embossing machine with a folder by Darice. Then I took my eBrush and using two different browns by Spectrum Noir airbrushed. Then I took my finger and pan chalks to color the embossed leaves. Then stamped directly with VersaMark ink and sprinkled clear Ultra Thick Embossing Enamel over the card and melted it creating water drops.

The leaf under the pumpkin was from my stash. The pumpkin is a Just For Fun Stamptangle image. After cutting out the pumpkin I colored with pencils my go to media lately for coloring.

The sentiment was printed and I cut it free form.

Challenges I'm entering this in:

http://justforfunrubberstamps.blogspot.com/2016/11/just-for-fun-november-challenge-give.html

http://themixedmediacardchallenge.blogspot.com/2016/11/mmcc-29-thanksgiving.html


Thank you for stopping by. I hope I've inspired you to make cards using the gratitude theme.

Wishing you Happy Frugal Crafting till we meet again!