Tuesday, June 26, 2012

Summertime Livin Is Easy

Over at Monica's Creative Madness there is the Cameo Creative Challenge going on. The theme for this challenge is Summer and you don't have to have a Cameo to enter. You do need to use a Silhouette for part of your project. Challenge ends July 5 at midnight PST. You can enter Here

I saw the challenge theme and immediately the lyrics from a song from the opera Porgy and Bess started going through my mind. "Summertime and the livin' is easy.Fish are jumpin' and the cotton is high." Well it doesn't feel like Summer where I'm living and I haven't gotten my fishing license yet so I don't know whether the fish are jumping. No cotton around here to get high either but the livin' is easy.

Thoughts start going through my head of heading to the ocean my favorite spot any time of the year but especially in Summer when it is usually warm enough to wade in the water with one of my dogs. For now though I must go to the beach and fly my kite  and wade in the water only in my head.

This card would not have come about without Cameron who cut out most of the print and cut images flawlessly. I'll forgive him for the wave as I probably re-sized it too small and didn't edit a point in one spot.

O.K. I know you want to see my masterpiece. Just a moment while I pull the curtain off. Ta Da! Opps! Cover your ears for a moment and please remove all children from the area. My camera card  just went belly up so sorry about the quality of the picture but I had to use my camera phone.
O.K went in to Photo Shop and enhanced the top photo so it is a little better quality.


The kite is from the Silhouette store the rest of the Summer images were scanned from a glitter sticker book but it is long gone so I don't remember the name other than it was from Dover Publishers. I thought I could trace the full page of images and cut them out that way but the way they were laid out on the page they cut wonky. I ended up having to individually crop each image and save. While at it I went ahead and enhanced some of them. The clouds are by Bird.The wave is from a  template in the book Card Making. The sandpaper and card base are the only two things that Cameron did not cut. The sun,title,and thongs were heat embossed with Recollection glitter embossing powder. The beach ball was heat embossed with clear  embossing enamel. I did it so it looks like it has water drops on it. I took silver ink and daubed it on the clouds to give them a little bit of texture. I folded the top of the waves over to make it look like the tide was coming in.

So what do you think? My roommate said it is too busy. LOL! He should have seen it before I started subtracting elements.

That is all for now but I'll soon have a tabbed card to share with you. Just wanted to get this done and posted before the deadline.

Thank you for looking and do come back. Wishing you Happy Frugal Crafting till we meet again.


Monday, June 25, 2012

Using Bottle Caps

Summer is here and with it more people will be drinking out of bottles with twist off caps. Some of those bottle caps will be metal. It is true you can buy bottle caps in craft stores but why put out the money when you can have them for the cost of whatever is in the bottle. If you are not too bashful you can ask your friends and neighbors to save them for you.

Bottle caps can be decorated in many ways. Word stickers may fit on them. You can cut circles out of fancy paper. I did a print and cut of an image for the one I used. You can spray paint them. Maybe with a glitter spray. The possibilities are endless.

Here is the card I came up with: (My camera is being wonky again. The petals are curled up. Click image to enlarge.)


The image was glued on  the bottle cap using Beacon 3-in-1 glue. It did slide a little bit when I was positioning it. I was worried it might not stick on there but it is down tight.  The bottle cap is attached to the flower with a couple of pop dots stacked.

The flower is a free studio file. I just deleted the center in order to have it solid. It is heat emboss with silver. I decided to go with silver since the edge of the bottle cap is silver.

The panel is a rectangle that Cameron cut out and I used my decorative edger ruler for the two edges. I'm a loving that ruler. I tore the paper slowly to get a more rustic look.

The panel was an experiment. I saw in a book where a woman used the mini egg shape ink pads and rubbed them over the paper in a design. I didn't have any of those but do have square chalk ink pads. Decided to see what I could do with those. It was so much fun that now I want to buy a bunch of those mini egg shape ink pads.

She stamped  with silver ink an image over the design but my silver ink pad is dead. I played with different inks on a scrap piece that I had played with the chalk inks and decided to use my purple solvent ink. After all just because you see something on a blog, in a magazine or book doesn't mean you have to copy exactly.

I hope I have inspired you to use those twist off bottle caps instead of tossing them in the garbage. Of course if you don't want to use them crafting you can always send them my way.

Thank you for stopping by and do come back. I think I have figured out how to make a tab card cutting file now. If so I will share a card as well as directions of how to make your own with or without a cutting machine.

Wishing you happy Frugal crafting till we meet again!

Sunday, June 24, 2012

Happy Birthday My Grease Monkey!

My son has a birthday next month and I'm always at a lose for what to make a card of for him. While going through my digital stash looking for an image for another project I found a background that started the creative juices flowing.. From there the project clicked into place.

I'm loving how this card all came together. Oh you wanted to see the card. Drum roll please! (click image to enlarge)Opps! Hold on a second while I upload new pictures. I thought that car in the garage looked funny. It was parked upside down. Good thing it was easy to fix.


I decided to have the Classic card face towards the opening of the card so that it would not  hide the details in the background. No tracing required for the background since I was just cutting out the whole image. Just make sure the setting is set to cut edge. I drew a narrow strip on the street side that the car was going to be traveling on and centered it horizontally for the track.I cut out one background with the slit and one without. 

I traced the classic car and the race car in the garage. I cut out two of the Classic cars. Brushed on one of them Dimensional Magic for the windows and head lights. When that was dried I placed pop dots on the backside. Slipped it through the track and attached the other car to it. Make sure the pop dots are not too large as you want the car to freely move on the track. I pop dotted the race car onto the back wall of the garage. Trying to place it so it looked like it was parked in there.

I brushed Dimensional Magic on the windows in the background on the one that had the slit in it. When dried and after the car was attached I glued that piece onto the other background. By the way a little bit of Dimensional Magic goes a long way so don't let the price scare you away from buying it. It can be a fun way to add to your project.

The sentiment was typed in Studio and the letters filled along with the line color filled and set to print. I didn't like the white background so decided to play with pattern.  The argyle pattern appeared to have the same colors as in the background. In addition argyle to me is classic and classy.  I felt like it needed something when laying things out on the Studio work-space. I often do that to get an idea of how the finished card is going to look. I came up with the idea of using a couple of wheels.

So what do you think of the card I made for a man who is a mechanic,loves to legally drag race,and has been in love with Classic cars since before he could talk? 

Thank you for stopping by. Do come back. I'm not sure what project I will feature next but I'm working on a couple of them.

Wishing you happy Frugal crafting till we meet again.


Wednesday, June 20, 2012

Photo Paper Not Just for Photo

I must admit I've been in a messy and experimental mood lately. I decided since I had my alcohol inks out dyeing paper towels (see previous post) to see what I could do with photo paper.

I definitely will be cutting more shapes out of Photo paper with my Silhouette and using alcohol and water color paints on them. I was thinking why didn't I think of this sooner. LOL! Here are my cards.

I could have cut out the flower with Cameron but decided to use the Sizzix die I won last year. I love how the photo paper worked for a flower. This was the first one I did where I learned that dry photo paper grabs the ink. Duh! I then sprayed gold Perfect Pearl mixed with water on the photo paper and dripped alcohol ink on it. The water helped the ink to move. The resulting pattern reminds me of something I might find in a Summer dress. I also cut out some sheer ribbon with my Big Shot and layered them between the flowers when I put it together. The square was stamped with a wood background stamp my sister gave me. I saw a card with pink wood background today and loved it. I went ahead and randomly stamped the pad over the stamped background.  I am not normally a pink person but I'm loving this card.
I sprayed the photo paper with water and then sprayed colored water but alas that particular mister no longer gives me a fine mist so I got splatters. I then randomly dripped Butterscotch ink and rotated the paper. The scallop is the scallop label in Studio. The butterfly is actually a free applique pattern which I converted to a cutting file. I sprayed them with water mixed with wild plum and stream alcohol ink. Then splattered gold water color paint while they were still wet. I'm not sure I like this card but it was fun playing and I know that someone will probably like it. LOL! So it is safe from the garbage can.

Have I inspired you to try photo paper either for backgrounds or cutting shapes out of? Since I can buy at a dollar  store packages of  the large size I think I'll be using it more. Where else can you buy unique paper for five cents a piece?

Thank you for stopping by and Happy summer. Wishing you happy Frugal crafting till we meet again.

Tuesday, June 19, 2012

Don't Forget The Paper Towels

Paper towels are for more than cleaning up messes in your craft area. They can add texture to your projects. They can be colored with thinned acrylic paint with food colors or inks. I have even spritzed glimmer mist on paper towels. Most paper towels are two ply so they can be separated.  The main reason I separate them is I can get two pieces of paper for the price of one.

Although in the past I have dipped paper towels in thinned acrylic paint and crumpled it and then unfolded it and let it dry for this card I did something different. I even stamped on a paper towel which is something I have not done before.

 O.K. fresh off the crafting table.  My paper towel card. (Click on image to enlarge)

I tie dyed the paper towels with alcohol inks and soap dye mixed in water. I did not like how the darker base turned out so decided to see about splattering with a bristle brush a mixture of  ink,water and pewter Perfect Pearls. I also splattered gold water color. The splattering helped the colors to bleed more The light colored one on the heart was too light but I sprayed the darker green on my plastic bag and laid it down on the bag pressing it down to pick up the ink.

I stamped the heart using a Ditto background stamp. I hate to admit it but I've had the stamp for a couple of months and this is the first time I've used it.

After gluing the paper towels on the shapes I tore the excess off. I glued crotchet thread around the heart and wrapped it around the heart. Then I tied my key on it. I decided to tuck the key under the thread so I could position it better.

The heart is a free Silhouette file. I ungrouped and deleted the star and stripes inside it. The panel is a rectangle shape drawn in Studio. I found the key when I put in free SVG keys in search. My gold embossing powder is lumpy and normally I break up the lumps but this time I left it to give an aged look.


What do you think? Have I inspired you to try paper towels as a crafting medium?

Thank you for stopping by. Do come back. As long as I had my alcohol ink out I did some play with them and photo paper which I'll share. Along with a card. Now I can't wait to go buy more alcohol inks.


Wishing you happy Frugal crafting till we meet again!

Friday, June 15, 2012

Glue Paint Play & Floral Card


For the most part my DIY glue paint play was disappointing. I discovered that alcohol inks mixed in glue left specks as it did not totally dissolve in the glue. I discovered that not all white glues are equal. My Elmer's multi-purpose glue was way too runny for drawing with and leaving a raised design. In fact it spread into a awful blob. However, I am pleased with how a couple of things turned out. I went ahead and used the glue paint with the specks because you know me I don't waste anything. Here is the card I made using my glue paint elements.


 I love the background piece. I've done this before but this time I did it a little different. I used two different glue paints. One mixed with Butterscotch alcohol inks and the other with Stream.  Next time I'll color the glue with my soap dyes. I've used those before. Food coloring works great and used to be inexpensive I don't know if it still is.

Paint glue on your wax paper and place single ply facial tissue,napkins, paper towels. or gift wrapping tissue in the glue This time instead of using the whole sheet like I normally do I tore it in pieces and layered.  Pressing it down as I went along.

Keep adding glue and paper until you are satisfied with the look. I went ahead and added a whole sheet of facial tissue on top. Then daubed the glue paint on top. Don't worry if your media tears you can always mend it with more paper. You can either leave it like it is or add another piece of wax paper on top. Depending on what effect you are after.

You don't have to limit yourself to one color. You can daub on other colors like I did here. Also while the paint is still wet you can add things like dried flowers,glitter,confetti, etc.

I tore the edges with a edge ruler for this card. Usually I just tear them straight. You can also trim them with a paper cutter.

The flowers are print and cut and the image is from Dover clipart. I painted a light coat of my Stream glue paint  which I thinned with water on them. It was lighter color than I wanted and not as shiny. I added more ink and added another coat. If you coat printed images too heavily with the glue you will lose your lines. Wonder how I know. Better to add two or more light coats.

Yes, I had to play with my Orchid Liquid Pearls. I don't know what I did because they flattened out but I still like them in the middle of the flowers. It was my first time using the Liquid Pearls. Hopefully I'll get better before I empty the bottle. LOL!

If you have kids out of school and they are bored send them outside with glue mixed with food coloring,wax paper and whatever thin paper you have on hand. Maybe that will keep them out of your hair for awhile and you will have some neat one of a kind papers to use. LOL! That is unless the kids can't part with their masterpiece unless you pay them.

My frugal tip is when school supplies go on sale stock up on white glue. You can always find a use for it.


Thank you for stopping by and do come back. I promise I won't be as long winded next time. LOL! Wishing you happy Frugal crafting till we meet again.


Thursday, June 14, 2012

Free Supplies At Home Improvement Centers

Maybe you find yourself at a home improvement center and not by choice. What are you going to do while the person you are with is drooling over tools and other things. Especially if you are stranded there for an hour or more.

You can walk around with a camera phone and take pictures of rugs and things which inspire you. Also you can pick up some free crafting supplies. No! I am not talking about shoplifting. I'm talking about free samples.

There are paint chip samples and many of them are large size and can be cut with a  cutting machine if you have one.  Some stores have wallpaper samples free for the taking. There is also though samples you might have overlooked. I'm talking about the counter-top samples. There are different sizes. I didn't realize that the larger size was the perfect size for my pre-scored card bases or I would have picked up more.


Here is the card I made today using one of the larger ones as a background panel. (click on image to enlarge)


The fairy and the flower background are from the delightful book Fairies Artist Studio. It comes with a CD of images which you can manipulate in Photoshop. I saved the background as a png. Then I had fun playing with different layers so I could customize my fairy. She was saved as a png.

In Studio I traced the fairy and then filled in the wings and boots with color. The dress did not fill in right. Some images just do not trace well. I went and deleted all but the filled in areas and retraced her and selected trace outer edge. Argh! Her wings printed blue instead of the teal color I had selected for fill in Studio. I chalked in her skin and outfit. Then used a color pencil for her hair. I used Stickles in  the waterfall color on her wings. She is pop dotted in the middle and one foot glued down. I wanted her to look like she was actually walking down the stairs.

The floral background was a little more trickier. After tracing and selecting trace outer edge I still had to edit points and do some deleting. I used chalks and color pencil to color it.

Because the samples have a hole in them you are going to have to either cover it with a background or find a creative solution like I did with the ribbon.

There you have my card using creatively a free sample. I hope my granddaughter likes it. Let me know what you think.

Thank you for stopping by. Do come back as I share with you about my failure and successes using DIY glue paint. As well as a card using some of what I made.

Wishing you Happy Frugal crafting till we meet again.

Tuesday, June 12, 2012

Interactive Father's Day Card

I wanted to make my roommate a special Father's Day card. Originally I had wanted to use the dogs but after many frustrating hours trying to trace the photo of them I wanted to use for a print and cut I gave up. I did however go with my original idea and added to it.


Yes, I used my track so that the dog moves through the grass. I'm thinking of using some craft floss for a leash tied around the dog's neck. I have no idea where the dog came from but I modified him from the original file.  I had to cut him out three times before getting him fat enough to not fall through the track. I did narrow my track.  Since my fur babies are black with brown  I. went ahead and used some black chalk.  

The grass is a Studio file which I filled in with color as well as the track. I made one piece of grass shorter and glued it on top of the other piece. For some reason white showed after cutting out the grass so I went ahead and rubbed what was suppose to be green ink on the grass. The grass is pop dotted to the track. I just used the dots on the sides. The track is pop dotted onto the card. 

The bone is another Studio file. The font is 4Dogs. I love the font but alas the apostrophe ends up being a sword. So the apostrophe and s was left off of father's. I don't know why I didn't make the track so that it filled all the way across. Still I think my roommate will like it.

I am working on a couple of other cards and perhaps I can get them posted sometime this week. Thank you for stopping by and do come back.

Happy Frugal crafting till we meet again!

Thursday, June 7, 2012

Paper Casting Cards

In no time at all you can put together cards if you have paper cast embellishments made.  As well as an assortment of card bases and shapes on hand. I posted about making paper cast embellishments here.
http://craftingfrugalway.blogspot.com/2012/06/paper-casting-embellishments.html

Here is a card I made from a soap paper casting. I love this sun and this time I didn't make it as thick as in the past.
Click on image to enlarge
Quick and easy to put the card together. Even with doing the sentiment in Studio it took less than ten minutes to put this card together. I did spritz the sun with Perfect Pearls Gold mixed in water ahead of time. The gold flecks don't really show up in the picture. I thought it interesting that the paper castings actually dry quicker than card stock when I spritz them.

Ta da! Here is my second card.


While downloading this week's samples from Dover I saw the black and white flower. I quickly changed the idea of what I was going to do.

Here is a closeup of the flower and you can see the Mandarin orange that I spritzed on the stamp casting as well as the gold on the flower.


If you have ragged edges  and don't like them on your stamp casting you are going to want to cover them some how like I did here with grosgrain ribbon. Or trim with a guillotine type paper cutter. Your blade paper trimmer is not going to do the job.

I hope I have inspired you and given you some ideas you can use in your crafting. Thank you for stopping by and do come back. I'm going to be playing with glue paint and posting instructions. Hopefully I can get a card made using what I paint. This can be fun project for the kids to do as well as inexpensive.

Wishing you Happy Frugal crafting till we meet again!

Wednesday, June 6, 2012

Paper Casting Embellishments


Several years ago I used to do paper casting for embellishments on cards. It was a lot of fun to do as well as a great way to use up junk mail. LOL! that was before I had a die cutting machine. While sorting through things I found some of my first embellishments and thought it would be fun to make them again.

Supplies you will need besides scrap or junk mail paper are:

Blender.... Preferably one that you pick up at a thrift store,garage sale or can con friends or family to give you. That is unless you don't mind replacing the blade on the blender you have now and getting some extra fiber in your smoothie.

Strainer...I prefer a plastic one as it is easier to clean. If you use a metal one dedicate it to paper making because believe me you are not going to get all the little pieces of paper out of it.

Plastic container....Something big enough to drain the pulp in.

Old towels, tee shirts,small pieces of old blanket, felt,or sponges....Something that will absorb the water. Paper towels can be used but that gets to be expensive unless you are going to recycle them into embellishments.

Molds....Cookie cutters,soap molds,candy molds,rubber or clear stamps

Today I am going to show you how to do your paper casting using soap molds. If you use cookie cutter molds be sure to seal one end with packing tape so that pulp doesn't ooze out leaving a ragged edge.

O.K. lets get started. First tear your paper in pieces and fill your blender about half way. I also recycled paper casting material that I did not like how the embellishment turned out.


Add warm water. I add two cups. The amount of water is not as critical as when making paper but you do want enough to cover the paper and to allow for the paper absorbing the water before blending. 
Blend on low for about 30 seconds and then high for a minute or more. The longer you blend the finer your end product will be. Yes, my blender is  sitting on the toilet. I'm trying to potty train it as it has a tendency even with the lid on to poop. Seriously though the kitchen is in use so the bathroom is the next best place as long as you have two. LOL! It is a rainy day or I would do this outside. This can be a messy project so I prefer to do it where I can easily clean up.

The amount of recycled paper casting material was so small that I was surprised that it came out an orange color. If using white paper you can color with food color or ink.

Next is to pour the pulp in a strainer over your container. I had to jury rig this a little bit with the lid of the container so the strainer would stay in place. Just easier for me that way. Especially since you want as much water as possible to drain so it takes a couple of minutes. I did with my hand swish the pulp a few times to open the holes back up so more water would drain. The more water you can drain the less blotting you will have to do.

Have ready your molds. Some people spray their molds with cooking spray. I don't do that with the soap molds and have not had a problem getting my embellishments out. I place them on a large lid  turned upside down to contain any mess while I fill them.
Now comes the fun part. Take a small amount of pulp and place in the mold and start patting it into place. Better to start with too little and add more later.
Blot with whatever you are using to remove the water. Here I am using a towel. Blot and tap until you have the thickness you want. If need be you can add more pulp. The pulp will compact as you blot and pat it. The more compacted the more likely your embellishment will stay together. LOL! Wonder how I know that. The more water you can blot up the less likely your embellishment will get moldy on you.


When you are satisfied find a place to place your molds. Preferable in a sunny place. But lacking that you can do it under a lamp like I am doing here.
Yes, poor Cameron has to share the space with my embellishments. But I have them so I can move them if I need or want to use him. When they are dry they  can be popped out like soap if they have not already  fallen out due to gravity.

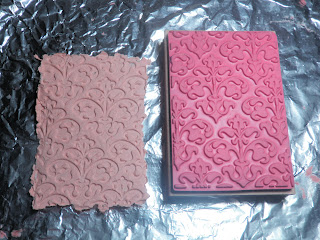
While playing I used a rubber stamp as a mold. Because the pulp on it was thinner it is dried. I am pleased with the way it turned out. I will definitely use this stamp and other stamps for paper casting this way.


 You finished making your embellishments and now it is time to clean up. Something very important to keep in mind while you clean up is that your mixture acts like concrete when dry. Under no circumstance pour the water in your container down your sink or tub unless you are prepared to pay a plumbing bill. Or clean your blender in the sink for the same reason. You can toss the water down the toilet with no problem as  well as water that you have swished  around in your blender to pick up the pieces as long as there is not a lot of pulp. After all you flush toilet paper every day. You can dump and rinse everything outside with a hose. Or dump it down a storm grate in the middle of the night while your neighbors are sleeping. O.K. please don't send me hate mail or place hate comments on my blog. I'm just kidding about the last. I would never do anything that has an impact on the environment like that. Especially since the storm drains where I live go to the river. I like to fish too much.

There you have it a fun and frugal way to make embellishments. Oh and if you have kids they can have fun doing this outside this Summer.

Thank you for stopping by and do come back. I will be doing a card with some of the embellishments after I fancy them up with paint,Perfect Pearl, etc.

Until we meet again I wish you Frugal crafting.

Sunday, June 3, 2012

Gone Postal!

No! No! Not postal that way. Although I must confess I was ready to shoot Cameron because he wasn't recognizing the registration marks for a print and cut. Instead I've gone postal creating a card for the Moxie Fab World Postage challenge.

In case you haven't noticed the postage theme is still going strong when it comes to using it in crafting. It seems like every day another company is coming out with postage theme products. Now having said that I don't have any of those products. However that doesn't mean that a project can't have a postage theme. After all with a little bit of research you can come up with all kinds of digital images to use. You can even make a small envelope and card like I did.

Oh, you want to see the card. Just a moment while I put the finishing touches on it. Don't worry you won't have to wait too long because this is the magic of the internet.

Drum roll sounding! :)


The background is a stamp collage that I cropped and resized. The airmail envelope,letter and post card were also resized. As was the pen. Oh and notice the trendy chevrons on the pen how neat is that! (These are all Royalty Free images) Easy Peasy  print and cut lol as long as Cameron recognizes the registration marks. The small envelope is actually cut from a recycled envelope. In fact the card is covering the bar code on it. The card is from the scallop label file in Studio library. (lol! yes another free file) Just replicated and welded as well as resized. The front  of it is stamped with a background stamp. I did pop dot the envelope on the card as I did not want the pen to be flat.

There is still time to get in on the fun. http://www.moxiefabworld.com/2012/05/card-creations-week-postage-challenge.html

This was my first attempt at doing a postage card. I'm not sure whether I like it or not but it did encourage me to think outside of the box. As well as practice printing and cutting. I do know that I'll be making more mini envelopes and cards to add to cards. As well as putting together more collages in my cards. I had forgotten how much fun making collages are.

My tip is to use those envelopes you were just going to throw in the trash in your crafting. Hey after all they are free even if bills come in them. LOL!

Thank you for stopping by and do come back. I am off to work on a Father's Day card for my roommate. I hope I can pull it off as it is pretty hard to top the iDad card from last year. Yes a iphone shaped card where the icons opened to reveal secret messages.

Wishing you happy Frugal crafting till we meet again.