Wednesday, December 31, 2014

Altered Playing Cards Week 16

Hi everyone! Can you believe that this is the last day of the year or that we are already in week 16 for the altered card challenge. This week there did not appear to be a theme but I did use Claudine's technique even though I had to improvise once again. Of course like usual I also put my own spin on things.

Claudine used Tim Holtz tissue but I don't have any so I used wrapping tissue paper and Ranger Archive black ink which is waterproof with background stamps.


For this card I painted my gessoed card with metallic turquoise and metallic copper paint to give it the look of old metal.. I used a checkerboard stamp I bought at a thrift store for this card. When the card was dry I took my stamped tissue paper crumpled it and then glued it down. When the glue was dry I took gel walnut stain and rubbed over it  with that and then with a paper towel dabbed some of the stain up. The sentiment was done with my Brother's label maker. I like using the clear tape.

The flower was the fun part of this project. It was an experiment in making my own paper clay from clean toilet paper.  I cut my petals out of card stock and then put the paper clay over the card stock covering it and shaping as I went. I made the three balls for the center. When the paper clay was dry I used my airbrush to color my flower and glued the balls in the center. I used a foam adhesive square on the back of the smaller petal to give the flower a little bit of dimension. Then I took a scrap of green ribbon to make my stem and a leaf.

This was a fun card to do and now I know that Ranger's Archival ink will work with my gel stain as well as glaze paints. :-)


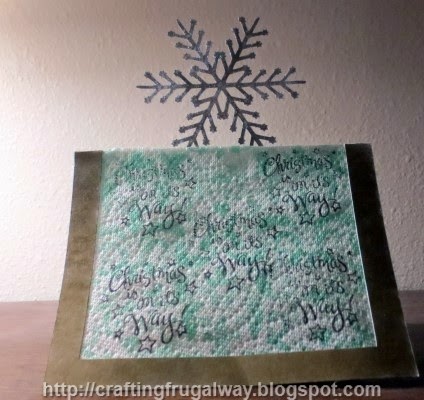
For this card I painted turquoise metalic paint on it. Even with the sequin tissue paper on it was still really bright. I stamped with my music background stamp and once again did what I did on the first card. When the glue was dry I took Powder Blue Paint and mixed it with  glaze medium. This gives color but still allows the paint to have some transparency depending on how much glaze you mix in.

The image I found on the internet when I put a search in for free New Year's clipart. After I printed and my machine cut it out I used Dimensional Magic for my bubbles. Glossy Accent would work also but Dimensional Magic just happens to be what I have.

Once again the sentiment was done with the label maker. This time I printed it with the letters vertical and overlapped the two labels.

There you have my two altered playing cards for this week. If you would like to try to make your own paper clay it is really easy.  This is a good way to play with clay without investing a lot of money. I used Mod Podge in mine but you can use regular white glue if you wish:
10 sheets double play toilet tissue paper shredded
1 Tablespoon of collage adhesive
1/4 cup of water

Put all ingredients in a ziplock bag  close it and knead. until you have a smooth consistency. Open the bag a little bit and squeeze excess water out. Store the clay in the bag between uses. This clay can be painted, colored with markers, sprayed with color mist, etc. You could even replace some of the water with food coloring.

This is all I have for this year. Wishing you a Happy New Year and Frugal Crafting till we meet again. I plan to do some tutorials and other fun things in 2015. See you then!

.


Friday, December 26, 2014

Altered Playing Cards Week 15

Hi everyone I hope if you celebrate Christmas that you had a good one. Luckily when I moved I kept my cell phone number as I received a phone call from a brother I had lost contact with. That made my Christmas. As well as the fact that my oldest granddaughter loved her gift of colored pencils and sketching pencils. The youngest immediately opened her gift and started coloring and adding stickers where they belonged.

We are now on week 15. There didn't really appear to be a theme but the technique was using stencils with embossing paste. I don't have any embossing paste and was too lazy to make my own with flour and glue. Instead I experimented with coloring "moulding paste" which normally dries clear. When I bought the moulding paste I was trying to fill out an order so I would not have to pay postage. I was looking for embossing paste but the "moulding paste" was cheaper and the manufacture said it could be used for transfer. I wasn't able to use it successfully for transfers but have been having fun experimenting.

Here are Claudine's cards. I just love that carrot.


When I saw the angel with the heart  on Claudine's card I thought of the fact that it would have been my anniversary on Monday. So I made my card with a stamp I must confess which I have never used in memory of the incredible love which I shared with Bill..

I wanted to stencil gold hearts but alas Metallic Mixative did not dry gold. However because of the light color the alcohol ink from my markers when I airbrushed colored them some. After the "moulding paste" dried I used a stamp with Stazon ink on the large hearts.  For the smaller hearts I used a Glaze pen to make random dots.I also used a Glaze pen to draw around the stenciled hearts.

I heat embossed my heart with wings using Lilac Vintage embossing powder. Then colored the heart with a Spectrum, Noir marker. Although I used glitter glue on the wings they didn't really end up being that glittery. I folded the wings up so it would look like the heart was flying to heaven. 

Like always it is a learning experience. I wanted to stamp my sentiment on ribbon but didn't have the color of ribbon I wanted. I discovered that I needed to color the ribbon first with the airbrush and then stamp.This is the back side of the ribbon and I loved the uncolored border so decided to use that side.


I decided to mix black acrylic paint in the "moulding paste" to color it.  I stenciled over a gesso card but since I had left over paste I decided to stencil over a card back which had not been prepped.

When the paste was dried I airbrushed with my eBrush and Spectrum Noir markers. I love how although there is color the blue background shows through. I  accidentally used my white Glaze pen on the squares  thinking it was my gelly pen but it dried clear. I then took my gelly pen and drew around the circles.

The bullfrog is ancient. It was one of the first stamps I bought and the copyright is 1983. Alas he has been sitting on the shelf gathering dust. When I was trying to decide what to use for this card I saw him and decided to use him. He is heat embossed with some green glitter embossing powder which was given to me. Then colored with Spectrum Noir markers. I used Dimensional Magic on the eyes. He is pop dotted on the card.

I decided to print my sentiment with my Brother Label Marker using clear tape. I went through different ideas of what to put the label on and finally went with a sheer ribbon. 

My goal this year has been to use stamps that I haven't used for awhile as well as other supplies which I have not used a lot. Both of these cards meet that goal with the stamps used and the ribbon. My other goal has been to experiment and that goal was also met. :-)

Do you make any crafting goals? If you don't are you going to make some for 2015?

Thank you for stopping by during this busy time of the year. Although I don't know what I'm going to be doing next do come back. Wishing you a Happy New Year and Happy Frugal Crafting till we meet again!


Monday, December 22, 2014

Altered Playing Cards Week 14

Hi everyone! I can not believe that we are already halfway through altering our deck of cards. As always you can jump in anytime. Click on the icon on the right for details.

Last week the theme was reindeer and I just happened to have a couple of reindeer stamps. :-) I had forgotten how much fun it was to heat emboss as well as cut stamped images out by hand. However, now I need to ask Santa for a pair of small scissors. Don't worry Cameron my trusty cutting machine you are not being replaced.

Here are Claudine's cards:
This was a really fun challenge but I must confess that I spent more time on my altered playing cards than I did on most of the Christmas cards I made. However, now I have some ideas for cards for next year. :-)


I started out by experimenting with my background. Since I had not prepped all my cards with gesso yet I went ahead and sprinkled Martha Stewart Coarse Crystal glitter in my wet gesso. When the gesso was dry I went then and used my airbrush with a blue marker. I was afraid it was going to change the color of the glitter but it did not.

Then I took a snowflake stamp and one with swirling snow and stamped with blue pigment ink.  I figured I might not get crisp images but figured since it was snow it was all right. 

Then I stamped my images on scrap card stock. I have lots of white scraps from doing print and cut as well as cutting out card bases. Rudolph was a stamp I picked up this year at a thrift store for under a dollar. At the time I didn't know what I was going to do. I heat embossed with copped embossing powder. Colore with Spectrum Noir markers and tied crotchet thread in a bow around his neck.  The tree and sentiment came in a package of G studio stamps which were under a dollar. I heat embossed the tree but the glitter embossing powder was too transparent so I didn't get the sparkle with the garland like I had wanted. I colored the tree and used a gold Sharpie on the star and the bronze one on the trunk. I used a hot pink glaze pen on the garland. Because of the black ink I had stamped with it became a dark purple. I then stamped and heat embossed the sentiment. I won't tell you how long I've had this silver embossing powder but the store has not been in business for several years.  Then I cut my sentiment out also. The tree and reindeer are pop dotted. I used the same blue ink as I used for the snowflakes around the edges.

Claudine used a die along with a matching stamp on her card. Since I don't have a die with matching stamp I had to improvise. I first stamped with blue pigment ink my snow swirl and heat embossed with Winter Wonderland embossing powder. Then I ran my cardstock through my embossing machine using a Darice embossing folder I bought this fall.

A good friend sent me a few years back a set of stamps with the reindeer. I heat embossed with copper embossing powder but decided to not color.  He is pop dotted on the card. Did I mention that I own stock in the company that makes those foam dots. Lol!

The Merry Christmas is a stamp I've had for awhile. I stamped once again with blue and the Winter Wonderland. I colored and cut it out. Alas my blue marker is brand new and was really juicy so it bled some on the Christmas. I cut the sentiment out free style.

I took a scrap of copy paper and tore it and then used my air brush with markers. I used a scrap from cutting out a scalloped shape to get my snow drifts.

Talk about being frugal both cards were made using scraps I love it when I can use some of my scraps up. Do you save scraps to use in your crafting?

Today started a new challenge using embossing paste. I'm hoping I'll be able to get my cards done this week. I still don't have my energy back but I am feeling better. I hope that everyone reading this is staying healthy. There are some nasty bugs out this year. :-(

Wishing you Happy Frugal Crafting till we meet again!

Sunday, December 21, 2014

Altered Playing Cards Week 13

Hi everyone! I'm a week behind on the altered playing card challenge. Last week the theme was bees. Here are Claudine's cards.
Here is my take on the challenge:
I tried to duplicate Claudine's background but it ended up being a disaster. I mixed orange and yellow metallic paint trying to get an orange yellow color. I didn't like it on my card so I went over while it was still wet with copper. I got the copper too thick and used a cosmetic sponge to wipe some of it off and then added some yellow. I discovered because the paint is so thick I could create a texture using the cosmetic sponge. When that paint was dry I took and rounded an old cosmetic spoinge and used that to randomly dab on Walnut gel stain.

My bee didn't turn out like I had planned but I decided to use it anyway.The bee printed out really light so I used my Glaze pens. I wasn't thinking when I put Dimensional Magic over it about copy paper curling. Opps! When some of the Dimensional Magic got on the other side I noticed that it made the paper translucent so after the front dried I went ahead and put some Dimensional Magic on the backside. At least now I know that Dimensional Magic will work over Glaze pens.

The sentiment is actually done on a scrap of pattern paper left over from making an envelope. I edged the paper with Vintage Photo Distress Ink. Alas my alphabet stamps were too large for stamping my sentiment and I could not find any suitable stamps. I used my Brother's label maker.

My honeycomb was actually a stamp cutting file from Silhouette.  I colored it with my airbrush and a marker.


The background on this card was fun to do. I used a stencil and gesso on my card first. Then airbrushed with a brown marker. Then placed a stencil and airbrushed with a maize marker. Then randomly used the airbrush with a blender marker. I used a marker to trace around only the hexagons in the stencil.

I don't remember where I got this cute bee at. which I turned it into a print and cut. Alas the antennas did not cut out right. After two tries of trying to cut him out I gave up and glued scrap floss. I edged him with Vintage Photo Distress Ink my go to ink.

The sentiment is stamped on the same pattern paper as in the first card.  This time I only inked the torn side with the Vintage Photo Distress ink. I found a cute set of alphabet stamps at WalMart for under $2, I noticed they had other fonts so I just may need to treat myself. My sentiment was stamped using Vintage Photo Distress ink. As I said this is my go to ink. It is the one ink that gets used the most. I need more practice stamping words as far as spacing goes but on the whole I'm pleased the way it turned out.

I started work on this week's cards and the theme is reindeer. I don't have the dies or stamps that Claudine's has but will at least adhere to the theme as I do have a couple of reindeer stamps. Hopefully I can get the cards done tomorrow as Monday there will be a new challenge.

Wishing you Happy Frugal Crafting till we meet again!

Friday, December 19, 2014

SVG Cuts Snowflakes

Hi everyone! Can you believe that it is almost Christmas. My cards are mailed and I have almost all of my shopping done. Alas I did not get as much outdoor decorating done as I wanted before the contest ended because I've been sick for two weeks now.Oh well making a wire lighted snowman will have to wait until next year. I did however hang in the side window a bunch of snowflakes on a string.
SVG Cuts has this free snowflake file and when I saw it knew I wanted to use it for ornaments. I don't have silver cardstock so I used my eBrush and a metallic marker for the solid piece. For the lacy top I painted glitter glue on it but alas the camera did not pick up the sparkle. I pop dotted the top snowflake on the base.  I also used clear zots to attach some snowflakes on the glass door around the wreath that I made. Alas I could not get any good pictures of the wreath as I kept getting reflections. The wreath has an old CD in the middle  which I used alphabet stickers on to say Merry Christmas. You can't see the greeting in the dark but anyone walking by during the day can see that and the snowflakes. Perhaps I will go out and take a nighttime shot of the lights and wreath all lit up.

That is all for now folks. I am off to do last week altered cards and then hopefully I'll get this week's done before Monday starts another challenge. Wishing you Happy Frugal Crafting till we meet again!

Thursday, December 4, 2014

Standup Snowflake Card

Hi everyone it has been lightly snowing all day. I don't know if my making a cutting file and this card had anything to do with it. Lol! I don't do a lot of designing in Studio creating cutting files. Especially if they are something a little complicated. However, I saw place cards with shapes up on top and decided to see what I could do. The person put the open panel in back but I decided to use it as the front. You know me I have to be different as well as try new things. Once again this was a learning experience and I'll do a few things differently the next card I make with this cutting file.

You can't really tell in this photo but the snowflake is really pretty on top.  I wanted to show you that snowflake does indeed standup on top of the card. After cutting out my cardbase I used my eBrush and a silver metallic Sharpie to turn the snowflake silver. Then I used a glue  pad to get the snowflake sticky and used ultrafine crystal glitter. In my playing with the glue pad I've  discovered that fine and ultrafine glitter works the best.
I also used the eBrush and a gold Sharpie to do my frame. I am loving my eBrush.


LOL! While posting this I remembered that I bought recently at a thrift store a Crayola light box for a couple of dollars. Wow! It really made a difference laying the card down on it and taking a picture.
Yes, Virginia that is a paper towel. Opps! I forgot about the stamping showing through on the other side. Next time instead of a sentiment I'll just do snowflakes. Also I won't separate the paper towel. The pale blue background which I eBrushed the paper towel with doesn't really show up. However the stencil came out great using a darker marker. Originally I wanted to stamp with silver or gold ink but alas it did not show up so I ended up stamping with Tuxedo Black Memento ink. 

That is my experimenting for now. I hope over the weekend to get some outdoor decorations made. I have some ideas. First though I wanted to get this card done as I'm going to give it to the Postal Clerk who has been so helpful to me during the year. I have the rest of my cards ready to get in the mail and hopefully people will shovel the sidewalks so I can safely walk to the store to mail them.

Are you ready for the holidays? If you mail cards are they mailed or ready to be mailed?

Wishing you Happy Frugal Crafting till we meet again!


Friday, November 28, 2014

Triangle 3D Christmas Tree Card

Hi faithful readers. I hope that you are having a good weekend. Oh my gosh! This started out as a simple Christmas card and I was having so much fun with markers and my eBrush yesterday and today that I forgot to quit.

I used Kraft card stock for my card base. I cut a scrap of Christmas card stock for the panel. All the shapes were cut out of one piece of Vanilla Card Stock. I'm getting low on white and wanted to keep it for printing and cutting.  I cut out triangles, stars,rectangles and squares. Then I got busy with my eBrush and markers.  First I did my tree and the tunks for outside and inside. Then using embossing folders I embossed them. I brushed the stars with a metallic marker.  As well as used it to do a border on the pattern card stock.

The border was cut from an old Christmas card.

After painting the ornaments with metallic water colors I wrapped gold thread around for garland. I love how the water colors gives the ornaments a distressed look.


For my tree which popsup when the card is opened I folded triangles in half and glued them to each other. I used six triangles for my tree but I think next time I may go with four instead. I air brushed my packages and then adhered ribbon. On the large packages I used Simplicity gem ribbon. Alas I have not been able to find anymore of it. Since I didn't have more cards to cut the border out of I cut photo paper into strips. Embossed with a retired Sizzix snowflake  border. Then airbrushed using a Sharpie metallic marker.

After air brushing the base of the small packages I used the airbrush with a dot stencils. I airbrushed the gems on the bows with the same marker as I did the dots.

In case you can't tell the eBrush  by Craftwell is the best present I've ever bought myself. It is so fun to see what I can do with it.

Wishing you Happy Frugal crafting till we meet again!

Wednesday, November 26, 2014

Pocket Santa Puppet Card

Hi everyone! I can't believe that tomorrow will be Thanksgiving which means that Christmas will soon be here. Of course all of my good ideas seem to come the week of Thanksgiving and I never seem to get all the projects done.

Last year I was going to make my granddaughters pocket Santa puppets. However when I opened up the file from Silhouette I realized it is a paper piecing file. I don't do paper piecing that well. Before taking a book on card making back to the library on Sunday I decided to look through it some more and there was a Santa pocket puppet card.  I decided to use the base for the chimney  from the file and to use a print and cut Santa. Of course with my ton of images I didn't have one suitable Santa so it was look on the internet for a free image.

I cut out the chimney pocket from that gray card stock I'm still trying to use up. LOL!  I wouldn't  necessarily needed a pocket in the front but I was thinking if I goofed up really bad stenciling my bricks I would have a backup. Lol! As it is when I masked the top with painter tape one of the bricks got a chip.. ;-) I am loving my eBrush for stenciling. I get such a clean stenciled image. I brushed white acrylic paint on the top and then while still wet sprinkled glitter over it.

The speech bubble was a free store file. It messed up cutting it out of the gray so I cut out of  a scrap of white card stock when I cut out my snowflakes.  I took my eBrush and a gold marker and changed the color. I used a scrap of black for the backing. It is pop dotted on the card. The snowflakes are heat embossed with what else but Winter Wonderland embossing powder.

Here is Santa with his head just peeking out of the chimney on the inside.

Here is Santa pulled out of the chimney. The original card used a piece of card stock glued to the card and to Santa. However, I thought it would be more durable to glue a craft stick on the back of Santa. Although I noticed today the dollar store had colored craft sticks I didn't have any so I used my eBrush and a marker to color the stick. Then I glued an extra snowflake from another project on the stick. I took a cotton swab and edged Santa using Vintage Photo distress ink. I think that edging an image gives it a little more dimension. Also if the cut is a little off you can mask the line.

Lol! I showed a friend the card and he asked if it was for him. When I told him no he started pouting. Lol! Maybe I'll have to make him a Santa Dog puppet. By the way you could take this pocket puppet idea and do cards other than for Christmas. I think it might be fun to do a cake pocket and have a puppet to pull out of the cake for a birthday. Or hw about a  chick being pulled out of a egg for Easter.

There is one more fun card I want to make from the book and then I have some ideas for making some decorations for outdoors. Our complex is once again having an outdoor decorating contest. I also need to try out some gift ideas before having my granddaughters attempt to make them. I like to make up a prototype so I'm aware of what pitfalls there may be. There is nothing worse than having an idea for something which ends up instead of being fun being poor frustration. Especially for children.

Do you do decorating inside or out for the holidays?  If you do do you like to make your own decorations.

For those in the U.S. Happy Thanksgiving tomorrow. For all the others wishing you a wonderful weekend. Hope you get a lot of crafting done.

Wishing you Happy Frugal Crafting till we meet again!

Tuesday, November 25, 2014

Altered Playing Cards Week 12

Yeah! We are now at week 12 of the altered playing card challenge and I'm actually keeping up. I don't think there was really a theme this week but Claudine did use pattern paper on her cards. She also did lines for writing but I didn't really want to do a lot of writing on mine. However I . did use her phrases as my jump start.


This card here took a little bit of thinking on my part. I started yesterday thinking about what I like about myself. I didn't really want to make a list and I decided this afternoon to go with one thing. One thing I like about myself is that I have the ability to have fun no matter what is happening in my life.


I don't  have much in the way of pattern paper. However, a few years back I was able to find some pattern paper of Monet's waterlilies. I always loved that painting. I had a scrap and decided to use it on this card.  I took a gold Sharpie and drew my border. I decided to print and cut out Peter Pan and Wendy from a image.  I have a stamp with have fun as part of the sentiment. I decided to mask and just use the have fun part. I stamped it on a scrap of plastic from a page protector. Then after using a drop of glue on the corners to adhere it I placed gems at the corners. The gems reminded me of water drops.


 As I said I don't have a lot of pattern paper. However, while I was prepping my cards I was also playing. I had inked a stamp and stamped into the wet gesso. I thought it would be perfect for this card. I was playing with my eBrush and metallic Sharpies. I discovered that if I held the eBrush up high that I got nice metallic speckles. The I am thankful for is from a journal tag which did not cut right. I cut it from the top. I printed the this momeent moments to come with a Brother's label maker. For the leaf which was print and cut I painted gold paint on it and then  
used a wrinkled plastic bag on it.

Next week there will not be a challenge but do come back the following week to see what week 13 is. Also come back soon to check to see what my next project is. I'll give you a hint it is another Christmas card but this one for children or for those who are children at heart.

Wishing you Happy Frugal Crafting till we meet again!

Friday, November 21, 2014

Cards For Caring Heart Drive and Last Card

Hi everyone! I wish I would have had time to have made more cards for the Caring Hearts Card drive but the deadline is the 28th and I wanted to allow time for the cards to get there. From my neck of the woods it usually takes about four days for mail to get to Texas or Ohio. If you are interested in participating you might still have time. http://www.jennifermcguireink.com/2014/10/caring-hearts-card-drive-2014.html

I just finished the last card today. As well as did messages inside for the person getting the cards wishing them a Merry Christmas or Happy Holidays depending on what stamp I used.
Here are the six cards I'm sending along with envelopes of course. 

Here is the last card I made today.Sorry I forgot the flash was on when I took the picture and was in a hurry to get things ready to mail.

The star background is one I made when I was playing with "moulding Paste" and a brass template.After the paste was dried I painted glitter paint over. Because the template was smaller than the card stock I went ahead and also covered the edges with the Moulding Paste.

The angel is a stamp by Hero Arts. I don't think she is still available. I have fond memories of stamping her and my son coloring her. As well as using glitter when we would make Christmas cards together.( We were eating glitter seasoned foods for months afterwards.) Although doing several moves I've purged my stamps she is one that is a definite keeper.

I colored her with Spectrum Noir markers and a gold sharpie for her trumpet and the stars on her dress. I did use chalk for her hair as the brown I have is too dark.

There you have it my rainy day crafting. Yeah! I got a ride to the post office before it closed so they are on the way.

On a personal note the reason I wanted to send cards is in memory of my husband. He loved watching me make cards and loved Christmas. Every year he would hand me a list of the people he wanted me to make cards for. I swear the list got longer every year but I didn't mind. He taught me the true meaning of Christmas which is to spread some joy in whatever small way you can.

I'm off to do some print and cuts so my granddaughter can make some cards this weekend. Wishing you Happy Frugal Crafting till we meet again..

Tuesday, November 18, 2014

Altered Playing Cards Week 11

Wow!  We are already at week 11 of the altered playing card challenge. You still have time to join in the fun. Just click on the image on the right for details. There is a theme and every week Claudine shares the techniques and products she used. Don't worry you don't have to do your cards like hers or even use the same products. This challenge is all about having fun.

This week the theme is snow. Here are Claudine's cards.

This was a fun challenge for me to do. Like usual I did some experimenting.
I used gesso on the card and then applied texture medium to bottom part and added salt for my snow. Since the salt had color from using it with water colors after the medium had dried I had to use white acrylic paint. I used my air brush for the top part. Then I stamped my snowflakes with an old foam stamp. In fact it was a cheap "Made In China" stamp I bought when my son was young. I bought the snowman stamp at the same time. I stamped the snowman and then hand cut him. I did a little bit of coloring using Spectrum Noir markers. The sentiment is a stamp from Fiskar. I colored the border with a Sharpie marker.

Claudine used a paper towel for her hot cocoa card. Her's she had color mists from spraying projects. I decided to practice with my air brush for mine. I used Mod Podge to adhere it to the card. This card I did not use geeso on so you can see the background of the card. I used a couple of snowflake stamps from the same stamp set as the Peace stamp.

There is no snow in my neck of the woods yet so I printed out a photo I took last winter. I decided to stamp the word Peace as that is what I feel walking through the park in the snow with my dogs. The cardinal came from a Dover sample. I just cut it out of another image. As far as I know there are no cardinals in this area.

Don't over look using common things like salt and paper towels. You can do all kinds of things with salt.

What common things do you use in your crafting? Do you ever experiment with different things?

Wishing Happy Frugal Crafting till we meet again!


Monday, November 17, 2014

Update On My Craft Room

Hi everyone! After my last post I had to go and redo a few things. Sometimes finding space and getting things to work is like doing a jigsaw puzzle. I also wanted to show you some of my ideas for storage. As well as some of my personal touches to make it truly my little piece of heaven here on earth.

 I did today buy a set of drawers which are perfect for under my work table. I will be buying another set as they will work back to back.  Anyway my oldest granddaughter had seen my craft room a couple of weeks ago and she was impressed with the changes I've made.

Over the door rack using mini bread pans to hold ink pads. I think this was originally intended to hold VHS tapes. I' know it has traveled all over the U.S with me as I've found it to be so handy.

M & M candy rack holds my spools of ribbon.  I figured when I saw it out by the curb I could find a use for it. Alas people where I live now do not put unwanted items out by the curb.

I was going to put up the thermal drapes but alas my car broke so I could not get to the store. My son fixed it today so I went and got a curtain rod so will hang them tomorrow. The big box is for donations and I'm still filling it.

My youngest granddaughter loved my angel hanging on the computer cabinet which houses my desktop computer. The white machine is an air purifier which I plug in when I'm using things with fumes. The doll is waiting to be wrapped for Bug's birthday. Lol! She doesn't know it is for her but she wanted to take her home today. Luckily she didn't see her birthday card as I didn't know they were coming over. The metal box on the top shelf my dad brought back from England after World War II. Right now it has some of my late husband's things in it. I will be sorting through it and sending his daughter some of his things.

My  fabric cutting mat and a shoe organizer hangs on the side of the computer cabinet. You have to find space wherever you can. Also things which don't work for one thing may work for something else.

K Cup Carousel holding Distress Paint ,liquid pearls, and Stickles. Rubber stamps which did not fit in the dividers decorates the top.

I want to redo the two larger wooden divider drawer inserts. Perhaps that will be one of my winter projects.

Clear pocket organizer I found at a dollar store a long time ago houses my most used supplies like scissors, rulers and some of the different adhesives I use. The small black box holds the adapters for my eBrush. It is perfect size and holds all six of them. The roll top wooden box I found at a thrift store and it is perfect for storing my most often used letter size card stock.

Look how clean this work space is.  And it still is even after my grandchildren came and played with me today.

 The Sharpies and eBrush are out because I want to practice using the eBrush with Sharpies. I find the laptop tray works great for working on things as I can move it aside if I need room for something on my work desk. I thought of placing the power strip on the side of the desk but then realized that it would be in the way. It will probably end up going in one of the nearest  cubby holes.

I still have a lot of work to do still but my space is starting to look really nice. Also it is getting easier to find things. Of course now that this room is not so chaotic I may not want to leave it.  In fact I may forget to set my pig timer for x number of minutes to craft or turn my small Mickey Mouse  mood clock around so I can not see the time. Only the changing colors.

You don't have to necessarily go and spend a lot of money to  fix up a craft room. My Ikea Cubby Shelving unit and desk was my one extravagant purchase and that was after I did lots of looking and thinking about my needs and my available space. I have probably more than gotten my money's worth from the wooden file cabinet which I've had for over fifteen years now. I don't have the paperwork I had when I first bought it so one drawer was perfect to dedicate to housing letter size card stock.  If I could find a couple of inexpensive metal file cabinets though I would trade this in as they would be more practical. For now though this works and you know the saying "If it ain't broke don't fix it.."  Don't be afraid to look at things and think how you might be able to use them. /When I saw the M & M candy rack I actually brought it home for my ink pads but it didn't work and then I decided to see if my ribbon would work. I didn't want to donate my K cup holder and thought I could come up  with some way to use it. Eventually I'm sure it will hold a collection of Distress Paint and Stain.

I'm tired and it is past my bedtime. Wishing you Happy Frugal Crafting till we meet again!


Thursday, November 13, 2014

The Good, Bad And Ugly My Craft Room

Hi everyone! I had to laugh when I checked out the Moxie Fab blog and discovered that there is a challenge for you to post a photo of your work space just as it is. The reason I was laughing is I had just cleaned mine. I have another apartment inspection Monday and the manager was not happy with my craft room a couple of weeks ago. Or at least I hope it was only my craft room as that was the only cluttered area in the apartment.. Anyway I thought I would post some pictures of how it looks right now. I'm still working on it and will be all through the weekend.
This is what my desk looks like. The roll top box holds the card stock I use most often. I had some rice paper on top but that has since been put away. I didn't take a picture but on the front of the desk is a clear pocket holder which holds scissors, and things like my most used adhesives. and tapes.
The rack on the door is  a VHS rack from way back. I had to take a shelf out so the door could be opened all the way. I.  have put in the wire baskets mini loaf pans which hold my ink pads  The ink pads are organized according to type of ink and by brand. This way I can take a pan to my table if say I only want to use distress ink. Cotton balls, cotton swabs and cosmetic wedges are also stored here as usually I use them with my ink pads.There are also a few rubber stamps that there was not space for above my cubbies.

The box holds my laminator. So far I haven't used it much but perhaps if I quit having apartment inspections I can actually work on some projects. 


The roll around stand holds my 12 x 12 card stock,. The top drawer holds some of the adhesives I use like Creative Magic and extra glue sticks,etc. Also my colored pencils, chalks, and punches are stored in drawers. On top is a clear folder which holds scraps of papers and envelopes with extra shapes in them. Also some craft magazines and books are piled on top.  One drawer of the file cabinet holds card stock, colored copy paper, sheet protectors and things like that. The other drawer holds things like owner manuals and other important papers.

On top of the filing cabinet is a on top of the toilet tank rack. It would not work in my bathrooms so I decided when short on space go up. The  green basket holds my reinkers, color mists and things like that.Right now the other basket is holding my playing card for the altered  playing card challenge. Eventually I'll come up with a way to display them. The two clear containers holds finished cards and my most recent ones are in the metal letter holder. I'm keeping the Marker Maker in its' original box. The empty space is where my airbrush goes when I'm not using it.

I decided to put my one cup coffee maker in storage as it takes up too much room in my kitchen. My French Press Mug takes up a lot less space. I was thinking there had to be something I could do with the K Cup Carousel. I don't have that many Distress Paints, Liquid Pearl or Stickles but what I had kept getting lost. Carousel to the rescue. One of these days I'm sure it will be full of either Liquid Pearls or Distress Paints. LOL! 

Yes my sewing machine is finally out of the box. If I wish to play my keyboard I can take my sewing machine off and the top folds flat and put my keyboard on top. The big box on top is one I'm filling for taking to a thrift store. The one on the floor is one I'm filling to put stuff in storage right now.  I hate to put nails in walls so the bulletin sits on the window sill, The blue painted piece was one of the last things my Mom painted so I don't really want to put it in storage where it might get ruined.

Lol! As we get over here you can start to see the ugly. I need to organize some of the things on top of my computer cabinet.  That is another on top of the toilet rack which again would not work. Right now it holds containers with yarn  and laces.I did put a  shoe pocket holder on the side to hold things.. This must have been meant for children shoes as mine sure didn't fit in it.

 I plan to have the blue container and boxes emptied before Monday. I may not get around to cleaning the cubbies but I don't see where they would be either a safety or fire hazard.Well maybe a safety issue if something falls and hits me on head but I have a hard head.


I had to take ribbon spools out of the door basket so I plan to put it in the M & M candy rack I found by the curb. I think it will fit on the windowsill.

A lot of my rubber stamps are displayed and stored in wooden drawer dividers. I don't have any drawers they will fit in so this is a good place for them. Yes there are a few bare places where I need to put stamps back away. Not even as a child was I good about putting my toys away. LOL!

O.K. I will confess I did not take a picture of the overflowing box and plastic container under my work desk. That is what I' have been been working on today. A lot of what is in the box will end up in the donation box.

O.K. Now you know my dirty secrets. I'm challenged  when it comes to organizing. I'm a messy who is trying to reform and I'm a pack rat.

Are you organized? Are you a "Messy"? Do you have any organizing tips which does not have to do with get rid of everything?  Would you be comfortable having someone come in and help you organize?

Back to work for me. No rest for the wicked and as you may know I'm really wicked. ;-)  Wishing you Happy Frugal Crafting till we meet again!

Tuesday, November 11, 2014

Week 10 Altered Playing Card Challenge

Hi everyone it is freezing in my neck of the woods. I thought it would be a good time to play inside with all of my toys and fun stuff. This is already week ten of the altered playing card challenge. The theme is think outside of the box with quirky and whimsical. I'm afraid that my muse deserted me when it came to those two themes. Of course if I would have had one of Claudine's stamp sets or even magazines to cut up it would have been a little easier. Having neither I had to go with what I had. Here is what Claudine's cards look like.
Here are mine and this is as whimsical or quirky as I could come up with.
I did a nice watercolor background of yellow and blue. Alas when I tried to glue down a loose edge I got a spot of glue on it. When I rubbed the glue it took the watercolor up with it. I carefully took my elements off and repainted it. Of course the blue and yellow turned to green. It was a Christmas green and I didn't really like it so I went and painted turquoise extreme glitter paint over it. It really softened the green. 

My lady here is a composite of three different images.  I thought it would be fun to give her the boots that the man in the image was wearing. More down below on the third image I used.

After I got the woman and the sentiment adhered I felt like I needed to do something else. I took a piece of white craft foam and cut it with a Sizzix flower die. Airbrushed color on it and then adhered microbeads  which I never seem to use. I think now it would have been better for me to have used the fuchsia color of beads but oh well.

O.K. I told you I would tell you about the third image. The original lady had very demur downcast eyes. I cropped a pair of eyes out of the image I used on my second card.

I did my sentiment in Studio the software for my cutter. I did an offset to get the shape. Originally I had drawn around it with a marker but had gotten some of the marker where I did not want it. The shade of blue was all wrong anyway.

Good thing with saved files and a little bit of ingenuity I can do re-dos. I think that is why I don't usually use commercial products as it can be more difficult to do things over.

For this card I covered it with gesso. Then while it was still wet I placed a cake texture plate in the gesso and removed it before the gesso had a chance to dry. (You can sometimes find  interesting cake texture plates on sale.)

Taking my e-Brush I airbrushed with markers. Alas I was going to just use the dark color around the edges but it went where I did not want it to on low. I used a blender pen in the e-Brush and then went back and e-Brushed with the lighter gray and the taupe color. This was one of those happy accidents and I love the result.

The flower was a free file from Silhouette. I went and filled it in with part of a digital copy of the cover sheet music of "Hello Beautiful" by Walter Donaldson.  It is interesting that there were two versions of this cover one with a man in the center and this one with the woman.

I took corrugated cardboard to make my stem and leaf. Then I took a scrap of Kraft cardstock and a white gel pen and wrote out my sentiment. When I was playing with my flower image I did the sentiment around it but I did not like how it looked. I printed out the sentiment on a scrap as well as wrote it out and went with the script. Even though I feel like my hand writing could use some improving. LOL

Frugal tip: Scour thrift stores for old sheet music to buy for crafting. A lot of old sheet music has wonderful images on them. Many of them the copyrights have run out on and never been renewed, Especially if they were copyrighted in the 30's and 40's. I  prefer to scan in the sheet music instead of using the original piece. Maybe I'm afraid that the sheet music police will arrest me. Lol!

This is all for now and it will probably be next week until I post again. I have a ton of cards which I want to finish on the inside. Wishing you Happy Frugal Crafting till we meet again!