Thursday, May 31, 2012

What's Not To Love About Gingham

Yes, I will confess that I love gingham and now I am wondering why I don't use it in my crafting. That is until now when Moxie Fab World is having a gingham challenge.

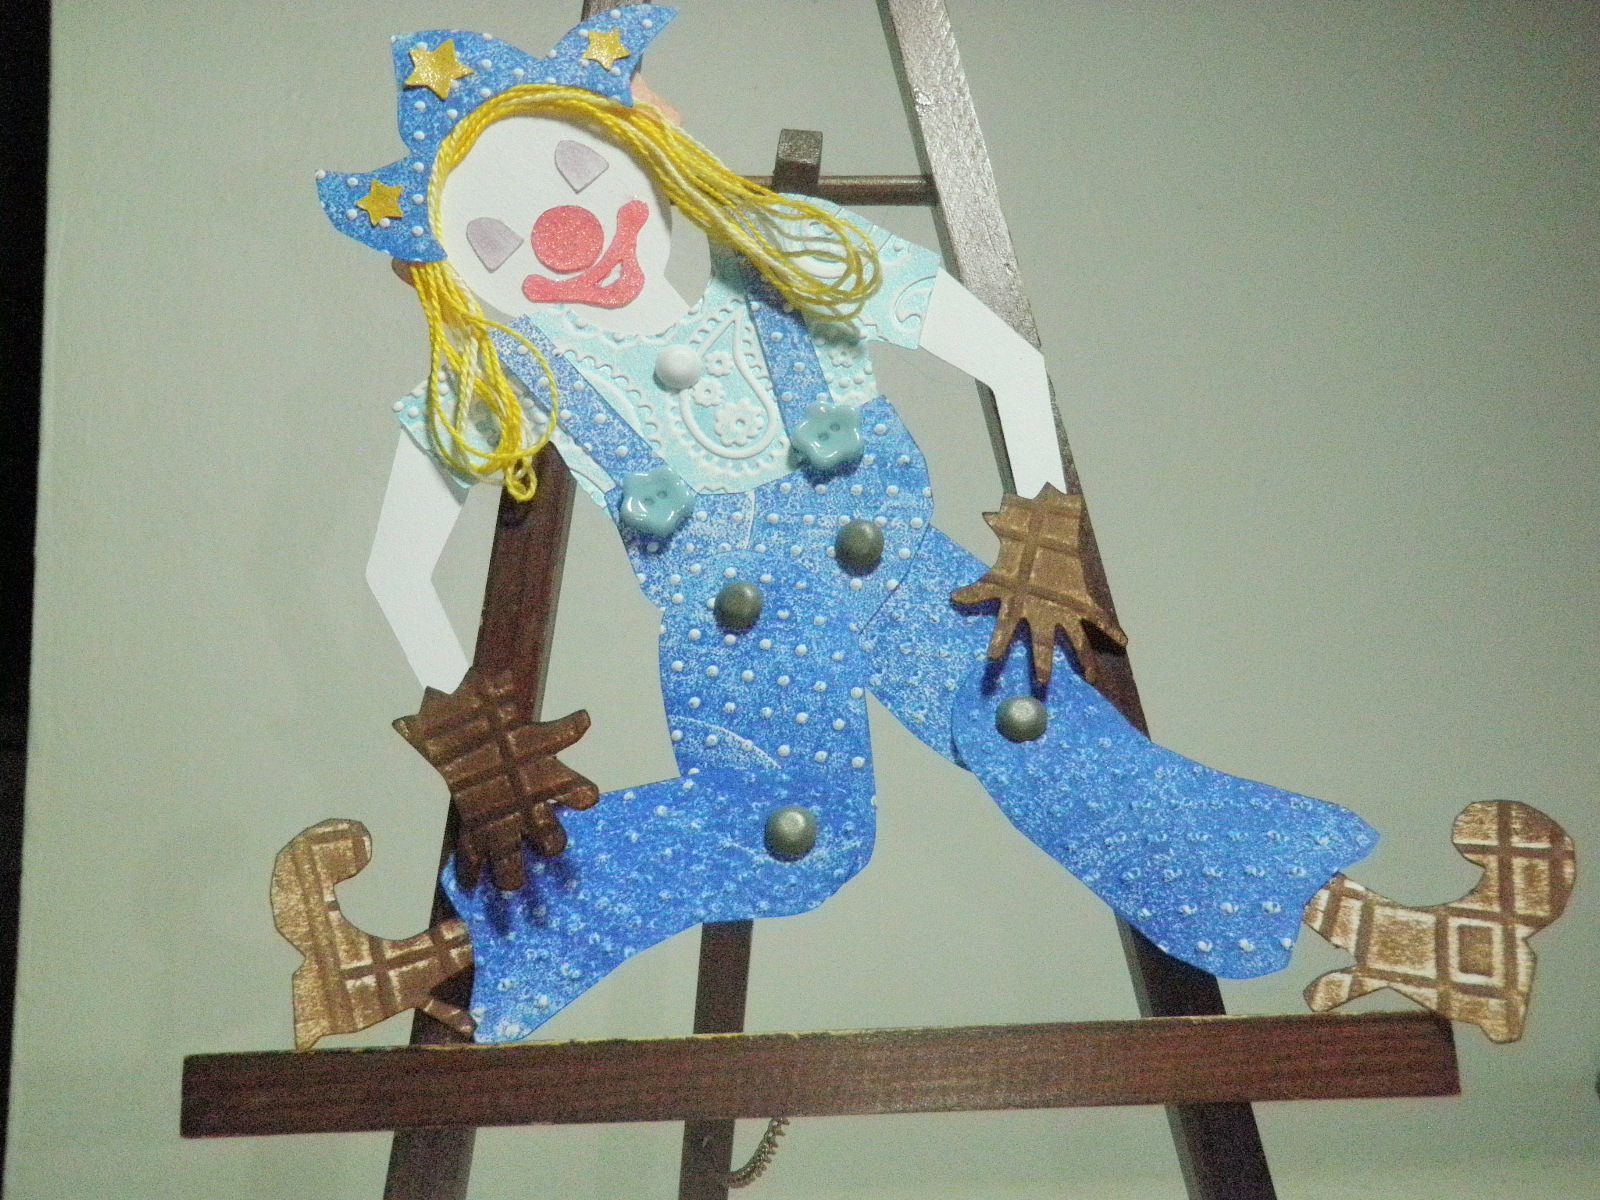
I figured this would also be the time to go ahead and make up a Sunbonnet Sue card which has been on the back burner. I have a quilting friend and we had talked about this pattern as she restores quilts. It is a special pattern to me because when I visited my Great Aunt I would sleep under a quilt with Sunbonnet Sue on it. It was like sleeping with a friend.

Here is my card. (Click on image for closer look at the details) What do you think? I hope my quilting friend likes her


The digital gingham was designed by June Lily and is a free download from her site. The bonnet is my own graphic design. I don't remember where I found the quilting template of Sue.  I traced the template and after playing in Studio I was able to fill in the pieces with pattern. I then went and turned off the cutting line of the individual pieces grouped them and traced again. This time using the trace outer edge. I didn't feel like paper piecing so turned her into a print and cut. I did an offset and filled that with purple. The grass,sun,flower,and rickrack border are all Studio free files. I duplicated the rickrack border and with the knife tool cut off a piece for the flower stem. Decided to cover the card front with burlap,added lace from my stash and then pop dotted the panel on. 

I was trying for a country/cottage look. Did I succeed?

To play along enter at http://www.moxiefabworld.com/2012/05/card-creations-week-gingham-challenge.html There is also close to 200 entries so if you are looking for inspiration and love the crisp clean look of gingham go on over and check it out.

My frugal crafting tip is you can often find free quilt patterns and use them in your crafting. Also don't forget that many needlework templates are available too and many of them will add to your project. LOL! Of course if you are like me a couple of hours may go by while you are looking and your hard drive gets fuller from all the delectable things you find.

I have had fun with the different Moxie Fab World challenges. What I like about them is I can stretch and try new things without having to use a certain product. I encourage you even if you don't want to enter a particular challenge to see what you can do with the challenge. Also doing a challenge even if you make it your own personal challenge just may get those creative juices flowing.

I just bought ink cartridges for my printer so I could do Sun Bonnet Sue and so now I am working on the postal challenge over at Moxie Fab World. It is still in the design stage and may end up being a personal challenge.

Thank you for stopping by and do come back. Happy Frugal crafting till we meet again.

Wednesday, May 30, 2012

Some Things Never Go Out Of Style

Some things  never go out of style. Brocade and Damask are two fabrics that are timeless. They are elegant and although formal they aren't stuffy.

I have always loved both Brocade and Damask so when I saw that Moxie Fab World has until the 4th of June a challenge using Brocade and Damask I knew I had to enter it. Of course first order of the day was finding my Sizzix embossing folder which has been gathering dust. Second thing was to open Studio and choose and cut the images I wanted.Of course once I got working on it I ended up making changes. For the better I think.

Here is the card I made:

The flower in the middle is a cutting file by Paola.  It is very delicate and although I had re-sized it I ended up making it and therefore the panel it is glued to bigger after having difficulties with it wanting to tear while being cut. Because it is so delicate I had to carefully take it off of my sticky mat. I did spray it with a faux glimmer mist to tone down the white. I wanted it to have a more aged look. Because wet or damp paper tears easily I was trying to be really gentle with it. Luckily I didn't tear it at any time during the process but I'm not so sure I'll use this file again as much as I love it.

The panel it is glued to is a free cutting file in Studio. Have you noticed I use the free files a lot. I inked my Sizzix Damask embossing folder and embossed it. LOL! I wasn't sure whether I was going to use the embossed or de-embossed side so inked both sides of the folder with two different blues. The more vibrant blue embossed side won out. I then sprayed my pink faux glimmer mist over the panel. I stuck it to dry on my sticky mat and it didn't curl. Now that I know that after embossing I can spray color on my embossed pieces I'll do it again. I love how it turned out.

I felt like something more was needed. I played around with different things but didn't like anything. When that happens it is time to lay aside the project.

I was looking for digital papers for another project when I found a damask seamless tile I also downloaded from Paola's website. I noticed that it had a touch of blue and pink in it.  I decided to mount the decorative panel on a rounded rectangle filled with that paper. As luck would have it I also had pre-scored cards in the color family of the fill paper.  I decided to paint a thin gold line at the top and bottom of the card base to add a touch of elegance to it.

This is not a color combination I would normally use. It seems lately I'm finding myself using different combinations which is fun.

You can find the challenge information as well as see the entries here: http://www.moxiefabworld.com/2012/05/card-creations-week-damask-brocade.html

Thank you for stopping by and let me know what you think. Right now I'm working on a Sun Bonnet Sue card and it will be different from anything I've done.  Hopefully I can get it finished and posted before the weekend.

Happy Frugal crafting till we meet again!


Saturday, May 26, 2012

Gold Fingers

Right now some of my fingers are gold because of a splatter challenge over at Moxie Fab World. My fingers are also green because the nozzle of a spray bottle leaked. Here is the splatter card which I made. It was fun being messy while being creative at the same time. (Click on the image to see the glimmer better.)

 Using two different greens and a pink faux glimmer mist I sprayed the scalloped panel and rectangle the flower is on. I discovered that depending on angle and distance I could get splatter patterns or an even spray. Because I wanted the splatter to be soft I sprayed while my card stock was still wet giving it a watercolor effect. I had never tried spraying more than one color at a time and was pleased the way they turned out.

The panel on the scallop is the same textured card stock as the base. My gold acrylic paint bottle was fairly empty so I added water to it and gold water color paint. (I buy water colors in tubes so it is easy to squeeze into water or onto my pallet.) I couldn't find my bristle paint brush so decided to try with a foam brush and my fingers to splatter. The blobs were large and runny. I didn't like it but remembered seeing a video where a woman splattered and then dabbed at the paint with a paper towel. LOL! I was in the bathroom splattering with my box so didn't have any paper towels so grabbed toilet tissue instead. Did have to in a couple of places brush off with my hand the small pieces of paper before the paint had totally dried. I like how it turned out and will have to keep that in mind for future projects.

The pink flowers are my o design flower petals. I made different sizes of the petals. I put them together with a gold brad. I love how with my faux  glimmer spray I can turn white card stock into a different color.

Spraying with glimmer mist or splatter paint the card  stock will probably curl but it can be ironed flat. I use a dry iron with a cotton setting. Sometimes you will get a ruffled look on the edges which may not iron out but I think it gives character to the project.

If you want to get into the fun of the Moxie Fab World Challenge it is open until the 4th of June.
 http://www.moxiefabworld.com/2012/05/card-creations-week-spatter-technique.html 
Even if you are not interested there are loads of entries to look at. In fact I'm not even halfway through looking at all the interesting and fabulous entries. Cath is going to have a difficult time picking winners.

My frugal tip is to take time to play. You never know what you may come up with using what you have on hand. Oh and if you have near empty bottles of acrylic paint don't be afraid to add water and use the thinned down paint for a color wash or other techniques.

Thank you for stopping by. Happy Frugal crafting till we meet again.

Thursday, May 24, 2012

Racing By To Say

My son was born with a wrench in his hand and a love of cars. That love of cars also includes racing. In fact on his 21st birthday I watched him race because that was how he wanted to celebrate his milestone birthday. I have to say I was relieved to see a fire engine and emergency personnel present. Definitely was glad also that he was legally racing. With Father's day coming up I thought it was the perfect time to make a card for him with a racing theme.


Here is the card I came up with. I was able to find a free Nascar SVG file to use as a print and cut at wecanbeaoriginal.com. The pennant was in my Studio library so it must have been a freebie since I don't buy that many files. The flags are a border which was free clipart I found somewhere. I added the sentiment and filled it in with a checkered pattern but for some reason although I changed the lines to black and to print .they didn't print. Since I ran out of ink just as I printed the flag and car I went ahead and filled the font in by hand so it is easier to read.  I took a stir stick and cut it in half and glued the pennant onto it. This is just behind the track which is pop dotted onto the card.


Yes, the car really does move on the track I designed. The card stock was in a pad and I never had an idea of how I was going to use it before. While looking for card stock I saw it and thought it would be perfect for the race track. 

A closeup of the car showing the windshield and lights which I used Dimensional Magic on.  This picture doesn't really do it justice. I love how it adds the little extra to it.

I don't know who is going to have more fun with this card. My son or my eldest granddaughter who was also born with a wrench in her hand. What can I say it is in the genes. LOL! I might just have to make my granddaughter her own card with a car that moves. After all this design of card would work for birthdays and other occasions.

You can make the track straight, curved or however you want to make it. The image you want to move is placed over the track and pop dotted to a circle underneath. Then I find it best if the track is pop dotted to your project. Just watch where you place your dots as you want your image to move freely.

The first time it took me a couple of tries before I got it right  designing the track but although there is a track die on the market you are limited by shape of the track and size. Not to mention the price as dies can get expensive. Which is probably why I have only two. One I bought on sale and one I won.

I have other projects in the works but I want to see if I can design a track where the images would move up and down. I think a card with butterflies in different positions on tracks would be cool.

My frugal tip is to remember to use search for finding free files. I have found a lot of free files that way when looking for something in particular. I have also found a lot of blogs with inspiration.

I'm not sure what I'll be sharing next but I have a few ideas in mind and a few more challenges I want to enter if I don't get too busy doing some redecorating and much needed organizing of things. Thank you for stopping by and do come by again.  Wishing you Frugal crafting till we meet again.


Tuesday, May 22, 2012

Who Says Lace And Doilies Have To Be White

 I was working today on another lace and doily card for the Moxie Fab World Challenge that ends June 4. LOL! After working on the previous white on white card I wanted to work with color. The cutting file is courtesy of Sylvia Fernie. I  resized it to 4x4. With all the delicate detail I think Cameron my Cameo did an amazing job. Next time though I'll double cut to make it easier to get all the little pieces. I did find a sticky lint roller helped in the weeding of the panel after I took it off the cutting mat.

These are my favorite summer colors. In fact my wardrobe is full of tops in this blue green and aqua colors. The yellow is reserved for shorts or slacks. I don't know why though I have never crafted with them.

The slits around the panel was perfect for weaving ribbon in and out. I decided to take that same ribbon and glue it as a border on the frame. I looked at the dots and thought I could use them to hand sew. My sister gave me some left over crochet thread which was the perfect color to use for the sewing.  The flower I cut off of a piece of lace trim and dampened it and then stamped pigment ink on it. I thought it was going to be darker than it ended up being. I backed the opening of the panel with a wire edged gold ribbon that I bought a couple years ago in a half price  bin. LOL! I don't know the maker of it but the spool says it is eyelash metallic. It definitely shreds into eyelashes which is probably why it was on sale. It works great for a backing material and I do have an idea of how to utilize the shredding in a modern art card sometime down the road. LOL!

When weaving with ribbon wrap tape around the end  of the ribbon which you are using to weave. It makes it a lot easier to get the ribbon in and out of your openings. Especially since some ribbons fray while you are weaving them.

To enter or to look at the fabulous entries go to:
http://www.moxiefabworld.com/2012/05/card-creations-week-doilies-lace.html

My frugal tip is if you don't crotchet or knit ask a friend who does what they do with their left over yarn or thread. It can come in handy and crotchet thread can even be used in place of  Baker's twine on your projects.

Thank you for stopping by and do come back. My next project is a Father's day card for my son. Father's day is going to be here before I know it. Happy Frugal Crafting until we meet again.


Monday, May 21, 2012

Lace And Doily Challenge

Moxie Fab World has a lace and doily challenge going on right now until June 4 so I decided to see what I could do.

I saw this dress while walking the dogs while visiting and decided to use it as my inspiration. Sorry the picture is not good but I could not take another picture at a better time. I was leaving that day after walking the dogs.


I was initially going to use vellum but after the vellum kept tearing even after putting a new blade in I gave up. Besides that the vellum is actually a gray color.  It looked dingy and was not the effect I was after. This is what I came up with.


 I don't know if taking pictures of white on white is tricky or if I just need better light. Hopefully you can see the details better with the closeups. Although it doesn't show well in the picture the card base is textured.


For the scallop piece I took a flourish file from Studio and mirrored and welded it. It was easy to draw the flower in Studio. I glued tulle behind the panel to make it look like lace. The scallop at the bottom was easy to make by using the letter O and then welding. Originally when I designed the rectangle panel I was going to do something else. Instead of adding a cut out embellishment on each side of the flower I decided to add a gem instead. The panel is pop dotted on the card base.


The sentiment was printed on a single flourish that I rotated. It took a little bit to manipulate the text. My touch-pad and I do not get along.

I thought later that I should have edged the flourish with silver to make it pop a little bit more. Designing cards is a learning experience for me. Doing a white on white is definitely something new for me.

To enter into the fun or to see some totally fabulous entries go to http://www.moxiefabworld.com/2012/05/card-creations-week-doilies-lace.html .

My tip of the day is to look at your stash and see how you can use them in new ways. The tulle and ribbon does not need to be just for bows. Also if you have a cutting machine see how you can use the negatives in your creations.

I'm off to making a more colorful card as well as a Father's day card for my son. Wishing you Frugal crafting until we meet again.


Wednesday, May 16, 2012

Fun In The Sun

Sorry about not posting lately. I was having fun with my sis and playing tourist. I don't do that too often. Anyway I brought sun and summer home with me putting me in the mood to do a summer card.

I have had a sandal cutting file since I scanned it from the book "Homemade" and traced it into a cutting file. With the card challenge over at Silhouette Plus forum using glitter and shimmer I knew I wanted to use it. Also Moxie Fab World has their Tuesday Trigger using this summery image.


I love the colors and the sparkle of the sugar. To me this shouts summer and fun. Although I could not totally duplicate the colors I love how my card turned out.

Before you look at my card you had better put on those sun glasses. LOL!


 Although I wanted to layer the colors like in the image I had to switch the colors around a little bit since I did not have a raspberry colored card  base and didn't want to use my one and only piece of raspberry card stock for one.

I used a pre-scored orange card base for the card. I sprayed adhesive on it and then sprinkled coarse Martha Stewart crystal glitter. Although it doesn't show up in the picture the green is white card stock which I sprayed faux glimmer mist on. It does have a sheen to it. The raspberry panel I also used spray adhesive on and crystal glitter. The sandal was heat embossed with silver embossing powder. I've wanted to do it for a long  but didn't have any silver until I visited my sister.

The sun was chalked with yellow chalk and then painted with gold Perfect Pearl. I tried to use the sentiment as a stencil but it didn't work. I decided to use silver glitter on a tag. Then cut out of yellow a tag  with the sentiment. Then glued the tags together. I used a Karen Foster brad to attach it to the sandal. The sandal is attached to the card with foam adhesive.

I encourage you to join in the Moxie Fab World Tuesday Trigger at http://www.moxiefabworld.com/search/label/Tuesday%20Trigger You have until the 20th of May. Also the Silhouette Plus May card challenge is going until the end of the month.

My frugal tip is to use adhesive and glitter to make your own glitter paper. It is a lot cheaper and by using spray adhesive the glitter doesn't seem to fall off.

Thank you for stopping by. Do come back. Happy Crafting until we meet again.


Monday, May 7, 2012

Another Tuesday Trigger:Vintage Vogue


When I saw the Moxie Fab World Tuesday Trigger I just knew that I had to enter it. Even though I am no longer a ribbon and lace girl I do like to use those elements on my cards. This is the totally fabulous inspiration image.


I love that taupe dress and knew that I wanted that color in my interpretation. Luckily I had some pre-scored cards and there just happened to be a card close to that color. I love those gold circles also on a sheer fabric.Here is my card. 


The frame,flourish and dress is digital images by Digi Deborah Designs from the Royal Wedding blog hop which is going on this month. I rubbed Antique Linen ink on the frame and the dress to give them a more vintage look. I added sheer ribbon to the empire waist of the dress and to the top of the lace. LOL! The lace may well be vintage now as it was left over from my dress making days when I would craft for myself designer looking dresses and lace and ribbon was all the rage. I was going to wrap the tulle around the gold card stock in a bow but after playing decided to just fold a piece over and glue it on top of the card stock. When I was playing around with the elements in the Studio software I decided to make the dress so that it would extend beyond the frame. Perhaps it is just me but it looked a little strange so decided to use the flourish. I was going to heat emboss it gold but realized that the detail would be lost and it would lose the vintage look. I don't know why the circles don't look flat but they are. LOL! I went back to add some glue to glue them down better after looking at the picture. The laminated glitter must be doing a weird optical illusion.

Well there you have my Vintage Vogue look. As well as a totally different color palette from my usual.

I hope you will hop over to Moxie Fab World and play along and feast your eyes on the awesome entries. This is opened until the 13th of May so you have time.
http://www.moxiefabworld.com/2012/05/tuesday-trigger-vintage-vogue.html

My frugal tip of the day is blog hop there are often some really great digital stuff for free.

Thank you for stopping by and do come back. I have a project in mind for the card challenge over at the Silhouette Plus Forum that I will be sharing next week. Happy Frugal Crafting till we meet again!

Thursday, May 3, 2012

Clowning Around!

I find a lot of inspiration in books. Books that I check out of the library. Often these books have templates in them. "Card Making" by Sally Henry is no exception. Although this book is geared for kids especially beginning card markers would find it helpful. One of the templates was for making a paper clown.With some modification other characters could be made. In fact I have some ideas and the book shows part of a fairy,pirate,and robot.

For now though I'm making the clown with a few differences. I added hair  for a girl clown. Who says girls can't be clowns. I wish I would have added brads to the arms so that they could be moved as well as the legs and head. She is done except for the eyes. I'm hoping tomorrow I can get to a craft store and that they will have small enough wiggly eyes. Otherwise I'll have to resort to using rhinestones which I color with a marker.

LOL! Just noticed the shadow of the hands in the picture. That darker color is a shadow. So what do you think of my girl clown?

The overalls was embossed with Swiss Dot embossing folder. The folder has a bad spot because I tried a canning lid in it as part of an experiment.  In this case though I think it just makes the overalls look a little worn. I inked the folder on the recessed side before embossing the pieces. The shirt I used a paisley embossing  folder and inked the raised side. The gloves and shoes were embossed with a texture plate and Vintage Photo distress ink rubbed over them. The ears were chalked. Nose,lips, and stars on the hat were colored with gel pens.. The eye area was colored with cheap eyes shadow I bought at a dollar  store. The buttons are from G Studio. Don't know where I got the assortment of brads from. Was glad to see I had a white one which holds the head on and allows it to move. The legs can be moved into all kinds of fun positions.

Unfortunately I had not considered the size when she was finished so I'll have to pay extra postage but my granddaughter is worth it. I know she will love it.

My frugal tip of the day is don't throw out that old eye shadow. Use it in your crafting instead. Happy Crafting till we meet again.