Saturday, December 31, 2016

HIMCR #282 Freestyle Anything But Christmas

Hi everyone can you believe this is the last day of the year. Tomorrow we will wake up and it will be a new year. This week the challenge over at Hiding In My Craft Room is Freestyle which means anything goes as long as it is not Christmas.

This week's challenge is sponsored by Di's Design and the winner will get a $12 gift certificate. Since Di's Design didn't provide images I was able to do my own thing. I thought it would be fun to do a Happy New Year's card.


I started by playing with Liquid Metals by Ken Oliver. on Georgia Pacific card stock. I used a wet by wet and sprinkled coarse sea salt on the wet paint. Then I used a Teresa Collin's embossing folder for my clocks. This is a large folder so it was fun to try to arrange it to get a pleasing design.

My sentiment came from a photo I took of an altered playing card I created a few years back I cropped the photo so that only the sentiment and watch were visible.

I don't know where I found the image of the champagne bottle with bubbles. I printed it out and then used Plaid Glitter Dimensional Magic on the bubbles.

I hope you will join us over at the Hiding In My Craft Room blog.

Wishing you a Happy New Year full of love and laughter. Also wishing you Happy Frugal Crafting till we meet again!

Saturday, December 24, 2016

HIMCR #281 Any Holiday But Christmas

Hi everyone this week's challenge over at Hiding In My Craft Room is brought to you by My Besties. The winner of this challenge will get the three images that are used by the design team.

At first when I saw this image I thought how am I going to use this in a project without it being Christmas especially since the day this post will air is Christmas Eve day. I decided to go with Valentine's. I took this cute girl into PhotoShop and added hearts. I also colored her in PhotoShop. Then did embellishing after I printed.


My background was a piece where I was experimenting with my peeled paint technique. It didn't turn out like I had planned so I went and sanded. Then I used a Darice embossing folder. I wasn't paying attention to what I was doing so ended up doing debossing. Then I took the piece out of the folder and painted on Precious Metal which is a liquid gold medium. I wiped some of the gold off. Then when dry I brushed on DecoArt Antiquing Cream and let it dry. Then I took a damp paper towel to wipe some of the medium off.

I used a clear glitter pen to outline the two hearts. As well as to do the shoelaces,the dots on the scarf and the center of the flower in her hair. I used a yellow glaze pen to add a little big of texture and highlights in her hair.

Then I cut my image out using my circle Spellbinder die. (For some reason my oval ones have disappeared.) Then using chalks and my finger I colored the edge with pink and the inside with blue.

That's a wrap for now. Wishing those of you who celebrate Christmas "A Blessed Christmas". Also wishing you Happy Frugal Crafting till we meet again.


Tuesday, December 20, 2016

Winter Wonderland Challenge #283

Hi everyone with a heavy heart I post today my last project as a guest designer over at Shopping Our Stash. The challenge is to use the Winter Wonderland theme but not Christmas. Today I'm using a digital image by MHK. I decided to do a gesso  print image. Later on I'll be showing a project using a stamped transfer image in gesso. Yes, this mad scientist has been experimenting again. Not being sure if it was going to work I did not take any photos during the process. Also it was a learning experience to see what would work and not work as far as the coloring went. I promise to next time take photos or perhaps a video of the process.

 My frame is a card stock from the Recollection Frosty Cabin collection. I never knew how to use this particular pattern so it has been collecting dust. The snowflakes are the left overs from cutting out a stencil.

The sentiment is part of the sledding friends digital stamp set. It is printed on deli paper. I did change the color of the lettering in a program similar to Microsoft Word.

I don't know if I didn't have enough gesso spread on my card stock or if I didn't have the print totally embedded in the gesso so I got some imperfections in the print. However, since this is a vintage photo it well might have suffered damage over the years. I played around with a couple of water soluble products but they just sat on the surface and I could not blend them the way I wanted. After wiping them off with a paper towel I went with using DecoArt Walnut gel. I kept brushing it on and wiping off until I got the look I wanted.

For those who are curious I use FolkArt white gesso as it is inexpensive and I've had good luck with it. I've been told that all brands are not created the same.

Thank you for stopping by. I hope you will come back on Saturday my normal day to post a new project.

Wishing you Happy Frugal Crafting till we meet again.


Saturday, December 17, 2016

HIMCR #280 Masculine Challenge

Hi everyone I'm back again with another Hiding In My Craft Room challenge. This week the challenge is to create a masculine project. A lot of times I struggle doing masculine but I think I succeeded this time.

The sponsor this week is MHK designs.

The winner will get their choice of three products. MHK graciously provided me with a choice of stamp sets. I loved the sentiments and the image with the sled friends set. The image reminds me of all the fun times I went sledding with nephews and later on with my son.

My background is done on a piece of recycled cardboard. I tried out DecoArt Weather Wood crackle and it didn't crackle on me. I don't know what I did wrong but after talking to different people I think the paint was too fluid. It did end up though making a nice background.

I printed the image out on matte photo paper using my laser printer. As I wasn't sure whether I was going to color with water colors or what I was going to do. Then I used my blending tool with Distress Vintage Photo ink. I decided to try to get the look of the old fashion tintypes. I cut my piece out by hand so my piece ended up being a little wonky. I really need to find my drawing compass. I'm sure it is with the other stuff the borrowers have borrowed.

I inserted the sentiment and the snowflakes which come in the set into Word so I could create the custom sentiment. Then printed it on Kraft card. I tried to foil but the snowflakes were too light of a color for the transfer foil to adhere. Also for some reason the foil only wanted to adhere in certain places of the sentiment. Second time I printed it out on my inkjet printer.

I printed the image out again with my laser printer to see how it would work as a gesso transfer. I used another sentiment from the stamp set. Details will be on my blog Tuesday.

As I write this a cold snap has appeared overnight. With the wind blowing it is even colder. Winter has finally appeared.

Wishing you Happy Frugal Crafting till we meet again!


Tuesday, December 13, 2016

Tag You Are It Challenge #282

Hi everyone I'm happy to be sharing with you another guest design inspiration piece for Shopping For Our Stash weekly challenge. This week the challenge is to create a tag from your stash. I hope you will join in the fun.

Since I seem to have found myself short on holiday cards I ended up using a tag on a card. I was originally going to use my machine to cut out a tag or two because I didn't have any on hand. However, a friend stopped in with a bunch of tags in his hand on his way to his apartment and gave me a couple.

Here is my creation:
I forgot when I did this technique on my tag that it comes out differently using metallic paint for some reason. The paint appears to be more elastic so although it bubbles it doesn't start cracking. Or even peeling like regular acrylic paint does.

 I started out by applying a base coat of paint which was suppose to show through. When it was dry I applied regular Elmer's glue and then while the glue was still wet went and painted Folk Art Peridot metallic paint over. I then immediately took my embossing heat gun and the fun began as the paint bubbled up. If a large bubble came to the surface while the paint was still warm I would push it down with the tip of a brush. If you decide to do this technique be careful as the paint gets really hot. Luckily I didn't set the smoke detector off or needed to use my fire extinguisher.

The background for the snow person was a scrap of confetti card which was sitting on my table. I figured it would be the perfect size to use. And the confetti dots would give it more of a festive look.  I decided to try a wet on wet using Liquid Metal which is a product I've never used before.(I just couldn't resist when I saw it on sale during Black Friday 😉) I wish I could have captured the little bit of sheen with my camera.

I stamped the Just For Fun Snowman and then cut out free form. Usually I color stamped images but this time I decided not to. After adhering the snow person down I used DecoArt Snow writer for my snow at the bottom and then sprinkled a light layer of ultra fine glitter.

I took a bead from my stash and threaded the ribbon through . Then threaded it through the hole in the tag and tied my bow. Normally I would not add something like the bead because of mailing but since I'm hand delivering this card it will be no problem. Besides I need to do something with the left over beads from my jewelry making days which was a few decades back. 😉

Tag You Are It! Now it is your turn.

Off to work on my regular design team project for Saturday. Wishing you Happy Frugal Crafting till we meet again!

Saturday, December 10, 2016

HIMCR #279 Super Scrappy Saturday

Hi everyone it is time for another challenge over at Hiding In My Craft Room. This week the challenge is to use your scraps. Something which I have a ton of.

The challenge is being sponsored by Lacy Sunshine. The winner of the challenge will have their choice of three images.

 Today I'm using Rory Steampunk Christmas Angel which Lacy Sunshine so generously provided for my use.


For my background I used a piece of music paper which I had originally downloaded from Graphic Fairy. I did print out the pocket watch paper instead of using a scrap of it as the original colors didn't work. I love being able to give an image a sepia look with my printer.  I don't remember where I originally got the image. All I remember is it was a free image.

I accidentally cut the watch panel too narrow so used scraps of ribbon as a frame. For some reason besides accumulating scraps of paper I end up accumulating scraps of ribbon.


The embossed panel is from a pennant which didn't cut correctly on my machine. I just cut it a smaller size to fit. I used black gesso on the panel before embossing it with a cogs embossing folder by Darice. One which alas had never been used after I bought it. I then painted Precious Metal Classic Gold liquid over the panel and wiped off some of  the color. Because it dried too fast I then took a wet brush to re-wet it and used a paper towel to mop up some of the color as I wanted some of the black to show through. After the panel was dry I brushed DecoArt Antiquing Cream. Then with a paper towel rubbing in a circular motion removing some of the cream and giving a polished look. In person the panel really looks like a piece of metal.
.
Rory was printed on my laser printer. Then a scrap of transfer foil applied using an laminator. She was colored with pencils. Then a blue glaze pen used for her eye color and a white gel pen.

I wanted her to stand in snow so I used a DecoArt Snow Writer.

I had snowflakes left over from when I cut out a stencil. I applied glitter glue and then sprinkled crystal glitter over the wet glue.

There you have my Scrappy Saturday inspiration piece. What do you do with your scraps? I would love it if you joined in the Scrappy Saturday Challenge and shared with the team your creativeness.

Thank you for stopping by. Do come back on Tuesday to see my next guest design team project.

Wishing you Happy Frugal Crafting till we meet again!


Tuesday, December 6, 2016

Pretty Packaging Shopping Our Stash

Hi everyone I'm thrilled to be doing my first inspiration piece as guest designer for the month of December over at Shopping Our Stash. It has been a few years since I've embellished a plain box or gift bag. Much less created them to embellish. This was getting out of my comfort zone but I'm pleased at the way it turned out. I hope you will like my inspiration piece and perhaps join in the challenge. After all this time of year if you are not into wrapping things you will need a pretty gift bag or box. Without further ado here is my project.


Can you believe this started out as a plain white box I cut out using a file which had been free from Silhouette a few years back. After cutting the box out I used a dark green Spectrum Noir marker and my airbrush to color the white card. Then just on the front I stenciled using  a foam brush and Iridescent medium.  Before it had a chance to thoroughly dry I brushed the medium again over it and wiped some of the medium off with a paper towel. Creating shimmer and a subtle pattern.

The gem trim I bought in the clearance bin at Michaels. Figuring for a dollar I could find some use for it.😉

On my desk was a scrap of fused plastic leftover from laminating pennants for a banner. It was the perfect size for a circle die to fit on. I brushed glue on the plastic and then tore pieces of lime green tissue paper which were then embedded into the glue. In some places I built up layers and in other places less layers. To make sure the paper was down tight I used more glue on a brush and used a pouncing motion so that I wouldn't wrinkle the paper. When it was dry I cut it out using my circle die.

I don't remember if the bell with the bird was a free sample from Dover or whether I got it somewhere else. It was in my die cut binder where I place die cuts that are extras. In this case my sister didn't want it when I went to visit her for a winter cardathon a few years back. It was the perfect size for the box.

Thank you for stopping by and do come back Saturday when I'll have an inspiration piece for Hiding In My Craft Room.

Wishing you Happy Frugal Crafting till we meet again!


Monday, December 5, 2016

A Look Back At Five Of This Year's Projects

Hi everyone today I'm posting photos of five of this year's projects as part of a design team application.  Out of the 64 projects I've blogged about I thought it would also be fun for you my faithful readers to see five of the projects with the details of how they were done.

This year has been an exciting crafting journey and in a way I'm sad to see it go. Yet, I know that next year more adventures are in store as I play and experiment more stretching my creative muscles.

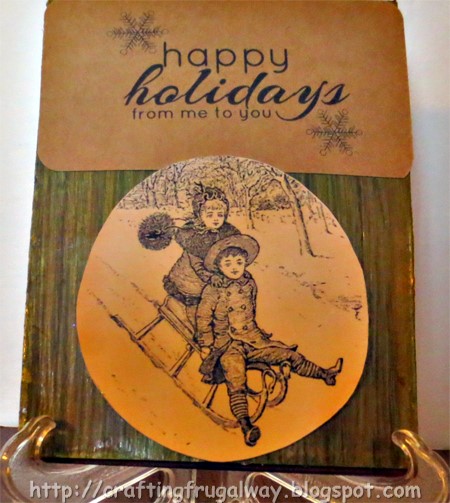
First off is a recent one where I dusted off a stamp which had been given me by a friend. The friend saw the card and asked if he could send it to his mom. 😁


I totally wasn't sure how this was going to turn out by stamping on photo paper using this post card stamp. (I believe the stamp is by Stampendous) Then coloring with gelatos and gel pens. Adding snow using a Snow Writer. Using a photo corner punch which had been gathering dust. Then not liking the white card stock frame using my eBrush with a Sharpie Bronze marker.


Second is the Just For Fun inspiration piece for their "Anything But A Card" challenge.


I had so much fun doing something other than a card. 😊 It was especially rewarding to take a stretched canvas found at a thrift store which someone had written on using a permanent marker. 

I've seen lately several canvas pieces using melted crayon. I decided to do my own thing. I bought at a dollar store a box of crayons and melted them with my heat gun. Being careful to not burn myself or make a mess all over my "play room". The smoke detector only went off once. Lol!

The wood frame was painted with DecoArt acrylic paint. Which I just happened to buy unopened at a thrift store. When dry orange ribbon was glued inside.

The stamps are by Just For Fun. I stamped the zentangle pumpkins on pattern paper. Then colored just the stems with color pencils. The pumpkin patch was stamped on white and colored with pencils.

"WELCOME" is scrabble pieces from a game found at a thrift store. Those games are really getting harder to find as people buy them up for crafting.


Third is the Let's Hear It For The Girls inspiration piece for the Just For Fun Rubber Stamp Design Team


When I saw the pattern corrugated poster board at a dollar store I knew I wanted to use it just not how. I play around a lot with different things before I start to create. When I saw the poster board on my work space I decided to see if  I could somehow work it in. I love the more modern look of the paper with the more Vintage look of the lady and the lace.

The background was created by placing Distress Paint on a piece of plastic. Then misting the paint with water allowing it to run. Placing my paper on the paint and pulling my print.

The lovely lady I think is one of my most favorite stamps by Just For Fun. The quote is also one of their stamps. For the lady I colored her with my color pencils which had been collecting dust for way too long. I had a lot of fun hand cutting around some of the letters for the quote.


Fourth is my card with the woven background.


 This was such a fun card to do. For the purple strips I first painted a light purple with a bristle brush and let it dry. I loaded my brush with a darker purple and after applying the paint but before it dried dragged my brush through the paint revealing the lighter color. When dry I cut into strips. I also took vellum and heat embossed. Cutting that into strips. Just like in grade school I wove them together to form my base. Then adhered to black card stock. Placed my frame which I cut out of white card and colored with a silver paint marker on top.

The Just For Fun Small Warbler Bird is stamped on deli paper. Then colored with pan water colors. Because the paint would bead up I kept mopping the paint with a paper towel.

The Be Happy is computer generated and printed on deli paper. Then cut out as a speech bubble.


Fifth and I think perhaps my most favorite is this underwater scene. For those who know me you know my projects had to include at least one beach scene. Yes, while some people leave their heart in San Francisco I left mine at the ocean.


I started by airbrushing both the water and sand with Spectrum Noir markers. Then I took my sea stencil and gold paint to do some stenciling in the sand.

I painted card stock with metallic green paint. When dry I cut it out with a corner leafy die. For some reason I have problems cutting this die completely out. Even trying the wax paper trick. However in this case it was alright as I was cutting it out for vegetation.

The Just For Fun seahorse is stamped on deli paper. My new favorite paper to stamp on as you can reverse the images if you wish on your project. I colored on the back  with color pencils which muted the colors and then in places on the front.

I used drops of Dimensional Magic on a page protector to create my bubbles. When it was dry I adhered it with Tombow multipurpose glue. I discovered that it is one of the few glues where you really have to look to see where the plastic was adhered using just drops of it.

There you have it a look back at five of this year's projects.  I hope if you have stayed with me reading this far that the things I've done over the year you can incorporate into your own creations.

Thank you for stopping by and do come back tomorrow when my first guest design project over at Shopping Our Stash goes live. I'll give you a hint it is not a card. 😉

Wishing you Happy Frugal Crafting till we meet again!

Saturday, December 3, 2016

HIMCR Challenge #278 Christmas Colors

Hi everyone I'm excited to be posting my first project for the Hiding In My Craft Room challenge. This week the challenge is Christmas Colors. Details can be found here: http://hidinginmycraftroomdesignteam.blogspot.com/2016/11/himcr-278-christmas-colors-dec-3rd_28.html

The challenge is being sponsored by Robyn's Fetish a digital stamp company. There are also digital papers available to purchase on their site. The winner will receive three images of their choice. Check out the site after you finish reading this post.😉Robyns Fetish Just make sure you have a cup of something to drink because you may just get lost looking at all the fabulous images and papers.

Enough yakking as I know you are wanting to see what I did with Carl The Snowman, First off  is as an ornament on the tree.


I digitally colored him in PhotoShop then printed multiple images on my card stock. After all no use printing just one per sheet. One thing I would do different is to cut the individual images out and then laminate and cut again. I thought I could save time but it took me longer trying to cut through all the layers.  Of course like a dummy I didn't think of cutting them out with one of my cutting machines. Because the wind blows really bad where I live I punched the hole and then used garden wire to fasten to the tree. The hole is large enough so if I decide next year to decorate indoors with all the Carls I can instead use ribbon. By laminating your images you can use them year after year.

Next is a banner which is also laminated.

Cut all the Carl's with my cutting machine. Sure saved my poor hands. Also use my Cameo to cut out the letters. My markers were running out near the end while I was airbrushing my pennants which I had also cut out with my machine. Note to self make sure you have ink to refill your Spectrum Noir in the colors you constantly use.

Last but not least is a card using Carl. This card turned out better than the image in my head.


 My background was created by using Darice Snowflake embossing folder  on gesso coated card stock. I had previously swiped Stazon Teal ink over the folder and then Clear Embossing ink. The embossing ink kept the Stazon ink wet so when I put my card in the folder the ink was transferred. I then took Liquitex Iridescence Medium and brushed over the panel. If you look carefully you may be able to see the sheen.

The other piece is from Recollection Frosty Cabin paper. I won't tell you how many years I've had it in my stash.


 I printed a smaller size of Carl for the card. That is beauty of using digital stamps. Then I took a Purple Liquid Pearl and with a toothpick added it to the center of the flower on the mittens. Guess I should have used the white but I still like how nice the center turned out. For the string I used Karen Foster Scrapper Floss. My embroidery thread was too flimsy. I cut a slit in the mittens and careful poked a hole up at the top. Threaded the floss through the slits and holes and then taped in the back the ends. I love the little bit of texture it gives. I think dental floss would probably work but not sure.

I decided to use the scallop die to cut instead of cutting out Carl. My only other set of Spellbinder dies my oval set has mysteriously disappeared . Perhaps it is time to clean the "playroom".

So there you have it my projects for my first design team post.  For the month of December I will be on the design team of Shopping Our Stash Weekly challenges as a guest designer. I can't tell you what projects I'm working on so you will have to come back and check them out. The first project for them will go live on Tuesday. It is going to be a busy month crafting for sure.

Thank you for stopping by. I hope you will come again. Wishing you Happy Frugal Crafting till we meet again!