Saturday, June 27, 2015

Viva La Verve and Stampotique Challenge

Baby its' hot outside and getting even hotter with the temperatures quickly edging up to triple digit. Thank goodness I have an in the wall air conditioner in the living room. Between that and a window fan along with a fan in my hallway my apartment is staying comfortable. Much too hot to be outside so I've spent the week organizing and doing some much needed cleaning in my playroom. As well as some crafting.

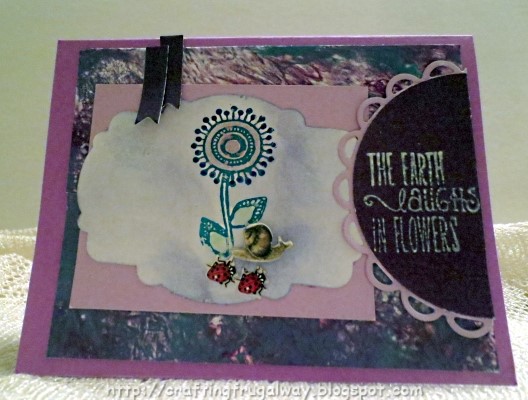
Wednesday was the start of a new challenge over at Stampotique. The theme is "give wings"  which means to take a stamp without wings and to add wings. I already knew what I was going to do. If you wish to join in go to http://stampotiquedesignerschallenge.blogspot.com. Also today Viva La Verve posted week number 4 sketch challenge. You can find details here at http://vlvsketches.blogspot.com When I saw the sketch I knew it would work great with the Stampotique challenge. I just love the sketch and again another great way to use up some scraps and bits.

By the way I got my Scan N Cut after having to go to the city last night to pick it up. Don't know why the driver could not find my apartment to deliver it. :-(  I'm a loving it. Of course I had to use the scallop shapes which it comes with for this card.

Further down in this post I'll share some pictures of my playroom.  It might not be this clean again until time for another apartment inspection. ;-)  For now back to the card.

Here is the sketch for this week:
I love this sketch but I had to get fancy. After all that new machine was calling me and there are over 600 cutting files stored in it. Thank goodness there is booklet showing all the shapes. :-)


The only thing that was not from a scrap is the card base. I first cut out the scallop rectangle.  The scallop circles are from a scrap of Monet Waterlillies paper which I bought at a  warehouse store several years ago. I love how with the Scan N Cut I could cut exactly where I wanted on the pattern paper.  (I have some 12 x 12 card stock with words  and this will be great to cut some of the words out.)The  big scallop was from another scrap. I cut my circles too large but was able to cut them smaller and now have frames for  other projects.

The piece the sentiment from Verve is stamped on is a scrap of paper for acrylics. I used my spouncers with yellow and green acrylic paint. I like randomly pouncing with them. I have different sizes of them. For those who don't know spouncers are round sponges usually on a wooden handle. I wasn't sure how the sentiment was going to stamp since the acrylic paper has a texture to it. I used Stazon Jet Black ink and it worked great. By the way the sentiment is from the June release of  Sparkly Dreams. This set has all kinds of neat quotations and a butterfly. Of course since the set came in the mail today I just had to use one of the stamps. :-) * wink* the lottery is now up to 64 million so I'm going to have to buy the winning ticket just to buy more Verve stamps.

I also used the StazOn ink for the toad. Lol! This is one of my vintage stamps as I bought it back in the 80's. To be honest I didn't know back then the proper way to care for rubber stamps so am surprised so many of them survived.  He is stamped on a Martha Stewart paint chip. Not only did the paint chip take the ink nicely but the Scan N Cut cut  him out like a dream. :-) The wings were in mystash. Several years ago I experimented with shaving crayons and then using an iron to melt the shavings. At the time I wanted to see if my SD cutting machine  would cut the card stock so cut out several butterflies.I thought this butterfly was the perfect size to add wings to the toad. I did have to trim the bottom off to fit.  I folded the wings back a little bit and after adhering them pop dotted the toad on the card.

There you have it my fun card to make. I kind of enjoyed being a mad scientist and adding wings to a toad. Toadally  so out of the box. Sorry could'n't resist making a pun.

For those who are interested this is what my playroom looks like now. It will never be in House Beautiful or one of those other magazines but it works.


This is what you see when you open the door. I added the drapes because the windows are drafty and it was so cold in the winter even with towels being used to try to block the drafts. I  can't help but smile seeing the bunny cookie jar. I didn't really have a place for it but didn't want to get rid of. I got rid of a lot of things my late husband bought me but I just had to keep her. ( She was his last gift to me and he was already far gone in his dementia journey but had a lucid moment while shopping at Goodwill.)She now holds the wide wire ribbon that I don't use a lot. The rest of the regular ribbon is to the left in the plastic display rack that a store threw out. You can't see it in the picture but the sides of the rack have M&M on it.

In the foreground on my work desk is my air brush. The small box next to it holds the marker adapters. Then there is a letter holder which holds cards to mail out or to hand to someone in person. Of course I have to have my Mickey and Minnie Mouse clock  present so I know when it is time to take a break and eat. Otherwise I get so caught up in my crafting that I lose track of time. I bought the wooden lazy susan years ago to use in a playroom but I never had the space before for it.  Some of my Iris Herringbone dishes hold different things as well as a wine glass and a favorite mug on it.

In one of the cubbies is the Iris Herringbone pitcher full of bristle brushes. A mug my sister gave me which has fine cracks in it holds foam brushes and rollers. A butterfly tea pot from my late husband holds other brushes. Previously I had all the brushes in a large bowl but I would grab one brush and others would fall out. Also if I wanted a particular type of brush it was hard to find it. On the top  of the cubby to the far right is the Keurig carousel which holds distress paint, stickles, etc. The green cracker barrel on the top holds the adhesive jewel ribbons. They sparkle like mini lights. The large brass bowl holds skeins of yarn. My late husband bought it for me. We were out going to different yard sales and I picked it up but didn't want to pay what it was marked for. He walked up to the lady and offered her a ridiculous low price for it and she accepted. 


So sad poor Cameron and my demon of a sewing machine were delegated to being stored under the sewing desk.  To the right of the Scan N Cut is a fake book which holds the deep blade, drawing pens and spatula. I just today pulled out from under the sink the old toolbox on the far right. I wasn't sure if it was going to fit on the Baker's rack or not. After it is spray painted the drawers will hold many of my clear stamps. Lol! I'm thinking of painting it a girly color since my son was eyeing it when he helped me move.  The black and white print on top of the tool box is a potato and ink print my sister did  back in the 70's. I have always loved this print and whenever I move things have been left behind  but not this print. I promised my sister if I got tired of it I would give it back to her but now decades later I'm still not tired of it. :-)

It is such a joy to be able to put my hands on something without having to search. I still have some misplaced craft items but I'm sure I'll find them. as I sort through some other stuff. I did do a lot of purging of  ribbon and stamps and things. As well as things that for some reason migrated into the room. I still have boxes and things in the closet to go through. Most of it is non craft items. Although ten book boxes are stuffed with photos.If it stays hot it will be a good time to sort through the tons of photos.and get them in photo boxes. The out of focus ones will go in a plastic box to use in card making and to scan in for making kaleidoscope images. 

Thanks for taking the time to read this far. I hope I have inspired you. Stay cool if you are where it is hot and stay safe. Wishing you Happy Frugal Crafting till we meet again!


Tuesday, June 23, 2015

Mojo Monday #403

Hi everybody! I'm so excited that I'm doing a happy dance. Come Thursday I'll be the owner of a Scan N Cut machine. Don't get me wrong I've loved my Cameo but there are  just things he won't do. Things like easily cutting shrink plastic or cutting thin art metal like the Tim Holtz.

The two things that convinced me to go with the Scan N Cut is I've been hand cutting out a lot of stamped images lately. Also I wanted a machine that I could easily take with me somewhere without necessarily having to drag my laptop along with me. I'm sure there will be times when I'll use Cameron.

Yesterday was the start of a new week and that means a new challenge over at Mojo Monday. I love this week's sketch but I had to modify it a little. More on that later. So without further ado here is this week's sketch.

Here is my card and I'm a loving how it turned out. It came out even better than the card I saw in my head. Also I managed to get good photos this time of the foil and the glitter marker used.

I started by using my eBrush and a neon marker from the Dollar Tree for my card base. Then I held my eBrush up high to get speckles using a gold Sharpie.

The purple piece was a scrap. In fact on the back side was where I practiced with lace and my eBrush. Believe it or not the vertical panel is what I started when I did my video in the last post. I scribbled more with markers and dropping alcohol blending solution. Then misted with Wild Plum.and Stream color mist.

I have not had much luck getting a good foil  stamped image using my glue pad and the  stamping adhesive was $10 plus I would have shipping on top. I have not priced yet what sticky embossing powder will cost me but alas my fine detail embossing powder did not work. My work around was to stamp the butterfly and the sentiment. Then to copy it on my laser printer. Doing it that way I now have the original stamped image and sentiment for later use. My laser copies I was able to then foil using my laminator. I was pleased how even though the butterfly is really detailed how nicely it turned out.

The butterfly and sentiment is from Verve's Happy Place set. I only bought two sets but you can see between this challenge and the Verve challenge I've been getting lots of mileage out of  them.  I love this butterfly. After the foiling was done I colored my butterfly with Faber Castell metallic colored pencils. For the body I used Marvy's  black pearl fabric marker.

Opps! I wasn't thinking when I stamped the sentiment and butterfly. They were stamped too close together and too close to the edge of the paper so my round die did not work. As it was I had to work to get the oval to work without cutting off the letters.  I used teal Stazon ink to edge my shape. I felt like it needed something.

Instead of ribbon or a piece of card stock I thought I would try something different. I took a piece of corrugated cardboard and cut my shape. I wasn't sure if it would work but I didn't want the brown color. I decided to see if my Marvy glitter fabric markers would work. As you can see here it is really sparkly. :-)

I can't wait to see what next week's sketch is going to be. :-) Do join me in the challenges at: http://mojomonday.blogspot.com/ Doing challenges is a lot of fun.

As you can tell I'm really enjoying using the Verve stamps. Now I don't want to be accused of enabling anyone but stamps and dies are on sale for 10%  off over at the Verve store. Also a bundle of all the June stamp releases are on sale for 20% off.  I'm not being paid to endorse these stamps being the frugal crafter I am I thought I would give you a heads up.. I love my stamps and I love how quickly the company processes the order plus I can't complain about paying $3.00 for shipping.

That is all for now. It is back to cleaning and organizing. Need to get things ready for my new arrival. :-)

Wishing you Happy Frugal Crafting till we meet again!

Monday, June 22, 2015

Fusion Bright Butterfly Challenge + Video

Hi everyone it is the wee hours in the morning and I have not gone to bed yet. I wanted to get a video made to go along with this post. Lol! The dogs were quiet and I was holding my breath that no train would come rumbling through. with the horn blaring. The only thing that separates my apartment from the train tracks is the parking lot. So needless to say when a train comes by you know it without a question. Then I had forgotten how to use the editing software for videos. It has been so long since I have made a video. The easiest part was uploading it to You Tube.

On Thursday Fusion posted their new challenge. The challenge happened to be titled Bright Butterfly so you know I had to see what I could do. Unfortunately I was not able to duplicate the bright colors but I think you will like my results. You can join in the fun here: http://fusioncardchallenge.blogspot.com/The challenge closes at noon PST June 30th.
Here is the sketch and inspiration photo.
Drum roll please as I unveil this gorgeous creation. Once again the photo does not do it justice even though I spent more time trying to get a couple of good pictures than creating the card.
I could not get as bright of colors as I wanted. I probably should have used my Distress Paint. However I do like how it turned out. If I did things correctly there should be a video at the end of this post on how to create the background. The only thing I didn't mention in the video is that after I did my alcohol marker technique I went ahead and used color mists.

I embossed plastic using a Darice embossing folder. I then used FolkArt glitter paint to paint the butterflies on the debossed side. When the paint was dry I used a black alcohol marker around the wings. Then smudged it using a paintbrush which was dipped in alcohol blending solution. Then I took a brush and painted over the back with Peridot Metallic paint and wiped it off. I wasn't fast enough and the paint dried before I got all I wanted off. A paper towel with a dab of dish detergent wiped over it and then wiped off took the excess off so that there was just small speckles of the paint. I love how the paint migrated into the debossed places. When the paint was dry I turned it over and used a marker to draw in the body and antennas of the butterflies.

I added a frame even though the sketch doesn't have one because otherwise where I glued the plastic down would have shown. Of course I could have stapled it down at the corners using my colored staples. I wasn't sure what color I was going to use for the card base but the blue really pops the background better than the pink so the pink is the card base.


My sentiment is from a set of butterfly stamps. Alas they did not get put away in their sack so I'm not sure who the maker is. I often stamp on tissue wrapping paper but I decided to see about stamping on nonstick parchment paper as it is a little stiffer. I was afraid of making a mess stamping directly onto the plastic. I have with Stazon stamped on plastic before but never sentiments. I used StazOn teal ink and adhered it using a glue stick. Like vellum  using a tape runner would show.

Here is my first You Tube video. Luckily my laptop with web cam is very flexible. In fact more flexible than I am. Lol! Ignore my paint splattered vinyl cover on my work table. As well as the trash can in the background.


Let me know what you think of my video. I know I need to make sure that what I'm doing is within the frame. I don't think I did too bad for my first You Tube video.

Do you like watching videos or would you rather see step by step photographs? Also along this same line do you like reading about the process I go through  as I create or would you rather I skip it?

As I said it is the wee hours and I best head off to dreamland. Morning will come too early with two dogs ready to go on an adventure outside. Who needs an alarm clock when they have two dogs.

Wishing you Happy Frugal Crafting till we meet again!


Saturday, June 20, 2015

da Vinci meets Warhol Card

Hi everyone it is Saturday and yesterday Viva la Verve posted the sketch for week 3. Can you believe that June is almost over. Viva la Verve Sketch challenge blog can be found here: http://vlvsketches.blogspot.com/.

I started to clean up my playroom and like most children got distracted and started doing what I call crafting cleanup. That is finding things that weren't put away to craft with or using what is on your work table. Anyway when I was sorting through what was inside of a clipboard where I put items for future projects I found a stamped Mona Lisa image and a card came to mind using the sketch. On top of that for some reason I started thinking about the artist Andy Warhol and thought I wonder what his take would be of Mona Lisa if he was going to use the image in his work.

Here is the sketch:
Here is my take on the sketch:
 
I started with turning the other piece of black card stock from making a card base into this card base. I then rounded the corners. I knew I wanted to use the Paris washi tape that I found at Dollar Tree. (I wish they carried it again.) When I spied this scrap of pattern card stock I was hoping it would work.

After playing with different scraps I decided to go with the hot pink for the background of Mona and my stamped sentiment. It helped to make the color in Mona's face pop more.

My faux stitching was done with a black glaze pen. Lol! if I had actually hand stitched on this card it would have ended up looking exactly like this with stitches being uneven and crooked.

I think I must have originally stamped Tim Holtz's Mona Lisa with Ranger's Archival ink. I'm saying that because I know that ink does bleed a little bit when it comes in contact with alcohol blending solution which is what this did. Also I remembered that I was going to originally paint with distress ink.

I decided to experiment and figured if I messed up the image I could always stamp it again. . I took some Sharpie markers and scribbled on an acrylic block which was already stained up. I then squirted some alcohol blending solution. Then I placed my stamp image face down. You can't see it in the photo but her hair actually has some copper and gold streaks which I had scribbled on along with my colors.

I was trying to figure out how I was going to do the sentiment. I played around with some chipboard tags but they were really too large. I decided I was going to stamp on antique calligraphy paper. I found a scrap which I had messed up on one side stamping. Being the frugal crafter I am I went ahead and stamped with my Ranger Archival ink. The sentiment is from Verve's Moments Remembered collection.  LOl! if I keep entering these sketch challenges I might need to buy more stamp sets. Although Verve stamps are not a requirement to enter.

That's all folks and I really need to get into doing some  serious cleaning and organizing instead of playing. ;-) Wishing you Happy Frugal Crafting and a fun filled weekend!

Friday, June 19, 2015

Silhouette Tool Box Card

Hi everyone can you believe it two posts in one day for me. Believe it or not Father's Day is Sunday here in the U.S.A. Back in June of 2013 Silhouette had as their free file of the day this cute tool box card. At the time I was in the midst of moving and in fact my poor son helped me move into my apartment on Father's day.  I forgot all about the file last year but recently while looking through the Silhouette library I saw the file. I thought what better thing to do than to make up a card for my son. It is especially fitting since my son is a mechanic. What can I say you have to let your kids do what they want to do. Besides that someone has to keep our vehicles running. ;-) I'm going to let my granddaughters write inside and give the card to their dad.
If anyone asks those screws were a royal pain. In fact I ended up losing a couple before I could get them on the card so had to cut more. Originally I was going to use silver foil on some of the pieces but I was having a difficult time trying to get the glue on so the foiling wouldn't look like a mess. Then I remembered I had some silver card stock so was going to use that. Instead I found adhesive mulberry silver paper and figured that would be even better.

This was an easy quick card to make. I hope my son likes it.

Have a great weekend! Wishing you Happy Frugal Crafting till we meet again!

Viva La Verve Week 2 June

Hi everyone by the time you read this Viva La Verve will have posted a new sketch. However, since we can link up for the month I'm entering this card into the challenge. http://vlvsketches.blogspot.com/ I'm also entering this card in the Stampotique challenge because the theme is celebration. http://stampotiquedesignerschallenge.blogspot.com/2015/06/sdc200-celebrating-our-200th-challenge.html
Here is the sketch. It took me a bit to figure out what size to make my rectangles so that they would work.
My card is just a little bit different from the sketch. I used rick rack and placed it further across my card and used a sticker instead of a bow. I decided to add to the challenge by challenging myself to use what was on the desk as well as what was in bags on the floor, what hadn't been used for a year and well as what was in my scrap box.

For my card base I took the other half which was sitting on my desk left over from making a previous card. My yellow panel was on my desk as I had originally cut it for a card base and then realized it was too flimsy for a card.  My pattern paper was a surprise as it was in a sack. I had purchased a pack of origami paper at a thrift store. I figured for under a dollar I couldn't go wrong. The rick rack was also purchased at a thrift store. I have wanted to build up my supply of rick rack but I refuse to pay the price. This package had an original price of fifteen cents and I paid a dime. I can not now a days find rick rack for under a dollar.

The mat for my sentiment was a piece of scrap antique gold paper. You can't really see the gold in the photo. My tag was on my desk a left over from cutting out a frame a long time ago. It is gray card stock but I covered it with Studio G washi tape. The bag of washi tapes was on the floor. My excuse is that I wanted to put up a spring rod in a cubby for washi tape but haven't bought the rod yet.

The sentiment is from Verve Moments Remembered stamp set. I had not put the set away when I was through using it so it was still on my desk. I stamped it on a really wrinkled piece of tissue wrapping paper. Then since my laminator was still on because I was trying to stamp and foil I went ahead and ran it through the laminator which smoothed the paper leaving a distressed look to the stamping.

I forgot to mention the doily. It doesn't really show but the doily is cut from a piece of antique calligraphy paper which a few years back I painted over with copper metallic paint. It is cut using my eBosser and a Spellbinder die. Lol! believe it or not I only have two sets of Spellbinder dies and a handful of other dies.

My butterfly is from a sticker set by Krafters Korner. I found the stickers at a dollar store when I stopped in one in the big city a couple of years ago. I went ahead and put it on a scrap of yellow card stock and then cut it out. It is pop dotted on the card. It doesn't really show up in the photo but the butterfly is edged in goldit is really gorgeous.

I'm using this as a birthday card. I was going to stamp a cupcake on plastic and color it and put it down further on the pattern paper but then I decided it would be just too much.

For my crafting friends I'm going to challenge you to clean up your crafting work space by using what is on your work space. I also challenge you to enter a challenge. Believe me my brain gets a workout and I stretch and grow as a card maker by getting out of my comfort zone. Although I just checked out this week sketch at Viva La Verve and it is an easy check. No complicating trying to figure what size to cut things.

Wishing you Happy Frugal Crafting till we meet again!

Wednesday, June 17, 2015

Mojo Monday Sketch 402

Hi everyone here it is the middle of another week. I was busy Monday finishing off a card for another chalgelenge and wasn't sure how I was going to do my card. I had been playing with my kaleidoscope software program but decided to not use my images. Here is this week's sketch.

 Here is my card and as you can see I followed it fairly closely this time. Although I didn't  place my elements on a separate panel so that there was a border.  I realized that would not allow me to have much ribbon sticking out from the smallest circle.
I don't normally do pink but I had a large enough piece of this fuschia pink to make the card base and the glitter circle card stock to make the small circle as well as the pink striped card stock for a mat for my circle with the flower cut out. I also have tons of white card stock scraps so took the opportunity to use a piece of that for the doily shape.The circle with the cut out was .left over from a project years ago. I 'm trying to use more of my scraps and this layout was perfect for doing that.

I used Silhouette circle frame file for my doily. I just deleted the inner circle. After it was cut out I stamped with Ranger water proof ink my sentiment from Verve. This is my favorite sentiment. I figured it was perfect since I was adding a circle with a cut out flower. I then took pan metallic water color paint and painted. It was too red looking so I  painted with white water color. I love how it . softened the black ink I had stamped with. After the doily was dry I stamped using a small flower background stamp and Memento Angel Pink ink. I wanted the stamping to be subtle.

For the middle circle I drew a circle in my cutting software and then modified a flower  file for in the center, This card stock was from an experiment years ago writing with chalk and then letting the paper soak in a tub of water. The paper  ended up being distress looking and after smooshing my cut out  around on my craft ma t which had thinned down Distress paint it became even more distressed looking. I then sprinkled gold Perfect Pearls on it while it was still wet. I just wish I had not been as heavy handed with the Perfet Pearls. The striped card stock is left over Learning Center card stock I bought  at Dollar Tree several years ago. I have lots of scraps of it because I used it one year for making Christmas cards. I cut it with a Spellbinder die.The gem was in my stash. In this photo it looks more washed out.

The small circle is cut from a tiny scrap of left over pattern glitter paper. Although you can barely see it I also cut out a scallop circle with my eBsser.


I  wasn't thinking when I did my stamping  of the sentiment and deciding what size to make everything so ended up using narrower ribbon. (Yes, my dear friend Beth I really do use ribbon once in awhile. With these sketch challenges more often. ;-) ) I decided since the gem is teal and the striped card stock has white in it to go ahead and use those colors. Although I'm not into pink I like the combination of a bright pink and teal. What do you think?

Be sure to check out Mojo Monday blog and  if are not really into doing challenges take a deep breath and join in. I would love to see what you do with the sketches and I know others would also.
http://mojomonday.blogspot.com/

I was so busy creating this card that time got away from me. It is past dinner time. Good thing I have take out on speed dial. ;-) Wishing you Happy Frugal Crafting till we meet again.

Monday, June 15, 2015

My Favorite Things Sketch Challenge

Hi everyone I saw on Sunday a sketch challenge over at My Favorite Things. Only thing is the challenge is ending soon so I had to hurry up and do my project. Note to self when it is close to the deadline don't use glitter glue. The circle for a flower wasn't sticking and when I went to press it down with my fingers the glitter glue on that circle wasn't completely dry. :-(

Here is the sketch for the challenge:
Here is what I came up with:
I started by airbrushing my card base although not much of it shows here. It was good practice for me.

The flowers are a Silhouette Store file,my window I quickly drew in Studio, and the scallop border was also from the Silhouette store. My Cameo for some reason was being obstinate so I ended up cutting things out one at a time. Grr!

The flowers were airbrushed with a Sprectrum Noir marker. Then painted with Iridescent Medium. The circle was covered with Studio G glitter glue. The chenille wire was also airbrushed with a couple of different colors of Spectrum Noir markers.

The background behind the window was a piece I had played with using my homemade color mist on antique calligraphy paper.

The window was painted using my air brush. I then adhered plastic on the back side. So in person it really looks like the cat is looking out a window. Of course I then had to add some lace for a window valance behind the plastic.

I scored the scallop for folding but forgot about allowing for a way to adhere my window box. Originally the window box was going to cover the full length of my window. I painted first Cafe Au Lait acrylic paint on my border. Then I went back and painted nutmeg acrylic paint and dry brushed over the paint to remove some of the paint. When the paint was dry I stamped the woodgrain pattern using Stazon Timber Brown ink.

The cat in the basket is actually a Christmas stamp where the cat is surrounded by ornaments. This was one of my first Christmas stamps. I painted the cat with water color paints. Then cut out the cat with part of the basket.

I then stamped my fairy from I Brake For Stamps. She is painted with water color paint. I chalked her skin but it really doesn't show in the photo. I tried to get a closeup of her but kept getting reflections :-(. I placed square adhesive foam inside the window box and then pressed her into place.

Because the window box sticks out this would not be a good card to mail unless you mail it in a box. I'm thinking of framing it without the glass and sending it to a friend. So which  of my friends who read this blog would like me to send this minature art piece to them? Lol! And not with the idea of getting a free frame.

Although this particular challenge ends in less than thirteen hours do check  out  http://www.cardchallenges.com/ to see what the next challenge is going to be.

I've been so busy trying to finish this card before the deadline that I have not checked out Mojo Monday to see what the sketch challenge is this week. Off to check it out. Wishing you Happy Frugal Crafting till we meet again!

Saturday, June 13, 2015

Shimmer and Shine + Tutorial

Hi everyone on Wednesday Stampotique posted a new challenge. The theme is shimmer and shine and you know me I love things that shimmer and shine. Only wish that I could get better picture of the cards I use shimmer and shine on. This card is no exception. The photo doesn't really do it justice. :-( I wish you could see all the shimmer on it.


I started by creating my Perfect Pearl background. A tutorial for how I did that will be further down. I then painted Liquitex Iridescent paint over my background to give more shimmer. I wish it would have shown better in the photo.

Years ago I found at Dollar Tree this holographic mylar texture wrapping paper.Alas I have not been able to find any since. I cut an oval out of it for a mat as well as stamped my sentiment on a piece.

I cut another oval out of card stock. I was going to eBrush over a stencil with paint but for some reason I could not get a good flow so I put my thinned metallic paint into a mister and misted it. 

The peacock is stamped on paper I made using glue and distress paints. While the glue/paint mixture was still wet I sprinkled Ice fragments.  The fragments didn't really stick that well but you can see a few here. Next time I'll leave the fragments off.  I used Jet Black Stazon Ink. for both the sentiment and the peacock. Stamps used are by Verve and are from the Moments Remembered set. Wish I could have gotten a better picture so you can see all the detail that the peacock has but there was too much glare.

I invite you to join the challenges at Stampotique. Each week there is a new challenge.  http://stampotiquedesignerschallenge.blogspot.com/

To make a Perfect Pearls background like I did or even the paper for the peacock here are the instructions.


First start by covering a sheet of plastic or a non stick craft mat with white glue. In the picture this is what is left on my plastic after pulling paint with Perfect Pearl  prints. 

I sprinkled three different colors of Perfect Pearls in my glue. Then because the Perfect Pearls was sitting on top of the glue I went ahead and spritzed it with water to get it to dissolve.

Then you will lay your paper into your glue mixture. I forgot to take a picture using just the Perfect Pearls. For this print I pulled I used paint with Perfect Pearls sprinkled in the glue. Lift your print up and set aside to dry. Different papers will give you different results.

There you have it a fun but messy technique to make your own designer papers. This technique works with Distress paint,acrylic ink,Perfect Pearls,watered down acrylic paint, and probably other mediums. For me it is always fun to see the results as no two papers turn out the same.

Wishing you Happy Frugal Crafting till we meet again!


Wednesday, June 10, 2015

Mojo Monday Challenge 401

Hi everyone can you believe we are already in the middle of another week. It is still hot so I've been playing in my playroom. Lol! It probably would have been better if I was cleaning and organizing it but we won't tell anyone.

I have for you today another card for the Mojo Monday challenge. Here is the sketch:
I made a horizontal card instead of a vertical. Alas it must be the heat frying my brain because I forgot to cut down the scrap of pulled print before adhering the ribbon and adhering it to the card. So my card layout is a little different since it was difficult enough to originally cut the canvas board.
 I read on a blog about cutting canvas board out using steel rule dies. Well while my large flower cut out I could not get the smaller flower to cut all the way through even running it through my machine twice. Since the canvas board did not cut through all the way I salvaged it cutting off the part where I had cut out a larger flower using the same die. I painted the canvas with light purple and aqua metallic acrylic paints. Then used a dark purple acrylic paint with a stencil.. The panel on the right is leftover from the card in the previous post. I thought of using washi tape but decided since I don't use ribbon much and have a large assortment to go ahead with ribbon.

The sentiment is from Verve's Moments Remembered set. I thought the glitter tissue paper the set was wrapped in was perfect to stamp on. I used Jet Black StazOn ink. I love stamping on tissue paper the challenge sometimes though is to adhere it without having the tissue wrinkle. I found a glue stick works best for adhering tissue paper..

I used a Spellbinder die for my metal circle. Alas it did not cut all the way through so I had to cut it out by hand. I used Vintaj swirl embossing plate. The small flower did cut all the way through. I used the Divine Swirl embossing folder to emboss the flower. Both pieces of Tim Holtz metal are colored with StazOn ink.  I used matte StazOn GlazOn on both metal pieces. Then on the flower used my purple ink and then used vintage StazOn GlazOn. When using more than one color of ink or alcohol markers on metal you need to use the GlazOn in between colors.Otherwise your color will wipe off.  The gem was in my stash and already that color. My poor airbrush is going to start feeling neglected so I guess I'm going to have to use it soon in another project. ;-)

Time to go clean and organize once again my playroom. Unless of course I get distracted by things such as the bag full of Washi tape I bought at Dollar Tree a month ago and haven't used yet. Much less put away. Of course I know none of you get distracted cleaning and organizing.

Wishing you Happy Frugal Crafting till we meet again! Oh and be sure to check out the Mojo Monday Challenge blog and even joining in the fun the more the merrier.http://www.mojomonday.blogspot.com/2015/06/mojo-monday-401.html

Monday, June 8, 2015

Viva La Verve Week 1 June Challenge

Hi everyone where I live it way too hot to be outside so it is a good time to be crafting. Of course I had to walk over to my storage unit to grab a fan to cool off my "playroom".

I am so excited to be entering a card into the Viva La Verve sketch challenge. I think between Mojo Monday and Viva La Verve sketch challenges Julie may have created a monster here as I quickly become a sketch junkie. Who knew it could be so much fun to create cards using sketches.

You don't have to use Verve stamps to enter the challenge but when you start looking at all their exquisite stamps  and dies you are not going to be able to help yourself. ( I only wish I could have afforded to buy more sets  and that the coordinating die set would have been in but woman can not live on stamps alone.) I was impressed with the quick service. I placed an order late in the evening and the next day it was on it's way to me. Not only that but when I got my order the stamp sets were wrapped like a package using pretty tissue wrapping paper. There was even a die added to my order which I modified for this card. The invoice was no ordinary invoice instead it was like a card printed on good quality paper. The postage also was reasonably priced. Sometimes for me that can be a deal breaker. I will definitely be ordering again from this company.

Enough of my jabbering here is the challenge sketch.
Here is the card I created. I love how it turned out even though it took me longer than planned.
 I pretty much adhered to the sketch but since I was going through my stash and found this cutout leftover from cutting a frame I decided to use that instead of a rectangle.

My background panels are cut from two different prints I pulled using glue, acrylic ink and gesso. I am so in love with these prints and can't wait to pull more prints.

I used Verve Happy Place stamps for the flower and the sentiment. In my stash I had leftover circles which were scored for folding for making Christmas ornaments. I cut the circle in half and used one side for my sentiment and the other to cut out pennants. The pennants were actually arrows but I cut off the tip. I also curled the bottom a little bit after they were cut out.

 It is a good thing I had two sides to play with as I did not realize on this shimmery card stock that my white ink would smear. After stamping I used clear detail embossing powder I am going to have to keep that idea in mind as often I want to use a ink but because of smearing I don't. The scallop half circle is cut out  of scrap as is the mat for the flower panel.


Although stamping and foiling worked it was not perfect. It was really bad at the bottom so a dimensional slug sticker and a couple of lady bugs took care of that.. I used a Palette glue pad  for my stamping and my laminator to adhere teal deco foil by therm o web. To be honest I have not been happy with my results using this particular glue pad for anything I have tried it on. I am going to purchase sticky embossing powder as I've seen that used with stamps and foil. In my experimenting clear embossing powder heated and then foil placed over and ran through a laminator works only if it is not a detailed stamp.

I used a glaze pen for the dots of the flower. Then the flower was colored with chalk. For the background I used a blending tool and Memento Summer Sky ink.

I invite you to join in the challenges. Details are here. http://vlvsketches.blogspot.com

If something doesn't turn out right do you throw it out or do you try to find a way to salvage it?

Wishing you Happy Frugal Crafting till we meet again!

Sunday, June 7, 2015

Collage Mixed Media Card Challenge

Hi everyone here it is the weekend again. The older I get the faster time seems to go. I just finished today this card for The Mixed Media Card Challenge. This month the theme is collage. Since I flunked art 101 I don't know if this card does qualify but I did use things in a different way than originally intended or changed the look of them. I had a blast making this card and using some things in my stash I've wanted to use but not sure how I was going to incorporate them into a card. Of course you know me I also had to do some experimenting. Drum roll please!
 I started by seeing if I could use double sided tape with therm o web deco foil for my top and bottom border on my card base. My double sided tape is at least ten years old and for some reason has wrinkles in it as well as in a few places I could not get the liner off. It probably got too close to a heat source so the imperfections show in my borders but I think it adds to this particular card.

I mixed purple acrylic paint and Liquitex Glaze in a bottle and using my air brush with the adapter got these neat speckles for the background. I never use some Mister Huey color mists which I won as I didn't like how they sprayed so decided to put the Honeydew color in a bottle and spray. I love how it turned out.  I then took Liquitex Iridescent Medium and dropped big globs of it on my cardstock and used a sponge roller to smooth it out. Alas in this photo you can't see the resulting texture but if you look closely you might see a little bit of the sparkle. Alas I've never been able to get a photograph of the medium but in my book this is a must have.

Since the adapter was out the next thing I did was mix in a bottle aqua acrylic paint,the iridscent medium and water to thin. I sprayed my scrap of a paper doily and then added purple acrylic paint to my mixture and sprayed again.

For my Chinese fortune I tore a piece of sheet music. Glued the fortune to that and glued the scrap of deco foil from doing my border.

I cut out with my eBosser a piece of a disposable Handkerchief. ( The package of handkerchiefs was given to me over thirty years ago and I thought they were too pretty to use for blowing my nose.) I stamped "Smile" using a Verve stamp from the "Happy Places" set. I used Memento Bamboo Leaves ink. I think it is really close to the green in the handkerchief.

Using a frame was an option for this challenge but I thought I would see if I could  cut a frame out using Spellbinder oval nestables and corrugated cardboard. I was not sure if the eBosser would cut the cardboard or not but it did a perfect job.  I painted my frame with ivory acrylic paint when that was dry I painted walnut gel stain over it and let it sit for a few minutes before rubbing some of the gel off with a paper towel.

Several months ago when in the big city I talked a friend into pulling into the parking lot of a dollar store that we don't have where I live. At that store I found all kinds of small shaped beads. I am so in love with the moon, star, and these flower beads. I used therm o web small Zots to attach them to my card.(Shameful plug here but if you click on the banner on the left you can find all kinds of neat products like the Zots which come in different sizes. They really do hold things like the beads here.)


Last but not least we have the butterfly. Using a die cut butterfly as my template I cut my butterfly out of a scrap of the pattern wax paper I created awhile ago.  In case you missed the tutorial for creating this kind of paper you spread glue on wax paper sprinkle ultra fine glitter and then place a single ply of facial tissue which you have colored with an airbrush, color mists, etc. For this particular paper I tore the facial tissue and then placed them in the glue. I took gold thread which alas has a tendency to separate so I don't like to use it in sewing and wrapped it around my butterfly's body.

There you have it with all the mixed media techniques I used. Right now it is still frustrating using the adapter to my airbrush but I'm going to tame that monster as it would be a waste of money to have the adapter gathering dust. ;-)

If you don't do collages I encourage you to step out of your comfort zone and try your hand at making a collage card. The challenge is open until the 25th.  Of course if you already do collages I invite you to also join in the card challenge. I also encourage you to experiment with different medium and get out those scraps or different things you have been hoarding and use them.

The temperature is in the 90's so too hot to be outside so I'm off to play with the Verve stamps which came in yesterday's mail. I'll be working on a Verve Sketch challenge and hopefully will be able to post my creation tomorrow at the latest.

Wishing you Happy Frugal Crafting till we meet again!


Thursday, June 4, 2015

Mojo Monday Challenge #400

Hi everyone sorry I've been missing in action. I am still recuperating from being ill and have not regained my energy yet. I have spent a little bit of time playing with the Siphon Adapter for the eBrush as well as playing with a glue and gesso technique. Anyway when I saw that Mojo Monday had a design team call and one of the requirements is to link up a card I knew that I had to make a card for it. I really hope that I will be considered for the design team as I want to start making cards using more sketches. It is time to step out of my comfort zone and grow as a card maker.
You have until Sunday 8 p.m Mountain time to submit an entry if you wish to play along. All the details are on their blog. http://mojomonday.blogspot.com/ Here is the sketch for this week.

Here is what I came up with.
If you have been reading my blog for any length of time you know that I usually find a way to fix a mistake and use it. I messed up on the background which I had colored with color mist using my airbrush when I tried to use gesso and a stencil with it. Gesso to the rescue. I spread a thin layer of gesso allowing the color to show through. Then with my airbrush and undiluted acrylic ink I sprayed speckles. With the airbrush I was able to direct the speckles where I wanted them and less mess than using a toothbrush. Alas you can not see the sheen from brushing iridescent medium.

Using Memento London Fog ink I stamped my music. I wanted the music to be more subtle than it would have been using black ink.

The butterfly was in my stash. I airbrushed with Spectrum Noir markers and then used a stencil of circles with my clear glitter pen.


I have lots of leftover paper doilies so used one on the corner. Following the sketch I didn't use the whole doily.

My flower was created with canvas paper. I spread glue on a plastic page protector and then dropped Distress Paint and diluted gesso into the glue. I then pulled my prints using different papers. The canvas paper had curled so I decided that would work with a flower die cut. I also used the die cut with my plastic which still had some of the leftover glue paint mixture on it. I cut slits in between the petals and curled the paper petals. Alas the plastic was not cooperative so I placed several square adhesive foam pieces in a stack and placed  the plastic flower on top.I tried to make dew drops with the iridescent medium. It didn't really work out like I had planned but I like the dots. The half pearl hides the stack of adhesive foam and I think helps to tie in the blue color more.

There you have it my card for the Mojo Monday challenge. Even if you don't want to join in the challenge I encourage you to go visit the blog. You will find a ton of inspiration and some lovely sketches. In the past I've used some of the sketches long after the challenge was over. It is a good place to get that mojo if you have been feeling blocked.

I am still playing with the glue technique. This week I also experimented with acrylic ink. Not sure when but I'll try to either do a picture tutorial or a video. It is a fun technique although to be honest I probably like it so much because it is messy. ;-)

Do you like doing messy techniques? Do you ever see instructions for a technique but not have all the products used so see if you can substitute with something else?

It is late so I'm wishing you Happy Frugal Crafting till we meet again!