

You can make the card any size you want. The card in the book I found the instructions in used a 4 3/4" x3 1/2 " folded card. The panel 3 3/4"x2 3/4". You will have to adjust the panel size to fit whatever size card you make.
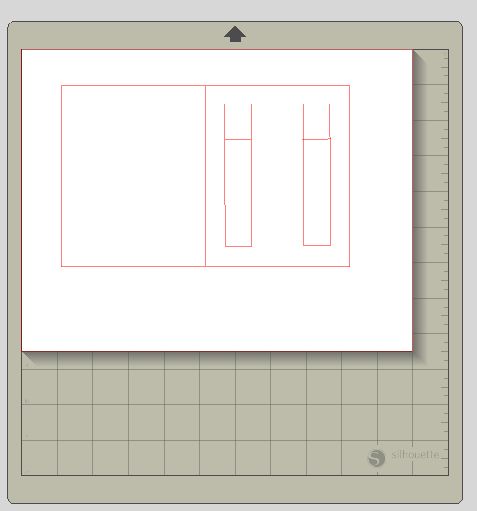
I made my card the tall way but you could make it the short way. You will draw two 3/4" wide rectangles starting 1/2" from side and 1/2" from top and stopping 1/2" from bottom. You will want the top of the rectangle open. So if doing this by hand you will only cut three sides. If cutting on your machine you will need to have the top open. Then you will cut about 1" down across the rectangle so that you will have short tabs. When the card base is cut out you should have two open slots and tabs which lift up. You will tuck the panel into the card base where it should stay. You don't even have to glue it in. I didn't here but I think I will probably get removable Zots to hold the tabs down. That way I can still replace the panel if I wish.
The card base and the panel were rubbed with chalk ink and a foam wedge cosmetic sponge. With the panel I first used one color vertically rubbing with the wedge down the panel all the way across. Then I rubbed horizontally with another color and then diagonally with a third. I tried to stamp with my pink pads directly on the panel but it appears they are both pretty dead. I was able to rub a little bit of pink ink on the cosmetic wedge and rubbed that on the panel in different directions.
The heart flowers were stamped with Distress ink. I had heat embossed them the first time the same as the center stamp but really didn't like the ragged look I got.The center stamp was stamped with VersaMark ink. Then heat embossed with Eggplant Recollections embossing powder.The center stamp may well be vintage as it was in a box of stamps at a yard sale. If you don't need the newest stamp yard sales can be a good place to pick up stamps as well as other crafting supplies. Thrift stores may or may not be. Where I live it is outrageous what thrift stores try to sell the rubber stamps for.
I decided since I didn't stamp further down on the panel to go ahead and add something. First I wrapped sheer ribbon around the panel but after a couple of days decided I didn't like it. I played around with bows, ribbon roses, etc. but didn't like anything. Decided to see what I had in my lace stash. Came across a piece of lace with holes in it and decided it would be perfect to weave ribbon in. Unfortunately my dark narrow purple was used up and last time at the store I couldn't find any. So I went for the aqua blue that I had also used as one of the colors on the panel.
That's all folks! I hope I have inspired you to get out those stamps if you have any. As well as to play with ink pads.
Thank you for stopping by. Do come back as I'm working on a cake card for the Sillhouette Plus forum card challenge. I can almost guarantee that it will be different from any card you have ever seen. That is if my experimenting turns out. LOL!
Wishing you Happy Frugal Crafting till we meet again!
I like the pastel colors you chose. The ribbon color really pops too. Thank you for sharing.
ReplyDeleteVery pretty card, soft colours.Thank you for sharing your card.
ReplyDeleteWhat a darling card. A lot of work went into this one. Can't wait to see what you are working on next. You intrigued me.
ReplyDeleteHey Myoriah! Thanks for linking this up to the Thank You Challenge for Stamp It! Cards Week in the Moxie Fab World! I'm so glad you joined in on all the fun! :)
ReplyDelete