Monday, January 28, 2013

"Take Wing" Mixed Media Card

Today is a blustery,rainy and I mean rainy day. The poor dogs and I got soaked just walking a short ways after my umbrella turned inside out. A perfect day for experimenting.

I must confess I bought a jar of Earth Safe Moulding Gel which has been gathering dust. No that is not a misspelled word. Moulding is what it says on the jar. Anyway I tried it a couple of times but was disappointed with my results. Not one to give up I decided to give it another try. It was an interesting learning experience.

O.K. I know you want to see the card. You don't want to read all of my ramblings.
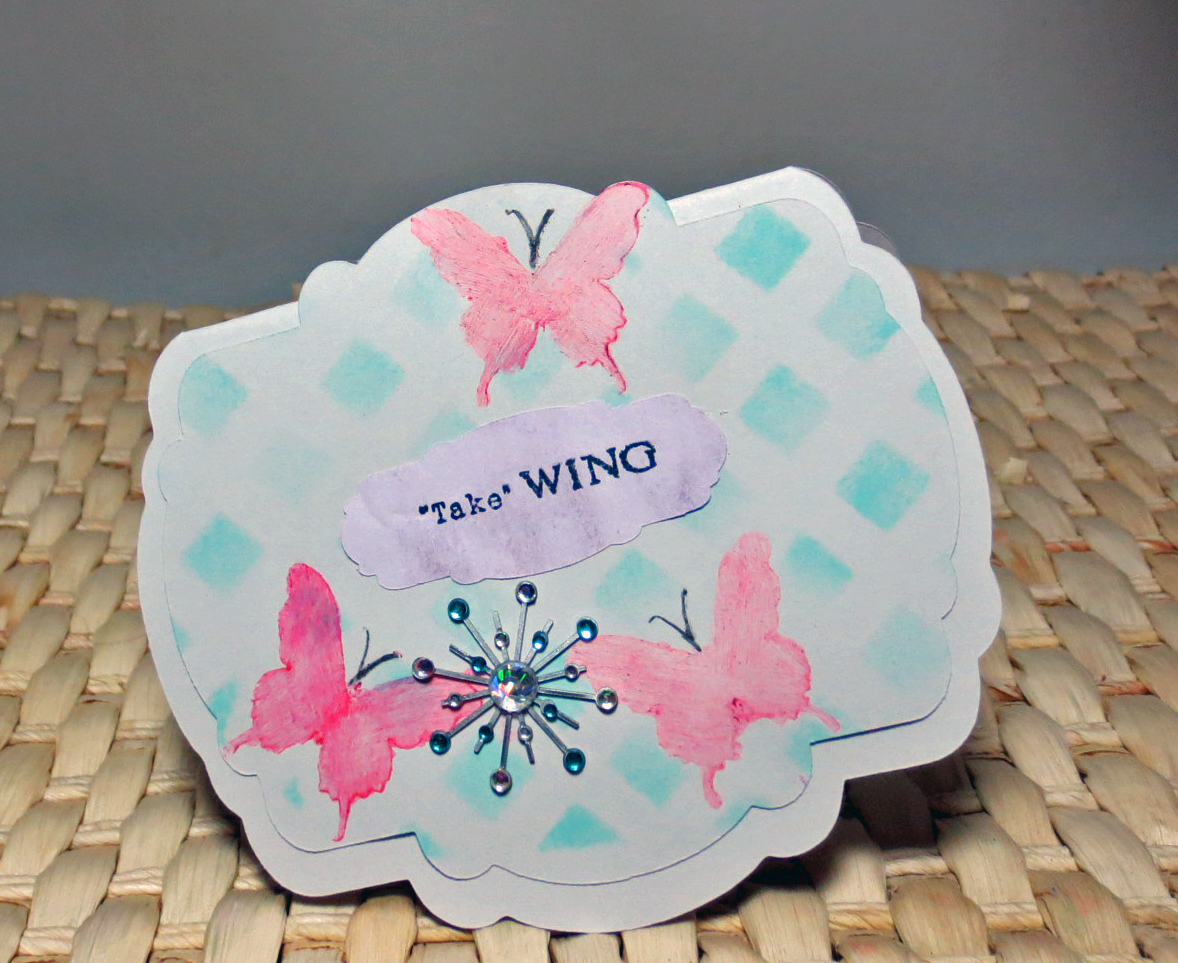
First off I took a frame in Studio and made my shaped card. O.K. my card is taking flight because I did not think to put a straight line across the bottom. The panel is the same frame and I sized it so I could just have it hang over the top a little bit but still fit in a standard envelope. The tag is just a miniature version.

I cut the butterflies a silhouette freebie, my lattice file which I have no idea where I got it,the panel and card shape from gray card stock I bought by mistake. The gray is growing on me. Anyway it was a mistake to cut the butterflies out of the card stock and I'll tell you why later. All part of the learning experience. If you are going to use ink from an ink pad or chalks no problem cutting stencils from card stock.

My first attempt I put the lattice over the front panel and rubbed Recollection Seafoam chalk ink over the stencil. I didn't think of the ink showing through for the butterflies. Then after removing the lattice I placed my butterfly negatives where I wanted them. I then added alcohol ink to the moulding gel and with just a little bit on a brush brushed it over the negatives. This is where the mistake came in. When I went to pull the negatives up they stuck and came up leaving chunks of the stencil card stock on my panel or tearing the card stock panel itself. Believe me it was not a pretty sight. Of course if you want to use a card stock stencil with moulding gel for the world's ugliest card be my guest.

For this panel I cut the butterflies out of thin plastic. I taped butterflies over the lattice and used my chalk ink. Alas the one butterfly shifted a little bit but I decided to go ahead and use the panel anyway. After all not all butterflies are alike. After removing my lattice and  butterfly shapes  I taped my plastic butterfly negative where the shape had been. I used a color pencil to draw in the antennae  I mixed moulding paste on my craft mat with a  drop of alcohol ink to color it. Then using a brush with just a little amount of the mixture I brushed it over the stencil. I did one butterfly at a time immediately removing the stencil.  I accidentally taking the negative off of the first one smudged the moulding gel but decided to go ahead and continue instead of throwing the panel away. I think it gives it sort of a water color look.

The tag I cut from paper I made a long time ago. Playing with shaved pastels in water. The sentiment is from Inkadinkado "Inspirational Lift" stamp set. I used Memento Tuxedo Black ink. LOL! The only black ink I own.

Don't tell anyone but the brad is covering up a little oppsie. Ummm....make sure you use fresh masking tape to hold the stencil down and that the stencil is clean if you are stenciling multiple images. The brad is Sparkle Burst I believe by Karen Foster. Actually I think it adds to the card. :-)

There you have it my play on a blustery,rainy day. One thing I noticed is as the moulding gel sat for a little while on my mat the color became more intense.  Which is why the last butterfly I did is darker. I think the moulding gel has redeemed itself and will find a way into other projects. The jar does say it can be used as a gel transfer medium so I may try that next.

Thanks for stopping by and do come back. Wishing you Happy Frugal Crafting till we meet again!


Wednesday, January 23, 2013

"Be" UNIQUE Heart Shaped Card

One of my crafting intentions for this year is to try new techniques and to use my Cameo more in my card making. With that intention in mind I made a heart shaped card template,a stencil and mask in Studio. Then cut them out with my Cameo. Then it was play time with my different crafting supplies. LOL! Not only is the sentiment "Be" UNIQUE on the card but this is a unique card for me at least.
First I took the heart from what was one week a freebie. The Be mine scalloped heart to make my card shape.  Oppsie! The card won't stand up if the heart has a sharp point. So with my scissors I cut straight across. I think it may have been better if I would have made a top fold instead of side fold as it is really skinny where the card folds. I cut out a heart smaller than the card for my focal panel. Then cut out even a smaller heart to use as a mask.

 I was going to mist the card base with my color mist but ended up having to mist a separate heart as the card base fell apart. So I had to cut out another card base to place the misted heart on. The camera doesn't really pick up the shimmer.

For the pattern heart I taped my stencil which I cut out using the herringbone background cutting file which I believe was a freebie at one time. Then I taped my smaller heart over it by making a tape loop on the back of it. I squirted a dab of Lowes Cornell Aquamarine Metallic Water Color Paint onto my craft mat. Then took a cosmetic foam sponge and coated it with paint and dabbed part of it off on the mat. Then I dabbed over my stencil.  (I discovered that you want a fairly thick paint and not too much on your applicator. Acrylic paints will work.) Then I took off the stencil and my heart mask because it was on top. Placed my heart mask back down and rubbed chalk over my stenciled pattern.

I meant to rub chalk ink over the smaller heart but I was having so much fun with my blending chalk I had forgotten that was my original plan. This time I removed the heart mask and placed my negative from cutting out the mask taping it down and used a couple of different colors of blending chalk. Then I stamped my sentiment and small key using my Memento Black ink. The stamps are from Inkadinkado "Inspirational Lift". set. There are eighteen fabulous stamps to the set. Normally I don't like to stamp directly because I'm afraid that after all my work that I'll mess up stamping. However, these stamps are high quality and so far I have not been disappointed with the Memento ink.

I decided after I was done stamping to go ahead and outline the heart with a clear glitter gel pen. I took the negative again and placed it down and used my pen to go along the edge. Next time though I'll tape it down first so it doesn't shift on me.

Anyway it was fun to try some new techniques. Now I need to start a folder to hold the masks and stencils as they can be used again. I know I will use the herringbone stencil again with different media.

I encourage you to try new techniques. It can be fun as well as frugal using supplies you might already have on hand.

Thank you for stopping by and do come back again. Wishing you Happy Frugal Crafting till we meet again!

Sunday, January 20, 2013

Valentine Window Card

Right now until 2/4 there is a Moxie Fab Window Challenge.  So I decided to see what I could do along with more experimenting with making a little different window card.. Like usual my plans were changed as I played. Here is the card I came up with.
The card shape is from Silhouette's Christmas three tree card kit. I wanted a little larger card so re-sized it.  The cutout shape is from that file also. I just placed it so that the shape would cut out a window. I took another shape from the file and copied it so that I could make the frame.  I also cut out the transparency in the shape.  I cut two frames out of  scrap paper. This way the frame shows through the cutout on the other side and is pretty instead of just white. I sandwiched the transparency between the two frames.

I had a little accident with the inkjet transparency shape.  It looked like I had a small glob of glue on it  and since it was a scrap I cut it out of that is a possibility. When I went to clean the glue whatever is on it to allow it to be printed on started coming off. So I decided to experiment. I was able to take the coating totally off which gave me a clearer shape. I stamped with Recollections sea foam chalk ink. But because there was not a coating on the transparency it smeared. So I cleaned the chalk ink off and re-stamped with the chalk ink. Then I happened to have sea foam embossing powder so I went ahead and used that otherwise a clear embossing powder could be used..  I heat embossed very carefully not holding my heat tool too long in one spot so that the transparency wouldn't melt. The stamp is Antique Brocade by Hero Arts.  

I cut out by hand the shape of the card out of practice rice paper for the inside since it will not cut with my Cameo. I then used breeze Recollections chalk ink to color it. Because my Valentine's Day stamp is so long it would have showed through the opening. So I stamped Happy on the top and Valentine's Day on the bottom. I then decided to make a couple of heart embellishments for the inside which would show through the opening on the front. First I rubbed Recollection pansy pigment ink on the card stock hearts. Then I had to play with some Distress Crackle Picket Fence Paint I had just bought.  So I brushed that on the hearts. When it was dry I took my finger and rubbed more pansy ink on it. Then I heat embossed it with clear Ultra Thick Enamel in my convection oven.

I was so busy playing that I totally forgot that I was going to paint the gray card stock. Alas my white card stock does not cut nicely so I went with the gray with the idea of changing it. Still I like the way that the card turned out.

My frugal tip is to don't be afraid to experiment. Also if you do have cutting files look at them and see if perhaps you can do something else with them.

Thank you for stopping by and do come back. Wishing you Happy Frugal Crafting till we meet again.