Sunday, December 21, 2014

Altered Playing Cards Week 13

Hi everyone! I'm a week behind on the altered playing card challenge. Last week the theme was bees. Here are Claudine's cards.
Here is my take on the challenge:
I tried to duplicate Claudine's background but it ended up being a disaster. I mixed orange and yellow metallic paint trying to get an orange yellow color. I didn't like it on my card so I went over while it was still wet with copper. I got the copper too thick and used a cosmetic sponge to wipe some of it off and then added some yellow. I discovered because the paint is so thick I could create a texture using the cosmetic sponge. When that paint was dry I took and rounded an old cosmetic spoinge and used that to randomly dab on Walnut gel stain.

My bee didn't turn out like I had planned but I decided to use it anyway.The bee printed out really light so I used my Glaze pens. I wasn't thinking when I put Dimensional Magic over it about copy paper curling. Opps! When some of the Dimensional Magic got on the other side I noticed that it made the paper translucent so after the front dried I went ahead and put some Dimensional Magic on the backside. At least now I know that Dimensional Magic will work over Glaze pens.

The sentiment is actually done on a scrap of pattern paper left over from making an envelope. I edged the paper with Vintage Photo Distress Ink. Alas my alphabet stamps were too large for stamping my sentiment and I could not find any suitable stamps. I used my Brother's label maker.

My honeycomb was actually a stamp cutting file from Silhouette.  I colored it with my airbrush and a marker.


The background on this card was fun to do. I used a stencil and gesso on my card first. Then airbrushed with a brown marker. Then placed a stencil and airbrushed with a maize marker. Then randomly used the airbrush with a blender marker. I used a marker to trace around only the hexagons in the stencil.

I don't remember where I got this cute bee at. which I turned it into a print and cut. Alas the antennas did not cut out right. After two tries of trying to cut him out I gave up and glued scrap floss. I edged him with Vintage Photo Distress Ink my go to ink.

The sentiment is stamped on the same pattern paper as in the first card.  This time I only inked the torn side with the Vintage Photo Distress ink. I found a cute set of alphabet stamps at WalMart for under $2, I noticed they had other fonts so I just may need to treat myself. My sentiment was stamped using Vintage Photo Distress ink. As I said this is my go to ink. It is the one ink that gets used the most. I need more practice stamping words as far as spacing goes but on the whole I'm pleased the way it turned out.

I started work on this week's cards and the theme is reindeer. I don't have the dies or stamps that Claudine's has but will at least adhere to the theme as I do have a couple of reindeer stamps. Hopefully I can get the cards done tomorrow as Monday there will be a new challenge.

Wishing you Happy Frugal Crafting till we meet again!

Friday, December 19, 2014

SVG Cuts Snowflakes

Hi everyone! Can you believe that it is almost Christmas. My cards are mailed and I have almost all of my shopping done. Alas I did not get as much outdoor decorating done as I wanted before the contest ended because I've been sick for two weeks now.Oh well making a wire lighted snowman will have to wait until next year. I did however hang in the side window a bunch of snowflakes on a string.
SVG Cuts has this free snowflake file and when I saw it knew I wanted to use it for ornaments. I don't have silver cardstock so I used my eBrush and a metallic marker for the solid piece. For the lacy top I painted glitter glue on it but alas the camera did not pick up the sparkle. I pop dotted the top snowflake on the base.  I also used clear zots to attach some snowflakes on the glass door around the wreath that I made. Alas I could not get any good pictures of the wreath as I kept getting reflections. The wreath has an old CD in the middle  which I used alphabet stickers on to say Merry Christmas. You can't see the greeting in the dark but anyone walking by during the day can see that and the snowflakes. Perhaps I will go out and take a nighttime shot of the lights and wreath all lit up.

That is all for now folks. I am off to do last week altered cards and then hopefully I'll get this week's done before Monday starts another challenge. Wishing you Happy Frugal Crafting till we meet again!

Thursday, December 4, 2014

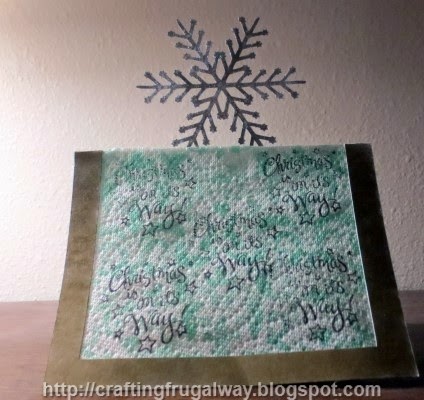
Standup Snowflake Card

Hi everyone it has been lightly snowing all day. I don't know if my making a cutting file and this card had anything to do with it. Lol! I don't do a lot of designing in Studio creating cutting files. Especially if they are something a little complicated. However, I saw place cards with shapes up on top and decided to see what I could do. The person put the open panel in back but I decided to use it as the front. You know me I have to be different as well as try new things. Once again this was a learning experience and I'll do a few things differently the next card I make with this cutting file.

You can't really tell in this photo but the snowflake is really pretty on top.  I wanted to show you that snowflake does indeed standup on top of the card. After cutting out my cardbase I used my eBrush and a silver metallic Sharpie to turn the snowflake silver. Then I used a glue  pad to get the snowflake sticky and used ultrafine crystal glitter. In my playing with the glue pad I've  discovered that fine and ultrafine glitter works the best.
I also used the eBrush and a gold Sharpie to do my frame. I am loving my eBrush.


LOL! While posting this I remembered that I bought recently at a thrift store a Crayola light box for a couple of dollars. Wow! It really made a difference laying the card down on it and taking a picture.
Yes, Virginia that is a paper towel. Opps! I forgot about the stamping showing through on the other side. Next time instead of a sentiment I'll just do snowflakes. Also I won't separate the paper towel. The pale blue background which I eBrushed the paper towel with doesn't really show up. However the stencil came out great using a darker marker. Originally I wanted to stamp with silver or gold ink but alas it did not show up so I ended up stamping with Tuxedo Black Memento ink. 

That is my experimenting for now. I hope over the weekend to get some outdoor decorations made. I have some ideas. First though I wanted to get this card done as I'm going to give it to the Postal Clerk who has been so helpful to me during the year. I have the rest of my cards ready to get in the mail and hopefully people will shovel the sidewalks so I can safely walk to the store to mail them.

Are you ready for the holidays? If you mail cards are they mailed or ready to be mailed?

Wishing you Happy Frugal Crafting till we meet again!