Several years ago I used to do paper casting for embellishments on cards. It was a lot of fun to do as well as a great way to use up junk mail. LOL! that was before I had a die cutting machine. While sorting through things I found some of my first embellishments and thought it would be fun to make them again.
Supplies you will need besides scrap or junk mail paper are:
Blender.... Preferably one that you pick up at a thrift store,garage sale or can con friends or family to give you. That is unless you don't mind replacing the blade on the blender you have now and getting some extra fiber in your smoothie.
Strainer...I prefer a plastic one as it is easier to clean. If you use a metal one dedicate it to paper making because believe me you are not going to get all the little pieces of paper out of it.
Plastic container....Something big enough to drain the pulp in.
Old towels, tee shirts,small pieces of old blanket, felt,or sponges....Something that will absorb the water. Paper towels can be used but that gets to be expensive unless you are going to recycle them into embellishments.
Molds....Cookie cutters,soap molds,candy molds,rubber or clear stamps
Today I am going to show you how to do your paper casting using soap molds. If you use cookie cutter molds be sure to seal one end with packing tape so that pulp doesn't ooze out leaving a ragged edge.
O.K. lets get started. First tear your paper in pieces and fill your blender about half way. I also recycled paper casting material that I did not like how the embellishment turned out.
Add warm water. I add two cups. The amount of water is not as critical as when making paper but you do want enough to cover the paper and to allow for the paper absorbing the water before blending.
Blend on low for about 30 seconds and then high for a minute or more. The longer you blend the finer your end product will be. Yes, my blender is sitting on the toilet. I'm trying to potty train it as it has a tendency even with the lid on to poop. Seriously though the kitchen is in use so the bathroom is the next best place as long as you have two. LOL! It is a rainy day or I would do this outside. This can be a messy project so I prefer to do it where I can easily clean up.
The amount of recycled paper casting material was so small that I was surprised that it came out an orange color. If using white paper you can color with food color or ink.
Next is to pour the pulp in a strainer over your container. I had to jury rig this a little bit with the lid of the container so the strainer would stay in place. Just easier for me that way. Especially since you want as much water as possible to drain so it takes a couple of minutes. I did with my hand swish the pulp a few times to open the holes back up so more water would drain. The more water you can drain the less blotting you will have to do.
Have ready your molds. Some people spray their molds with cooking spray. I don't do that with the soap molds and have not had a problem getting my embellishments out. I place them on a large lid turned upside down to contain any mess while I fill them.
Now comes the fun part. Take a small amount of pulp and place in the mold and start patting it into place. Better to start with too little and add more later.
Blot with whatever you are using to remove the water. Here I am using a towel. Blot and tap until you have the thickness you want. If need be you can add more pulp. The pulp will compact as you blot and pat it. The more compacted the more likely your embellishment will stay together. LOL! Wonder how I know that. The more water you can blot up the less likely your embellishment will get moldy on you.
When you are satisfied find a place to place your molds. Preferable in a sunny place. But lacking that you can do it under a lamp like I am doing here.
Yes, poor Cameron has to share the space with my embellishments. But I have them so I can move them if I need or want to use him. When they are dry they can be popped out like soap if they have not already fallen out due to gravity.
While playing I used a rubber stamp as a mold. Because the pulp on it was thinner it is dried. I am pleased with the way it turned out. I will definitely use this stamp and other stamps for paper casting this way.
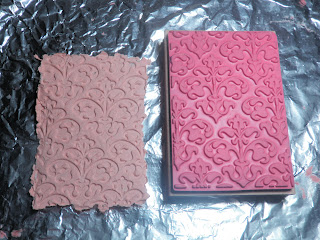
You finished making your embellishments and now it is time to clean up. Something very important to keep in mind while you clean up is that your mixture acts like concrete when dry. Under no circumstance pour the water in your container down your sink or tub unless you are prepared to pay a plumbing bill. Or clean your blender in the sink for the same reason. You can toss the water down the toilet with no problem as well as water that you have swished around in your blender to pick up the pieces as long as there is not a lot of pulp. After all you flush toilet paper every day. You can dump and rinse everything outside with a hose. Or dump it down a storm grate in the middle of the night while your neighbors are sleeping. O.K. please don't send me hate mail or place hate comments on my blog. I'm just kidding about the last. I would never do anything that has an impact on the environment like that. Especially since the storm drains where I live go to the river. I like to fish too much.
There you have it a fun and frugal way to make embellishments. Oh and if you have kids they can have fun doing this outside this Summer.
Thank you for stopping by and do come back. I will be doing a card with some of the embellishments after I fancy them up with paint,Perfect Pearl, etc.
Until we meet again I wish you Frugal crafting.


