Tuesday, June 23, 2015

Mojo Monday #403

Hi everybody! I'm so excited that I'm doing a happy dance. Come Thursday I'll be the owner of a Scan N Cut machine. Don't get me wrong I've loved my Cameo but there are  just things he won't do. Things like easily cutting shrink plastic or cutting thin art metal like the Tim Holtz.

The two things that convinced me to go with the Scan N Cut is I've been hand cutting out a lot of stamped images lately. Also I wanted a machine that I could easily take with me somewhere without necessarily having to drag my laptop along with me. I'm sure there will be times when I'll use Cameron.

Yesterday was the start of a new week and that means a new challenge over at Mojo Monday. I love this week's sketch but I had to modify it a little. More on that later. So without further ado here is this week's sketch.

Here is my card and I'm a loving how it turned out. It came out even better than the card I saw in my head. Also I managed to get good photos this time of the foil and the glitter marker used.

I started by using my eBrush and a neon marker from the Dollar Tree for my card base. Then I held my eBrush up high to get speckles using a gold Sharpie.

The purple piece was a scrap. In fact on the back side was where I practiced with lace and my eBrush. Believe it or not the vertical panel is what I started when I did my video in the last post. I scribbled more with markers and dropping alcohol blending solution. Then misted with Wild Plum.and Stream color mist.

I have not had much luck getting a good foil  stamped image using my glue pad and the  stamping adhesive was $10 plus I would have shipping on top. I have not priced yet what sticky embossing powder will cost me but alas my fine detail embossing powder did not work. My work around was to stamp the butterfly and the sentiment. Then to copy it on my laser printer. Doing it that way I now have the original stamped image and sentiment for later use. My laser copies I was able to then foil using my laminator. I was pleased how even though the butterfly is really detailed how nicely it turned out.

The butterfly and sentiment is from Verve's Happy Place set. I only bought two sets but you can see between this challenge and the Verve challenge I've been getting lots of mileage out of  them.  I love this butterfly. After the foiling was done I colored my butterfly with Faber Castell metallic colored pencils. For the body I used Marvy's  black pearl fabric marker.

Opps! I wasn't thinking when I stamped the sentiment and butterfly. They were stamped too close together and too close to the edge of the paper so my round die did not work. As it was I had to work to get the oval to work without cutting off the letters.  I used teal Stazon ink to edge my shape. I felt like it needed something.

Instead of ribbon or a piece of card stock I thought I would try something different. I took a piece of corrugated cardboard and cut my shape. I wasn't sure if it would work but I didn't want the brown color. I decided to see if my Marvy glitter fabric markers would work. As you can see here it is really sparkly. :-)

I can't wait to see what next week's sketch is going to be. :-) Do join me in the challenges at: http://mojomonday.blogspot.com/ Doing challenges is a lot of fun.

As you can tell I'm really enjoying using the Verve stamps. Now I don't want to be accused of enabling anyone but stamps and dies are on sale for 10%  off over at the Verve store. Also a bundle of all the June stamp releases are on sale for 20% off.  I'm not being paid to endorse these stamps being the frugal crafter I am I thought I would give you a heads up.. I love my stamps and I love how quickly the company processes the order plus I can't complain about paying $3.00 for shipping.

That is all for now. It is back to cleaning and organizing. Need to get things ready for my new arrival. :-)

Wishing you Happy Frugal Crafting till we meet again!

Monday, June 22, 2015

Fusion Bright Butterfly Challenge + Video

Hi everyone it is the wee hours in the morning and I have not gone to bed yet. I wanted to get a video made to go along with this post. Lol! The dogs were quiet and I was holding my breath that no train would come rumbling through. with the horn blaring. The only thing that separates my apartment from the train tracks is the parking lot. So needless to say when a train comes by you know it without a question. Then I had forgotten how to use the editing software for videos. It has been so long since I have made a video. The easiest part was uploading it to You Tube.

On Thursday Fusion posted their new challenge. The challenge happened to be titled Bright Butterfly so you know I had to see what I could do. Unfortunately I was not able to duplicate the bright colors but I think you will like my results. You can join in the fun here: http://fusioncardchallenge.blogspot.com/The challenge closes at noon PST June 30th.
Here is the sketch and inspiration photo.
Drum roll please as I unveil this gorgeous creation. Once again the photo does not do it justice even though I spent more time trying to get a couple of good pictures than creating the card.
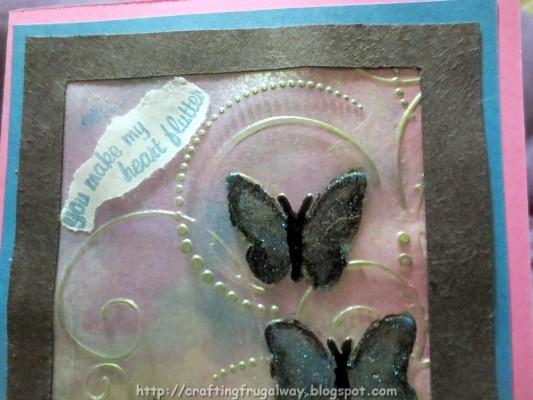
I could not get as bright of colors as I wanted. I probably should have used my Distress Paint. However I do like how it turned out. If I did things correctly there should be a video at the end of this post on how to create the background. The only thing I didn't mention in the video is that after I did my alcohol marker technique I went ahead and used color mists.

I embossed plastic using a Darice embossing folder. I then used FolkArt glitter paint to paint the butterflies on the debossed side. When the paint was dry I used a black alcohol marker around the wings. Then smudged it using a paintbrush which was dipped in alcohol blending solution. Then I took a brush and painted over the back with Peridot Metallic paint and wiped it off. I wasn't fast enough and the paint dried before I got all I wanted off. A paper towel with a dab of dish detergent wiped over it and then wiped off took the excess off so that there was just small speckles of the paint. I love how the paint migrated into the debossed places. When the paint was dry I turned it over and used a marker to draw in the body and antennas of the butterflies.

I added a frame even though the sketch doesn't have one because otherwise where I glued the plastic down would have shown. Of course I could have stapled it down at the corners using my colored staples. I wasn't sure what color I was going to use for the card base but the blue really pops the background better than the pink so the pink is the card base.


My sentiment is from a set of butterfly stamps. Alas they did not get put away in their sack so I'm not sure who the maker is. I often stamp on tissue wrapping paper but I decided to see about stamping on nonstick parchment paper as it is a little stiffer. I was afraid of making a mess stamping directly onto the plastic. I have with Stazon stamped on plastic before but never sentiments. I used StazOn teal ink and adhered it using a glue stick. Like vellum  using a tape runner would show.

Here is my first You Tube video. Luckily my laptop with web cam is very flexible. In fact more flexible than I am. Lol! Ignore my paint splattered vinyl cover on my work table. As well as the trash can in the background.


Let me know what you think of my video. I know I need to make sure that what I'm doing is within the frame. I don't think I did too bad for my first You Tube video.

Do you like watching videos or would you rather see step by step photographs? Also along this same line do you like reading about the process I go through  as I create or would you rather I skip it?

As I said it is the wee hours and I best head off to dreamland. Morning will come too early with two dogs ready to go on an adventure outside. Who needs an alarm clock when they have two dogs.

Wishing you Happy Frugal Crafting till we meet again!


Saturday, June 20, 2015

da Vinci meets Warhol Card

Hi everyone it is Saturday and yesterday Viva la Verve posted the sketch for week 3. Can you believe that June is almost over. Viva la Verve Sketch challenge blog can be found here: http://vlvsketches.blogspot.com/.

I started to clean up my playroom and like most children got distracted and started doing what I call crafting cleanup. That is finding things that weren't put away to craft with or using what is on your work table. Anyway when I was sorting through what was inside of a clipboard where I put items for future projects I found a stamped Mona Lisa image and a card came to mind using the sketch. On top of that for some reason I started thinking about the artist Andy Warhol and thought I wonder what his take would be of Mona Lisa if he was going to use the image in his work.

Here is the sketch:
Here is my take on the sketch:
 
I started with turning the other piece of black card stock from making a card base into this card base. I then rounded the corners. I knew I wanted to use the Paris washi tape that I found at Dollar Tree. (I wish they carried it again.) When I spied this scrap of pattern card stock I was hoping it would work.

After playing with different scraps I decided to go with the hot pink for the background of Mona and my stamped sentiment. It helped to make the color in Mona's face pop more.

My faux stitching was done with a black glaze pen. Lol! if I had actually hand stitched on this card it would have ended up looking exactly like this with stitches being uneven and crooked.

I think I must have originally stamped Tim Holtz's Mona Lisa with Ranger's Archival ink. I'm saying that because I know that ink does bleed a little bit when it comes in contact with alcohol blending solution which is what this did. Also I remembered that I was going to originally paint with distress ink.

I decided to experiment and figured if I messed up the image I could always stamp it again. . I took some Sharpie markers and scribbled on an acrylic block which was already stained up. I then squirted some alcohol blending solution. Then I placed my stamp image face down. You can't see it in the photo but her hair actually has some copper and gold streaks which I had scribbled on along with my colors.

I was trying to figure out how I was going to do the sentiment. I played around with some chipboard tags but they were really too large. I decided I was going to stamp on antique calligraphy paper. I found a scrap which I had messed up on one side stamping. Being the frugal crafter I am I went ahead and stamped with my Ranger Archival ink. The sentiment is from Verve's Moments Remembered collection.  LOl! if I keep entering these sketch challenges I might need to buy more stamp sets. Although Verve stamps are not a requirement to enter.

That's all folks and I really need to get into doing some  serious cleaning and organizing instead of playing. ;-) Wishing you Happy Frugal Crafting and a fun filled weekend!